


Move the W15HT/58’s MICROPHONE ON/OFF Switch
to the ON position. The receiver audio level display
should now respond to varying sound levels.
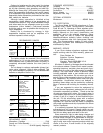
Sound Pressure Levels
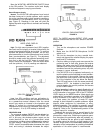
Normal. The W15HT/58’s Microphone Level control
has been factory-set to provide optimum audio modula-
tion at the receiver under typical operating conditions,
as indicated by LED illumination in the -10 to 0 range
(see Figure 2). Readings in this area will yield the
highest dynamic range without overload and resulting
distortion.
AUDIO LEVEL DISPLAY
FIGURE 2
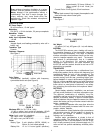
High. For high sound pressure level (SPL) applica-
tions such as loud singing or musical instruments, the
preset microphone level may be too high. To avoid an
overload and potential distortion condition, use the sup-
plied screwdriver to turn the Microphone Level control
down (counterclockwise; see Figure 3). This adjustment
should be made under the expected operating condi-
tions, that is, with the high SPL singer or musical instru-
ment in use at the microphone. Turn the control down
until the optimum (-10 to 0) readings are obtained.
HIGH SPL GAIN ADJUSTMENT
FIGURE 3
Low. Low SPL conditions such as soft-spoken in-
dividuals or conditions where the microphone must be
at a greater-than-normal distance from the sound
source, may require an increase in the microphone gain
setting. To correct for a low-level condition, turn the
Microphone Level control up (clockwise; see Figure 4)
until a proper (-10 to 0) LED reading is obtained.
RECEIVER GAIN
The rear-panel receiver OUTPUT can be adjusted us-
ing the receiver’s MICROPHONE OUTPUT LEVEL con-
trol. In this way, the wireless system output can be
made identical to that of a conventional wired
microphone, avoiding extreme differences in mixer in-
put level settings. Turning the MICROPHONE OUTPUT
LEVEL control counterclockwise decreases the output
level, and turning it clockwise increases the output.
LOW SPL GAIN ADJUSTMENT
FIGURE 4
NOTE: The W25DR receiver’s OUTPUT LEVEL control
does not function with the OUTPUT switch in the LINE
position.
OPERATION
1.
2.
3.
4.
5.
Turn on the microphone and receiver POWER
Switches.
Make sure the W15HT/58 Microphone On/Off
switch is on.
Talk into the microphone (or play a musical instru-
ment) and observe the receiver display for proper
audio and RF indications.
Continue talking or playing and move around the
performing area. In each area, observe the receiver
display and make sure the RF signal strength is
adequate (the audio level should not change with
movement around the performing area, only with
changes in source loudness).
If the W15HT/58 is to be operated continuously, at-
tach the plastic control lockplate to avoid acciden-
tal movement of the controls. Remove the screw
just above the control panel. Insert the protruding
tip of the lockplate in the slot below the Battery
Test LED and secure it with the screw previously
removed. NOTE:
the lockplate is clear plastic and
permits viewing the control positions and access
to the POWER switch.
Normal operation is shown by steady illumination of
the yellow RF SIGNAL LED on the Shure W20R receiver,
or by illumination of any green LED of the RF SIGNAL
LEVEL display on the W25DR receiver. Weak signals are
evidenced by intermittent operation of the W20R LED
and by illumination of the lower LEDs on the W25DR.
In most cases, the problem of weak RF signal
strength is also indicated by audible evidence: signal
dropout, either continuous or intermittent, or noisy,
distorted operation. The condition is generally caused
by RF signal blocking or operation beyond the system
capability. Refer to the Troubleshooting section of the
receiver manual for remedies.
Feedback-the annoying howl or squeal heard in the
sound system- is as much a problem in wireless micro-
phones as in wired mics. Checking microphone opera-
tion throughout the performing area will probably un-
cover any locations that are prone to audio feedback. If
the problem cannot be solved by a slight lowering of the
receiver output level or the associated amplifier gain,
relocation of the loudspeakers or possibly professional
equalization of the sound system is recommended.
3