


English
4
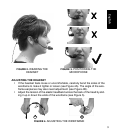
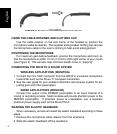
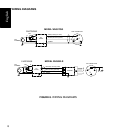
FIGURE 5.
ELASTIC HEADBAND ADJUSTMENT
USING THE CABLE RETAINER AND CLOTHING CLIP
Use the cable retainer on the wire frame of the headset to position the
microphone cable as desired. The supplied spring-loaded clothing clip secures
the microphone cable to the user’s clothing to help avoid entanglement.
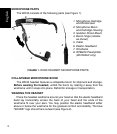
POSITIONING THE MICROPHONE
For maximum gain-before-feedback, position the microphone and boom so
that the microphone is within 13 mm (1/2 inch) of the right corner of your mouth
(see Figure 3). This will also help minimize breath noise or “popping”.
CONNECTING THE WH30 TO A SOUND SYSTEM
WIRELESS APPLICATIONS (WH30TQG)
1. Connect the mini TA4F connector from the WH30 to a wireless microphone
transmitter such as the Shure T1 bodypack transmitter.
2. See the user guide for your wireless transmitter and receiver system for ad-
justing gain and other parameters.
WIRED APPLICATIONS (WH30XLR)
Connect the output of the RPM420 preamplifier to an input channel of a
mixing or recording console. Most consoles will provide phantom power to the
RMP420 preamplifier. If phantom power is unavailable, use a separate
phantom power supply such as the Shure PS1A.
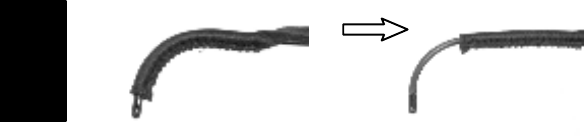
WASHING THE ELASTIC HEADBAND
When necessary, remove and wash the elastic headband according to these
steps.
1. Remove the microphone cable retainer from the wireframe.
2. Slide the elastic headband off the wireframe.