6 TASCAM X-17
English Features and controls
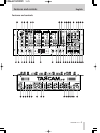
Top Panel
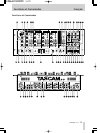
1 MAIN MIC input
Connect the main microphone to this XLR/TRS
connector that can accept both balanced and unbalanced
signals.
This is a “combo” type jack which accepts both XLR
type and 1/4” TRS type connectors.
Connections are as follows:
XLR TRS
GND: Pin 1 Sleeve
HOT: Pin 2 Tip
COLD: Pin 3 Ring
There is another MAIN MIC input connector on the
rear panel. Only use either the connector on the
rear panel or the top panel (you cannot use both at
the same time).
The MAIN MIC channel also has a dedicated insert jack
on the rear panel.
2 ON switch and indicator for MAIN MIC
channel
Push for on, and push again for off. When this switch is
on, the MAIN MIC channel is active and the indicator
lights.
3 MAIN MIC LEVEL
Adjusts the signal level of both the top and rear MAIN
MIC inputs.
4 OL indicator
When the MAIN MIC and/or AUX MIC input signal
cause an overload, this indicator lights (post-insert, but
pre-EQ).
All input adjustments must be done very carefully.
Use the level meters and/or headphones for
reference. Make sure that the top red meter LEDs
do not all light up, as this shows that the signal can
clip (overload and distort).
5 MIC EQ
2-band EQ (HI and LO, both cutting and boosting by 12
dB) affecting both the the MAIN MIC and AUX MIC
input signals.
6 ON switch and indicator for AUX MIC channel
Push for on, and push again for off. When this switch is
on, the AUX MIC (auxiliary microphone) channel is
active and the indicator lights.
NOTE
NOTE
7 AUX MIC LEVEL
Adjusts the signal level of the AUX MIC input.
8 TRIM controls and OL indicators
Adjust the input signal level for each PGM.
If a PGM’s input signal causes an overload, the PGM’s
OL indicator lights.
All input sensitivity adjustments must be done very
carefully. Use the level meter and/or headphones
for reference. Make sure that the top red meter
LEDs do not all light up, as this shows that the
signal can clip (overload and distort).
9 PGM EQ
Provides three-band EQ (equalization) for each PGM
signal. The control for each band can cut the band by up
to 26 dB and boost it by up to 12 dB.
If all EQ controls on a PGM are set to –26dB, this will
almost completely cut the signal of the PGM.
0 Input Selector switches
Select the input signal for each PGM. Each PGM can
select from either a LINE input or a PHONO/LINE input
(the selection between phono and line is made on the rear
panel).
q CUE switches and indicators
Sends the pre-fader signals of the PGMs to the CUE
monitor bus. When CUE is activated for a PGM, the
CUE indicator lights.
w PGM faders
Adjust the level of the PGMs
e FADER START switches
Set the automatic start of A and B using the cross-fader
on or off.
r Cross-fader ASSIGN selectors
Select the signal sources assigned to the A and B cross-
fader outputs. Each of the four PGMs can be selected as a
signal source, and there is also a THRU setting, which
means that no PGM is assigned to the cross-fader on that
side. Use the PGM and MASTER faders to adjust the
output if this setting is made.
t Cross-fader
Mixes between the A and B outs, assigned from the PGM
signals.
The cross-fader can be reversed, and you can set the
cross-fader curve to match your preferences (see below).
It is possible for you to replace the cross-fader if this
becomes necessary (see below for details).
NOTE


