


10
Installing the AX16-AT
AX16-AT—Owner’s Manual
6
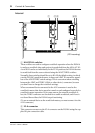
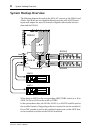
Connect the AX16-AT IO-A connector to the DS2416 IO-A connec-
tor using the supplied 20-pin cable (connect the end with the fer-
rite core to the DS2416).
7
Connect the AX16-AT IO-B connector to the DS2416 IO-B connec-
tor using the supplied 20-pin cable (connect the end with the fer-
rite core to the DS2416).
8
If you are using an AX44, connect the AX16-AT THRU-A connector
to the first AX44 using the 20-pin cable supplied with the AX44.
9
If you are using a second AX44, connect the AX16-AT THRU-B con-
nector to the second AX44 using the 20-pin cable supplied with
the AX44.
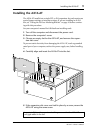
10
Replace the computer’s cover.
11
Connect your ADAT multitrack recorder, or other ADAT-compatible
device, such as a Yamaha 02R, 03D, or 01V digital mixing console
with an ADAT I/O card installed, to the A or B IN/OUT connectors
on the rear of the AX16-AT using EIAJ fiber optical cables.
Fitting the ISA-bus Mounting Bracket
Before installing the AX16-AT into an ISA-bus slot, you must replace the
PCI-bus mounting bracket with the ISA-bus mounting bracket.
To prevent static electricity from damaging the AX16-AT, touch a grounded
metal part of your computer, such as the power supply case, before handling
it.
1
Remove the two fixing screws that secure the PCI-bus mounting
bracket to the AX16-AT card and carefully remove the mounting
bracket.
2
Carefully fit the ISA-bus mounting bracket and secure using the
two screws removed previously.