


Since the voice has been initialized, the output level of operator 1 will be set at
90 and that of operator 2 will be 0, so at the moment we only hear the sound from
operator 1.
STEP 4:
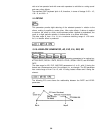
Set the OP1 (carrier) EG
Select the ENVELOPE GENERATOR AR parameter, and select operator 1 by pressing
the OPERATOR SELECT button.
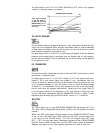
We want an instantaneous attack, so AR should be set at 31. Select the D1R
parameter and set to 10 for a relatively slow initial decay.
Select the D1L parameter and set to 10.
Select the D2R parameter and set to 8.
Select the RR parameter and set to 8.
Now play a note and listen to the volume envelope we’ve created. This is the basic
form of the electric piano voice.
STEP 5:
Copy OP1 (carrier) EG Parameters to OP2 (modulator)
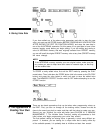
Hold down the EG COPY button and press the OPERATOR/AMS ON-OFF 2 button.
The EG parameters you just set for operator 1 have now been copied to operator
2. You can check this by selecting operator 2 (press OPERATOR SELECT) and
looking at the EG parameters (AR—RR).
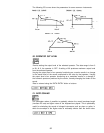
STEP 6:
Set OP1 and OP2 Output Levels
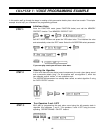
In this step we’ll create the basic timbre of our piano voice.
First, select OP1, select the OPERATOR OUTPUT LEVEL parameter and set it to
99.
Next, select OP2 and set its output level to 66.
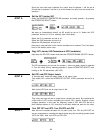
Play a key and note that we no longer have a simple sine wave. By increasing the
output level of OP2 we are modulating the carrier, OP1, thereby creating a more
complex waveform. In this case the frequency ratios of OP1 and OP2 are left at
their initialized values of 1.00, since this is the basic timbre we want for this voice.
STEP 7.
Turn OFF OP1 and OP2, Turn ON OP3 and OP4
Now that we’ve created the basis for our piano voice, turn OP1 and OP2 OFF so
we can concentrate on creating the attack sound using the remaining operator stack
(OP3 and OP4). Now turn OP3 and OP4 ON.
42