


Basic Operation 13
EMX620—Owner’s Manual
Basic Operation
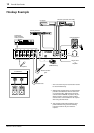
Connecting Sources
Before connecting any microphones or instru-
ments, make sure that the EMX620 and any other
applicable equipment is turned off. Also make
sure that the LEVEL control on each EMX620
input channel, and the MAIN MASTER and
MONI MASTER controls are turned down.
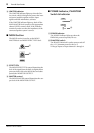
1 Connect cables to your mics and instru-
ments, and insert the other end of the
cables firmly into the appropriate Lo-Z or
Hi-Z jack (channels 1–4), LINE jack (chan-
nel 5), or INST jack (channel 6).
B Turn on the power, starting with the
sound sources and finishing with the
EMX620.
Reverse this order when turning off the power.
C Set the MAIN MASTER control to the √√
√√
position.
D While speaking into a connected mic, or
playing a connected instrument, adjust
the input channel LEVEL control so that
the 0 LED of the MAIN section level meter
lights occasionally.
Repeat this procedure for each channel.
E Use the EQ controls on each input chan-
nel to adjust the tonal characteristics of
each source.
F Use the 7-band graphic equalizer to
adjust the tonal characteristics of the
main output.
G Use the MAIN MASTER control to set the
overall volume level of the main mix.
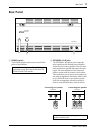
Monitoring
By connecting a powered monitor speaker to the
MONITOR OUTPUT, you can create a monitor
mix independent of the MAIN mix, since the
input channel MONI controls are not affected by
the LEVEL controls.
1 Set the MONI MASTER control to the √√
√√
position.
B While speaking into a connected mic, or
playing a connected instrument, adjust
the MONI control of the input channel
that you want to monitor.
Repeat this procedure for each channel.
C Use the MONI MASTER control to set the
overall level of the monitor mix.
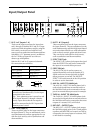
Using the Built-in Effects
The EMX620 features a built-in digital effects
processor, allowing reverberation or ambiance to
be added to vocals or instrument sounds.
1 Turn on the digital effects processor by
pressing the DIGITAL EFFECT ON switch.
The DIGITAL EFFECT indicator lights up.
B Use the DIGITAL EFFECT switches to select
an effects program.
VOCAL ...... Reverb suitable for vocals.
L. HALL...... Reverb typical of a large hall.
S. HALL...... Reverb typical of a small hall.
C Set the MAIN EFFECT RTN control to the
√√
√√
position.
D While speaking into a connected mic, or
playing a connected instrument, adjust
the EFFECT control of the input channel
that you want to process.
E Use the MAIN EFFECT RTN control to
adjust the overall level of the processed
sound.
F Use the MONI EFFECT RTN control to feed
the processed signal to the MONI bus and
subsequently MONITOR OUTPUT.
Note: When connecting line-level sources to
input channels 1 through 4, turn on the corre-
sponding PAD switch.
Note: The Lo-Z and Hi-Z jacks on input chan-
nels 1 through 4 cannot be used simultaneously.
Note: If the processed sound is distorted even
with an EFFECT RTN control turned down,
turn down the EFFECT control on each channel.