


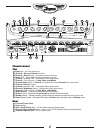


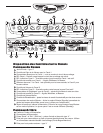
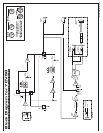


Chassis Layout
Top
1
Input jack – 1/4 inch phone jack.
2
Channel 1 Gain and Volume Controls.
3
Channel 1 Boost Switch – Activates the boost circuitry.
4
Boost LED – Illuminated Red when the boost is active.
5
Channel 1 Indicator LED – Illuminates Yellow when active.
6
Channel 1 Tone Controls – Treble, Bass, and Middle.
7
Channel Select Switch – Channel 1 is optimized for lead, Channel 2 for clean sound
8
Channel 2 Volume Control.
9
Channel 2 Indicator LED – Illuminates Green when active.
10
Channel 2 Brightness Switch – Add sparkle to your clean sound.
11
Channel 2 Tone Controls – Treble, Bass, and Middle.
12
Master Volume – Controls the overall level of the amplifier.
13
Reverb Control – Adjusts the Accutronics® reverb level for both channels.
14
Standby Switch – Activates standby mode to keep the tubes warm while the amp is not in use.
15
Power Indicator Jewel – Illuminates Red when in Active mode, and Yellow when in Standby mode.
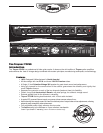
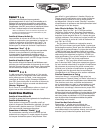
Rear
16
Fuse and Power Cord
17
Power Switch.
18
Send / Rtn (Efx/Line) jacks – 1/4 inch phone Input and Output jacks.
19
Channel Select Footswitch jack – uses a 1/4 inch TRS standard latching dual-footswitch.
20
Extension Speaker jack –1/4 inch phone jack.
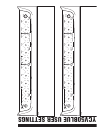
2
0
5
10 0
5
10
0
5
10 0
5
10 0
5
10 0
5
10
0
5
10 0
5
10 0
5
10 0
5
10
0
5
10
CHANNEL
SELECT
Traynor Guitar Amplifier
GAIN
1 2
VOLUME
VOLUMEMIDDLEBASSTREBLE
MIDDLEBASSTREBLE MASTER VOLUME
REVERB
POWER
STANDBYBRIGHTNESSBOOST
INPUT
MODEL TYPE: YS1003
Z359BR / 1v4
CAUTION: REPLACE WITH
SAME TYPE FUSE AND RATING
ATTENTION: UTILISER UN FUSIBLE DE
RECHANGE DE MEME TYPE ET CALIBRE
SEND
EFX / LINE FOOTSWITCH
RTN
CH. SELECT
/ BOOST
ON
EXTENSION
SPEAKER
POWER
ValveCustomCustom
50
TRAYNOR YCV50
DESIGNED & MANUFACTURED BY
YORKVILLE SOUND • Toronto, CANADA
POWER
EL34
V4
EL34
V5
PREAMP
SPLITTER
12AX7
V3
12AX7
V2
12AX7
V1
DÉB RANCH É L’APPA REIL AVANT
DE REMPL ACER LES L AMPES
DIS CONNE CT PO WER W HEN
REP LACIN G TUB ES
THIS UNIT MUST BE GROUNDED!
CET APPAREIL DOIT ETRE MIS Á TERRE!
DISCONNECT POWER
BEFORE SERVICING!
DEBRANCHER L’APPEREIL AVANT
D’ENLEVER LES COUVERCLES!
•
Q
U
A
L
I
T
Y
&
I
N
N
O
V
A
T
I
O
N
•
•
E
S
T
A
B
L
I
S
H
E
D
1
9
6
3
•
230V
50Hz 0.5A
120VAC
60Hz 1.0A
FUSE: T2.0A sloBlo
FUSE: T800mA
2
7
3
8
9
1
4
5
6
10
11
12
13
14
15
16
17
18
19
20
2