ENGLISH
19OPERATIONS
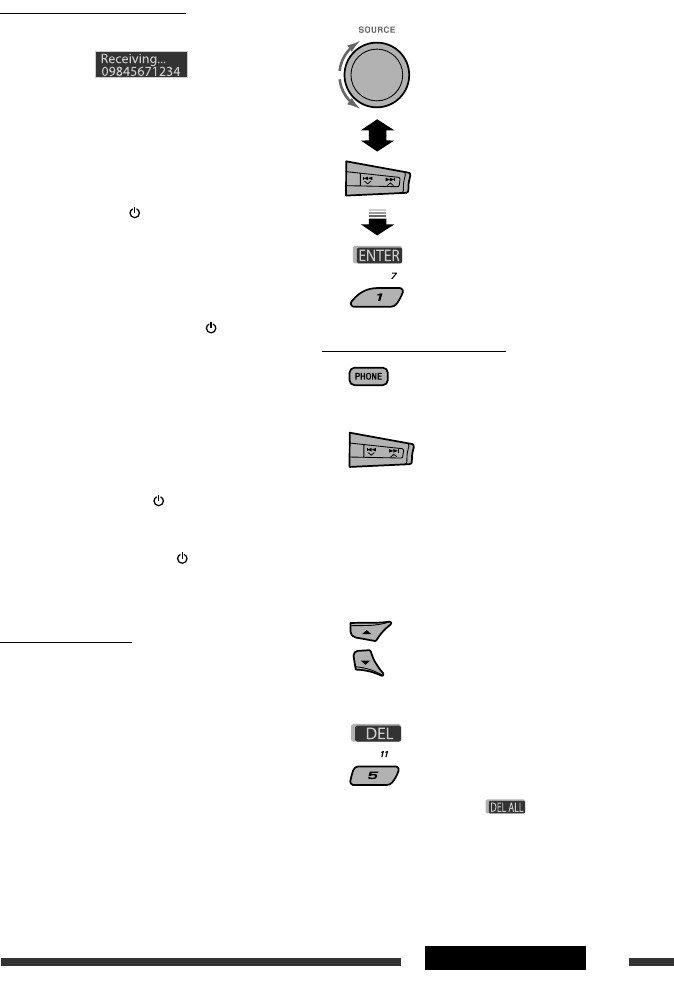
When a call comes in....
The source is automatically changed to “Bluetooth.”
• Phone number appears (if acquired).
When “Auto Answer” is activated....
The unit answers the incoming calls automatically, see
page 37.
• When “Auto Answer” is deactivated, press any
button (except
/control dial) to answer the
incoming call.
• You can adjust the microphone volume level (see
page 37).
To end the call or reject an incoming call
Hold any button (except /control dial).
• When “Auto Answer” is set to “Reject,” the unit
rejects any incoming calls.
Answering a waiting call
If your cellular phone is equipped with the call waiting
function, you can put the current call on hold and
answer the waiting call.
Press any button (except /control dial).
• To restore the on-hold call, press any button (except
/control dial) again.
• When you end one call, you can connect to the other.
When a SMS comes in....
If the cellular phone is compatible with SMS (Short
Message Service) and “MSG Notice” is set to “On”
(see page 37), the unit rings and “Received Message”
appears on the display to inform you of the message
arrival.
• You cannot edit or send a message through the unit.
Continued on the next page
How to enter phone number
How to delete phone number
1
2 Select “Call.”
3 Display the list of phone numbers using one
of the dialing method (see step 3 of “Making
a call” on page 18).
4 Select the name/phone number you want to
delete.
5 Delete the selection.
• Press number button 6 ( ) to delete all
the listed numbers in step 3.
Select a number.
Move the entry position.
Confirm the entry.
OPERAŢII
La primirea unui apel telefonic…
Dispozitivul Bluetooth devine automat sursa.
• Este aşat numărul de telefon (dacă este memorat).
Când este activată opţiunea „Auto Answer” (Preluare
automată a apelurilor)...
Aparatul preia apelurile automat, vezi pagina 37.
• Când funcţia „Auto Answer” este dezactivată, apăsaţi orice
tastă (cu excepţia tastei /I/butonului de comandă)
pentru a prelua apelul.
• Nivelul volumului microfonului poate reglat (vezi
pagina 37).
Pentru a încheia sau respinge apelul telefonic
Menţineţi apăsată orice tastă (cu excepţia /I/ATT/
butonului de comandă).
• Când opţiunea „Reject“ (Respinge) a funcţiei „Auto
Answer” este activată, aparatul respinge toate apelurile.
Preluarea unui apel în aşteptare
Dacă telefonul mobil este echipat cu funcţie de „apel în
aşteptare”, puteţi să puneţi apelul prezent în aşteptare şi să
preluaţi apelul în aşteptare.
Apăsaţi orice tastă (cu excepţia /I/ATT/butonului de
comandă).
• Pentru a recupera un apel în aşteptare, apăsaţi din
nou orice tastă (cu excepţia tastei /I/ATT/butonul de
comandă).
• La încheierea unei convorbiri, puteţi prelua un alt apel.
La primirea unui SMS....
Dacă telefonul mobil este compatibil cu serviciul de mesaje
scurte (SMS) şi funcţia „MSG Notice” (informaţii mesaje)
are setată opţiunea „On” (vezi pagina 37), aparatul emite
un semnal sonor şi este aşat mesajul „Received Message”
(primire mesaj) pentru a pentru a vă informa că aţi primit
un mesaj.
• Nu puteţi edita sau trimite un mesaj prin intermediul
acestui aparat.
Cum să introduceţi un număr de telefon
[Rotiţi] Selectaţi un număr.
Selectaţi poziţia de introducere.
Conrmaţi selectarea.
Ştergerea unui număr de telefon
Selectaţi „Call” (Apel).
Apelaţi lista de numere de telefon cu ajutorul
uneia dintre metodele de iniţiere a unui apel
(vezi etapa 3 pentru „Iniţierea unui apel” de la
pagina 18).
Selectaţi numele/numărul de telefon al
persoanei pe care doriţi să-l ştergeţi.
Ştergeţi selecţia.
• Apăsaţi tasta numerică 6 (
ENGLISH
19OPERATIONS
When a call comes in....
The source is automatically changed to “Bluetooth.”
• Phone number appears (if acquired).
When “Auto Answer” is activated....
The unit answers the incoming calls automatically, see
page 37.
• When “Auto Answer” is deactivated, press any
button (except
/control dial) to answer the
incoming call.
• You can adjust the microphone volume level (see
page 37).
To end the call or reject an incoming call
Hold any button (except
/control dial).
• When “Auto Answer” is set to “Reject,” the unit
rejects any incoming calls.
Answering a waiting call
If your cellular phone is equipped with the call waiting
function, you can put the current call on hold and
answer the waiting call.
Press any button (except
/control dial).
• To restore the on-hold call, press any button (except
/control dial) again.
• When you end one call, you can connect to the other.
When a SMS comes in....
If the cellular phone is compatible with SMS (Short
Message Service) and “MSG Notice” is set to “On”
(see page 37), the unit rings and “Received Message”
appears on the display to inform you of the message
arrival.
• You cannot edit or send a message through the unit.
Continued on the next page
How to enter phone number
How to delete phone number
1
2 Select “Call.”
3 Display the list of phone numbers using one
of the dialing method (see step 3 of “Making
a call” on page 18).
4 Select the name/phone number you want to
delete.
5 Delete the selection.
• Press number button 6 ( ) to delete all
the listed numbers in step 3.
Select a number.
Move the entry position.
Confirm the entry.
) pentru a şterge
toate numerele aşate în timpul etapei
ENGLISH
19OPERATIONS
When a call comes in....
The source is automatically changed to “Bluetooth.”
• Phone number appears (if acquired).
When “Auto Answer” is activated....
The unit answers the incoming calls automatically, see
page 37.
• When “Auto Answer” is deactivated, press any
button (except
/control dial) to answer the
incoming call.
• You can adjust the microphone volume level (see
page 37).
To end the call or reject an incoming call
Hold any button (except /control dial).
• When “Auto Answer” is set to “Reject,” the unit
rejects any incoming calls.
Answering a waiting call
If your cellular phone is equipped with the call waiting
function, you can put the current call on hold and
answer the waiting call.
Press any button (except /control dial).
• To restore the on-hold call, press any button (except
/control dial) again.
• When you end one call, you can connect to the other.
When a SMS comes in....
If the cellular phone is compatible with SMS (Short
Message Service) and “MSG Notice” is set to “On”
(see page 37), the unit rings and “Received Message”
appears on the display to inform you of the message
arrival.
• You cannot edit or send a message through the unit.
Continued on the next page
How to enter phone number
How to delete phone number
1
2 Select “Call.”
3 Display the list of phone numbers using one
of the dialing method (see step 3 of “Making
a call” on page 18).
4 Select the name/phone number you want to
delete.
5 Delete the selection.
• Press number button 6 ( ) to delete all
the listed numbers in step 3.
Select a number.
Move the entry position.
Confirm the entry.
.
Continuare pe pagina următoare
ENGLISH
9OPERATIONS
FM station automatic presetting
— SSM (Strong-station Sequential
Memory)
You can preset up to six stations for each band.
1 While listening to an FM station...
2
3
Local FM stations with the strongest signals are
searched and stored automatically in the selected
FM band.
Manual presetting
Ex.: Storing FM station of 92.5 MHz into preset number
4 of the FM1 band.
Using the number buttons
1
2
3
Using the Preset Station list
• When is shown on the display, you can
move back to the previous screen by pressing number
button 3.
1 Follow steps 1 and 2 of “Using the number
buttons” on the left column.
• By holding
5 / ∞, the Preset Station List will
also appear (go to step 4).
2
3
Display the Preset Station List.
4 Select the preset number you want to store
into.
• You can move to the lists of the other FM bands
by pressing number button 5 ( ) or
6 ( ) repeatedly.
5 Store the station.
Preset number flashes for a while.
Continued on the next page
ENGLISH
22
Listening to the CD changer
It is recommended to use a JVC MP3-compatible CD changer with your unit. You can connect a CD changer to the
CD changer jack on the rear of the unit.
• You can only play conventional CDs (including CD Text) and MP3 discs.
Preparation: Make sure “Changer” is selected for the external input setting, see page 34.
1
Select “CD-CH.”
2
Select a disc to start playing.
[Press] For selecting disc number 1 – 6.
[Hold] For selecting disc number 7 – 12.
[Press] Select track
[Hold] Reverse/fast-forward track
MP3: Select folders
* By holding either one of the buttons, you can display
the Disc List (see page 14).
To select a disc/folder/track on the list
See “Selecting a folder/track on the list (only for MP3/
WMA/AAC file)” on page 14.
Select “Disc” in step 3 to display the Disc List of the CD
changer.
After pressing M MODE, press the following buttons to...
Skip 10 tracks
MP3: Within the same folder
Repeat Track:
Repeat current track
Repeat Folder:
MP3: Repeat all tracks of current
folder
Repeat Disc:
Repeat all tracks of the current disc
Random Folder:
MP3: Randomly play all tracks of
the current folder, then tracks of the
next folder
Random Disc:
Randomly play all tracks of current
disc
Random All:
Randomly play all tracks of the discs
in the magazine
• You can also cancel the playback mode by selecting
“Off” or press number button 4 (
).
*
ENGLISH
30
4
Press number button 1 ( ) to
move to another setting level.
4 /¢ : select the quality of
LPF. [–12dB/oct or –24dB/oct]
Control dial: Turn the control dial to select
the subwoofer phase. [0deg (normal) or
180deg (reverse)]
* If “Off” is selected in step
2, you can only
adjust the subwoofer phase.
C Hi Pass (Hi Pass Filter)
Turn the control dial to select the cutoff
frequency to the front/rear speakers. Set this
to match the LPF setting.
• Off: All signals are sent to the front/rear
speakers.
• 62Hz: Frequencies lower than 62 Hz are
cut off.
• 95Hz: Frequencies lower than 95 Hz are
cut off.
• 135Hz: Frequencies lower than 135 Hz are
cut off.
D VolAdjust, [–5 to +5]
Turn the control dial to adjust the input level
of each source (except FM).
Adjust to match the input level of the FM
sound level.
• Before making an adjustment, select the
source you want to adjust.
E Loudness, [Off or On]
Turn the control dial to select “Off” or
“On.” When “On” is selected, low and high
frequencies sound are boosted to produce a
well-balanced sound at low volume level.
4
Exit from the setting.
Adjusting the sound
You can adjust the sound characteristics to your
preference.
• When is shown on the display, you can
move back to the previous screen by pressing number
button 3 or 6.
1
2
• For “EQ” setting, see page 29.
3 Adjust the selected setting item.
A Fad/Bal (Fader/Balance)
1 Press number button 1 ( )
to move to the “Fad/Bal” adjustment
display.
2 Adjust the speaker output balance by
pressing:
5
/
∞
: between the front and rear
speakers. [F6 to R6]
4 /¢ : between the left and
right speakers. [L6 to R6]
B Subwoofer
1 Press number button 1 ( ) to
move to the “Subwoofer” adjustment
display.
2 Use 4 /¢ to select a cutoff
frequency to the subwoofer.
• Off *: All signals are sent to the
subwoofer.
• 55Hz: Frequencies higher than 55 Hz
are cut off.
• 85Hz: Frequencies higher than 85 Hz
are cut off.
• 120Hz: Frequencies higher than 120 Hz
are cut off.
3 Turn the control dial to adjust the
subwoofer output level. [0 to 8]


