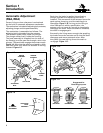
Section 4
Assemble Brakes
18
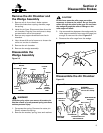
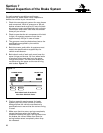
NOTE:
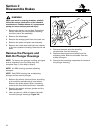
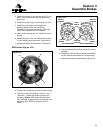
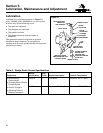
Support brackets must be used on trailer
axles where the chambers have tubes equal to or
longer than shown in
Figure 4.10
. Weld the
bracket to the axle. Attach the tube with a U-bolt
and saddle bracket as close as possible to the
chamber. For information on welding, refer to
Meritor Maintenance Manual No. 14.
6. The bottom drain hole in the non-pressure
housing must be open.
7. Tighten the collet nut against the plunger
housing by hand. Then use a brass drift and
hammer to tighten the collet nut an additional
1/4–1/2 turn.
WARNING
When you work on a spring chamber, carefully
follow the service instructions of the chamber
manufacturer. Sudden release of a compressed
spring can cause serious personal injury.
8. When the brake has a spring chamber, release
the spring.
9. Apply the brakes and check for leaks at all
connections.
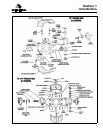
Install the Brake Shoes
A
E
T
AND N
N-A
E
T
FIBERS WARNING
Some brake linings contain asbestos fibers, a
cancer and lung disease hazard. Some brake
linings contain non-asbestos fibers, whose
long-term effects to health are unknown. You
must use caution when you handle both asbestos
and non-asbestos materials.
1. Apply lubricant to the plunger and adjusting
bolt slots and all areas of the spider and
retaining hardware that contact the shoe.
Use O-616-A (NLGI Grade 1) or O-645 (NLGI
Grade 2) Meritor-specified lubrication.
WARNING
Be careful when installing springs. Sudden
release of spring tension can cause serious personal
injury.
2. Follow the instructions on pages 18 and 19 to
install the brake shoes.
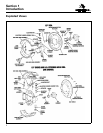
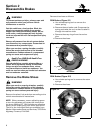
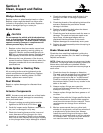
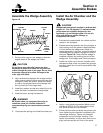
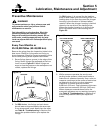
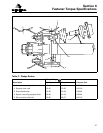
RSA Brakes (Figure 4.11)
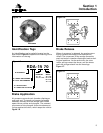
Figure 4.10
X
"U"-BOLT
SADDLE
BRACKET
“X” = 7.25" FOR SERVICE CHAMBER
“X” = 5.75" FOR SPRING BRAKE CHAMBER
Figure 4.11
SPRING
RETAINER
SHOE
WEB
ANTI-RATTLE
ROD
BACKING
PLATE
WASHER
RETAINER
A
D
A
C
B