


2
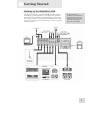
A Tour of the iMultiMix USB
14
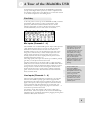
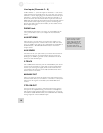
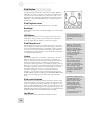
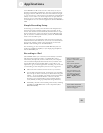
iPod Section
The iPod section contains the controls for your iPod. With the
iMultiMix you can not only play content from your iPod, but you
can also record your mix directly to it. Please note that not all
iPod models are compatible for playback and recording from the
iMultiMix – check the compatibility chart on page 20 for more
information.
iPod Playback Level
This knob controls the audio playback level of your iPod.
Backlight
Pressing this button turns your iPod’s backlight on for 30 seconds,
if it is off.
LED Meters
These meters monitor the level of the input signal sent to your
iPod. This is the signal that your iPod will record. The meters
show the signal after the Limiter, if it has been engaged.
iPod Record Level
This knob adjusts the gain of the input signal sent to your iPod.
Aim to adjust this control such that the level going to the iPod (as
shown on the iPod LED meters) is consistently yellow (or higher
if you don’t mind some intermittent distortion). This will allow
for maximum recording resolution with a minimum of distortion
or unpleasant Limiter artifacts.
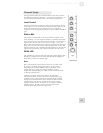
Limiter
This button engages the stereo Limiter. Since there is no way to
adjust the level of your mix once it has been recorded to your
iPod, it is important that the recording is loud, but still clear and
undistorted, before entering your iPod. The Limiter feature
prevents the audio signal sent to your iPod from clipping, thereby
allowing you to boost up the recording level without worrying too
much about distortion. However, it is still possible to overdrive
the Limiter circuit with too hot of a signal, resulting in an
unpleasant “pumping” sound or, at the extreme, distorted
recording. It is important that you avoid this by listening to the
iPod Rec Monitor signal and adjusting the iPod RECORD LEVEL
knob so the recording is loud, yet still retains a good dynamic
range.
iPod control buttons
These buttons are used for your iPod’s navigation controls. They
work just the same as they do on your iPod. You will notice that
there is an additional control here which does not appear on your
iPod – the REC MODE button. When you press this button, your
iPod will enter the recording menu. To begin recording, press the
ENTER button while in the recording menu. The red LED above
the REC MODE button will illuminate while recording.
Jog Wheel
The jog wheel works as your iPod’s touchwheel control.
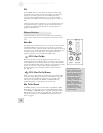
The recording feature will
record the stereo audio signal
from the Main Mix directly to
your iPod.
While i
t
’
s
connected to the
iMultiMix, your iPod will
charge automatically except
when it is recording. By
default, charging is disabled
during recording. This is
because charging while
recording may introduce low
level noise into your
recordings.
If your battery is getting low
while recording, or if you
plan to record very long
sessions, press and hold |<<
and >>| for about one second
while recording to toggle
charging on. Press and hold
|<< and >>| again to disable
charging at any time while
recording.
I
f you listen ca
r
efully to your
recordings made with 5
th
generation video iPods, you
may hear some low-level
chirping sounds. These
sounds are made by the
iPod’s spinning hard drive.
These sounds mostly exist
outside of the audio spectrum
of your hearing.
Flash-based iPod Nanos do
not exhibit this noise.