


©American Audio® - www.americanaudio.com - WM-700™ Instruction Manual Page 6
WM-700™ RECEIVER CONTROLS AND FUNCTIONS CONT.
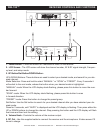
6. Antennas - Receives RF signals from the transmitter.
7. 12v DC Input - Connect the included power supply to this input, or any other 12v power adapter.
8. Squelch Adjustment - The squelch adjusts the output level to prevent external noise. If you set
the squelch to high you will reduce the range of the system. Set the squelch to a minimum before
turning the receiver on.
9. Mic/Line Switch - This switch lets you select your output source. If your connected to the line
input on a mixer or amplier set the switch to “Line”. If your connected to a Mic input on a mixer or
amplier set the switch to “Mic”.
10. Unbalanced 1/4” Output - This unbalanced output can be used to connect the receiver to the
line-level input of a mixer or amplier.
11. Balanced XLR Output - This balanced XLR output can be used to connect the receiver to bal-
anced input of mixer or amplier.
WM-700™ RECEIVER MODES
Manual Mode: In manual mode you can set your desired channel manually.
1. Select manual mode by pressing and holding either the UP or DOWN buttons until MANUAL is
highlighted in the LCD.
2. Press the SET button for 2 seconds. The LCD will start to ash and “MUTE” will appear in the
LCD.
3. Press the UP and DOWN buttons to nd your desired channel or an interference free channel.
After you have found your channel release the button and let the LCD ash 5 times and you selec-
tion will be locked into the channel setting.
Auto-Scan (Scan) Mode: In Scan mode you can let the receiver scan to for a clear channel.
1. Select auto-scan mode by pressing and holding either the UP or DOWN buttons until Scan is
highlighted in the LCD.
2. Press the SET button for 2 seconds. The LCD will start to ash and “MUTE” will appear in the
LCD.
3. Press the UP and DOWN buttons to nd your desired channel or an interference free channel.
After you have found your channel release the button and let the LCD ash 5 times and your se-
lection will be locked into the channel setting.
Preset Mode: In Preset mode you can select a Preset channel that is pre-programmed into the re-
ceiver. There are 4 Preset groups with 8 default channels in each group. Each of the 8 default chan-
nels are different in each of the 4 Preset groups.
1. Select Preset mode by pressing and holding either the UP or DOWN buttons until Preset is high-
lighted in the LCD.
2. Press the SET button for 2 seconds. The LCD will start to ash and “MUTE” will appear in the
LCD.
3. Use the UP button to scroll through the 4 Preset groups, and use the DOWN button to scroll
through the 8 default channels in each Preset group. After you have found your desired channel or
an interference free channel release the button and let the LCD ash 5 times and you selection will
be locked into the channel setting.