


©American Audio® - www.americanaudio.com - WM-700™ Instruction Manual Page 7
WM-700™ MIC SYSTEM OPERATION
1. Plug the receiver in and press the power button for 2 seconds to turn “On” the receiver.
Note: Make sure the squelch on the receiver is turned the minimum before switching on
the power.
2. Set your desired mode by pressing and holding the UP or DOWN buttons. Every 2 seconds the
receiver will switch to the next mode, release the button when you reach your desired mode.
3. Set the Channel by pressing and holding the SET button for 3 seconds or until it starts to ash.
Press the UP and DOWN buttons to select your desired channel. After you have found your
desired channel or an interference free channel release the button and let the LCD ash 5 times
and you selection will be locked into the channel setting.
4. Press the power button located on the bottom front of the mic for 1 second. Press the power but-
ton so that the channel display begins to ash.
Set the mic to the same channel as the receiver by pressing the either the channel UP or DOWN
buttons to nd the same channel as the receiver. After you have found the same channel let the
LCD ash 5 times and your selection will be locked into the channel setting.
If the signal from the mic is being received by the receiver the RF Segment meter will light up and
let you know how strong the signal is.
5. Speak, sing, or play your instrument at a typical level. The AF Segment meter will light up and let
you know how strong the signal is.
6. When nished, turn the mic “Off” by pressing the power button for 2 seconds. Then press the
power button on the receiver for 2 seconds to turn it “Off”.
Note: If you have rechargable batteries installed in the mic, you can connect the supplied
cable to the DC out located on the front of the receiver to the input jack on the bottom of the
mic and recharge the batteries.
Receiver Set Up
1. Plug the included power supply into the DC input connector on the back of the receiver.
2. Plug the other end of the power supply into an power outlet.
Note: Make sure the squelch on the receiver is turned the minimum.
Microphone Set Up
1. Unscrew the bottom part of the microphone. The battery compartment is located inside of the
microphone. Insert two AA batteries.
2. Screw the bottom of the microphone back into place.
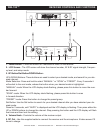
Connecting the Receiver Output
1. You can connect the receiver to a output source using a cable with an 1/4’’ jack or 3-pin XLR
female connection.
2. Connect one end of the cable to the receiver, and the other end into the mic or line input of a
mixer, PA
system, or amplier. Set the Mic/Line switch accordingly on the receiver.
WM-700™ MICROPHONE SYSTEM SET UP