


Functions (Front Panel) Cont.
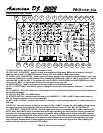
(12) TALKOVER LEVEL - Adjust the TALKOVER volume on MIC 1.
(13) MIC 1 / MIC 2 LEVEL FADER - Adjusts the microphone volumes of MIC 1 and MIC 2. MIC 3 levels may be adjust-
ed with the CHANNEL 4 FADER (17) when the CH-4 LINE 5/LINE 6/MIC 3 SWITCH is set to MIC 3.
(14) ASSIGN SWITCH - Used to switch the crossfader on or off.
(15) CHANNEL ASSIGN SWITCH - Used to select which channel is to be mixed with another.
(16) FEATHER FADER™ CROSSFADER - Mixes the signals of one channel with another. With the CHANNEL ASSIGN
SWITCHES (15), you can choose which channel is to be mixed with another. EXAMPLE: Set the left CHANNEL
ASSIGN SWITCH to channel 1 and the right switch to channel 2 in order to mix the signal of channel 1 with channel 2.
When the crossfader is set to the center position, both channels can be heard at once.
(17) CHANNEL FADER - Used to adjust the output level of the individual channel.
(18) BEAT INDICATOR - The LED lights up at every bass beat of the respective source. As soon as the LEDs blink
synchronously, the speed of the two sources is synchronized.
(19) CUE CROSSFADER - Selects the channel for monitoring. The monitor signal comes from the Prefader. This means
it will not be affected by the channel faders. You can monitor each channel individually. Connect your headphones to the
HEADPHONES jack (22). Slide the CUE MIXING CONTROL (11) to CUE and select the desired channels with the CUE
switches (5). When you slide the CUE MIXING CONTROL to PGM (CUE switches without function), you can cue the
output signal of the mixer. If the CUE MIXING CONTROL is set to the center position, you can cue both the channel sig-
nal you selected and the output signal. With the CUE LEVEL control (21), you can adjust the phones volume without
changing the output signal.
(20) SPLIT CUE - Control and monitor headphone signal. Slide fader to the left to hear the source music from channel
or channels selected by CUE BUTTONS (5). Slide fader to the right to hear PROGRAM MIX (PGM) output. The
smooth CUE MIXING fader is designed for fast and frequent headphone monitoring.
(21) CUE LEVEL CONTROL - Adjusts the headphone output level.
(22) HEADPHONES JACKS - Use this jack to connect the headphones. Headphones from 8 Ohms to 600 Ohms can be
used. 16 Ohms is recommended.
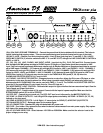
(23) ZONE 1 / ZONE 2 VOLUME, (24) ZONE BASS/TREBLE, (25) MONO/STEREO SWITCH - Control OUTPUT vol-
ume other outputs (ie. other rooms in a club, another amplifier, a satellite speaker system, a microphone paging system,
or the DJ control booth monitors). Use ZONE 1 / ZONE 2 VOLUME (23) and ZONE BASS & TREBLE (24) knobs
to control the output signal for their respective ZONES. ZONE 1 & ZONE 2 each have their own MONO/STEREO
SWITCH (26). ZONE 1 output is the same as MASTER program (31), while ZONE 2 is selectable from any of the 4
channels (17) or PROGRAM MIX (PGM) (19).
(26) ZONE 2 ASSIGN - ZONE 2 may be assigned to any of the 4 channels (17) or PROGRAM MIX (PGM) (19).
(27) SEND CONTROL - Controls output to effects (ie. echo boxes, phasers, reverb, etc.).
(28) RECEIVE CONTROL - Controls the input from effect (ie. echo boxes, phasers, reverb, etc.).
(29) SEND / RECEIVE ON / OFF SWITCH - Turns SEND (27) & RECEIVE (28) CONTROLS ON / OFF. Red LED will
light when switch is ON.
(30) BNC-JACK FOR GOOSENECK LAMP - 12V DC
(31) MASTER FADER - Adjusts the level of the master output.
(32) MASTER MONO/STEREO SWITCH - Used to set the master output to mono or stereo. If this switch is set to
STEREO, the master signal is sent to the MASTER OUT jacks (43). For mono and bridged operation, set this switch to
MONO, and connect your amplifier with the 3-pin XLR jacks on the rear panel, the BALANCED OUTPUT jacks (47).
(33) BALANCE CONTROL - Used to adjust how much of the signal is sent to the left and right MASTER OUT jack (43).
(34) MASTER LEVEL DISPLAY - The LEDs show the signal level of the right and left master level output.
XDM-3633 User Instructions page 6