


Owner’s Manual
TSD-SEQ6
Sequencer Controller
AtlasSound.com – 4 –
Specifications are subject to change without notice.
1601 Jack McKay Blvd. • Ennis, Texas 75119 U.S.A.
Telephone: 800.876.3333 • Fax: 800.765.3435
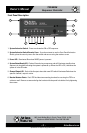
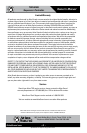
Rear Panel Description
TSDInput/Outputconnectionsareremovableforeasysystemwiring.Theconnectorshavea3.5mm
pitch between pins.
1. DC Power Input - Each TSD that requires DC power comes with a 2 position connector for an
external24VDCpowersupply(soldseparately).BecauseoftheTSD’slowpowerconsumption,a
single external power supply may power more than one TSD. Please refer to the specifications
on current requirements in milliamps to match with the appropriate power supply. Please observe
the polarity of the wiring to this connector. Note: It is acceptable to exceed the current
requirements of the TSDs but NOT safe to use a power supply that is below the current
requirement of the device. Use a power supply with a 500mA capacity (Atlas TSD-PS24V500MA).
2. Channel Output - There are 6 channel output control ports. Each output can be assigned to provide
a24VDCoutputoraHardSwitchContactClosure(CC).SeetheFunctionSettingsforOutput
configuration below.
3. Remote Activation Momentary Switch Port - Remote System activation can be done several
hundred feet away via a momentary contact closure type switch.
4. Remote Activation Hard Switch Contact Closure (CC) Port - Remote System activation can be
done several hundred feet away via a Hard Contact closure type switch.
5. Remote Activation 5 - 24VDC Port - Remote System activation can be done several hundred feet
away by applying 5 - 24VDC. Only a few milliamps of current is required.
6. Panel LED Port-ThisportcanbeusedtopoweranLEDonaremotepanelforsystemstatus
indication. The 24VDC Output will pulsate during a sequence and remain at a steady state when
the sequence is completed and all outputs are on.
7. Link Control Port - You can combine two TSD-SEQ6 units together to make a 12 step sequence
system. Note: Pay special attention to the Input and Output terminals. Connect the Output from
unit 1 (Master) to the Input of unit 2 (Slave). Connect the Output from unit 2 (Slave) to the Input of
unit1(Master).PaycloseattentiontothisortheLinkOutwillnotwork.SeetheFunctionSettings
for the Master/Slave configuration below.
1 3 4 5 76 8
1111
11 11
2
9 10