


Quick Overview of System Operation
Thank you for purchasing this Audio-Technica 1800 Series Single-channel Camera-mount
UHF Wireless Microphone System. All 1800 Series Single-channel systems are designed
primarily to be used with video cameras, with the ATW-R1810 Receiver mounted on a camera
and connected to the camera's audio input; they may also be used with other components
equipped with microphone-level input.
First, insert batteries. (See Receiver Battery Installation, page 8.) Note:TheATW-R1810 Single-
channel Receiver also functions without batteries if connected to an external power sup-
ply (12V DC source, 500 mA nominal current, not included).
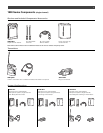
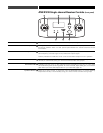
Next, attach the antennas to the antenna input jacks, and mount the ATW-R1810 Receiver to your
camera (mounting hardware not included); or use the included pouch with belt clip to attach the
ATW-R1810 to your belt. Connect the output cable to the AT W-R1810 and your video camera (or
audio mixer). (See Output callout, page 7).
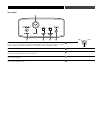
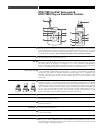
Turn the ATW-R1810 on: Press and hold the Power/Set button until the Power LED lights red.
Select an operating frequency. (See Selecting Frequencies on your Receiver, page 9.)
NOTE:Transmitter-Receiver pairs must be set to identical frequencies.
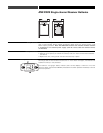
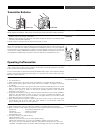
IF your system is equipped with a UniPak
®
Body-packTransmitter and lavalier microphone:
Plug the included lavalier microphone into the UniPak
®
body-pack transmitter and position
microphone on your subject about six inches below the chin. Anticipate movements that may
cause the microphone to rub against or be covered by clothing, and position the microphone to
avoid it. Turn the power on (See Operating the Transmitter, page 11). Select a frequency and
choose other settings. (See Operating the Transmitter and How to Set Frequencies on your
Transmitter, page 11.)
IF your system is equipped with a Plug-onTransmitter: Attach a microphone (dynamic or con-
denser) to the Plug-on Transmitter's input connector (See Microphone Input, page, 10). Turn
the power on (See Operating theTransmitter, page 11). Select a frequency and choose other set-
tings. (See Operating theTransmitter and How to Set Frequencies on yourTransmitter, page 11.)
5