


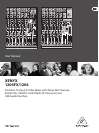


5 XENYX 1204FX/1204 User Manual
Introduction1.
The microphone channels feature high-end XENYX Mic Preamps that compare
well with costly outboard preamps in terms of sound quality and dynamics and
boast the following features:
130 dB dynamic range for an incredible amount of headroom•
A bandwidth ranging from below 10 Hz to over 200 kHz for crystal-clear •
reproduction of even the finest nuances
The extremely low-noise and distortion-free circuitry guarantees absolutely •
natural and transparent signal reproduction
They are perfectly matched to every conceivable microphone with up to •
60 dB gain and +48 volt phantom power supply
They enable you to use the greatly extended dynamic range of your •
24-bit/192 kHz HD recorder to the full, thereby maintaining optimal
audio quality
“British EQ”
The equalizers used for the XENYX Series are based on the legendary circuitry of
top-notch consoles made in Britain, which are renowned throughout the world
for their incredibly warm and musical sound character. Even with extreme gain
settings these equalizers ensure outstanding audio properties.
Multi-effects processor
Additionally, your XENYX mixing console has an effects processor with 24-bit A/D
and D/A converters included, which gives you 100 presets producing first-class
reverb, delay and modulation effects plus numerous multi-effects in excellent
audio quality.
The XENYX mixing consoles are equipped with a state-of-the-art switched-
mode power supply (SMPS). Unlike conventional circuitry an SMPS provides
an optimum supply current regardless of the input voltage. And thanks to its
considerably higher efficiency a switched-mode power supply uses less energy
than conventional power supplies.
USB/Audio interface
The USB interface supplied with the unit is a perfect match for the XENYX Series
and serves as a powerful recording interface to your PC or MAC. It supports
the digital transmission of signals on up to four channels with max. 48 kHz
and extremely low latency. When wired to the CD/TAPE INPUT and OUTPUT
connectors, the interface transfers the stereo mix from the console directly to a
computer. Both the recording signal and the playback signal from the computer
can be monitored at the same time. In this way, you can use several recording
runs to produce complete multi-track recordings.
Caution!
We should like to draw your attention to the fact that extreme volumes ◊
may damage your hearing and/or your headphones or loudspeakers.
Turn the MAIN MIX faders and phones control in the main section
fully down before you switch on the unit. Always be careful to set the
appropriate volume.
General mixing console functions 1.1
A mixing console fulfils three main functions:
Signal processing• : Preamplification, level adjustment, mixing of effects,
frequency equalization.
Signal distribution• : Summing of signals to the aux sends for effects
processing and monitor mix, distribution to one or several recording tracks,
power amp(s), control room and 2-track outputs.
Mix• : Setting the volume level, frequency distribution and positioning of the
individual signals in the stereo field, level control of the total mix to match
the recording devices/crossover/power amplifier(s). All other mixer functions
can be included in this main function.
The interface of BEHRINGER mixing consoles is optimized for these tasks enabling
you to easily keep track of the signal path.
The user’s manual1.2
The user’s manual is designed to give you both an overview of the controls,
as well as detailed information on how to use them. In order to help you
understand the links between the controls, we have arranged them in groups
according to their function. If you need to know more about specific issues,
please visit our website at http://behringer.com, where you’ll find explanations of
e.g. effects and dynamics applications.
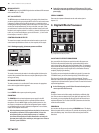
The block diagram supplied with the mixing console gives you an ◊
overview of the connections between the inputs and outputs, as well
as the associated switches and controls.
For the moment, just try and trace the signal path from the microphone input
to the aux send 1 connector. Don’t be put off by the huge range of possibilities;
it’s easier than you think! If you look at the overview of the controls at the same
time, you’ll be able to quickly familiarize yourself with your mixing console and
you’ll soon be making the most of all its many possibilities.
Before you get started1.3
Shipment1.3.1
Your mixing console was carefully packed in the factory to guarantee safe
transport. Nevertheless, we recommend that you carefully examine the
packaging and its contents for any signs of physical damage, which may have
occurred during transit.
If the unit is damaged, please do NOT return it to us, but notify your ◊
dealer and the shipping company immediately, otherwise claims for
damage or replacement may not be granted.
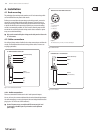
Initial operation1.3.2
Be sure that there is enough space around the unit for cooling purposes and to
avoid over-heating please do not place your mixing console on high-temperature
devices such as radiators or power amps. The console is connected to the
mains via the supplied cable. The console meets the required safety standards.
Blown fuses must only be replaced by fuses of the same type and rating.
Please note that all units must be properly grounded. For your own ◊
safety, you should never remove any ground connectors from electrical
devices or power cables, or render them in operative.
Please ensure that only qualified people install and operate the ◊
mixing console. During installation and operation, the user must have
sufficient electrical contact to earth, otherwise electrostatic discharges
might affect the operation of the unit.