


10
ULTRALINK UL2000M
2.2.4 AUTO MUTE
If the transmitter is turned on, off, or is switched to another channel without first muting the receiver,
or if the transmission drops out due to weak batteries, audible noise will result. Even if the noise limiter
is enabled on the receiver (ch. 2.2.3), it still requires some time to react, and such noise can not be
suppressed safely.
To bridge this latency time, the ULR2000 offers a practical Auto Mute function:
When the ULM2000 is being turned off, when you are switching channels or during low-battery indication,
an inaudible send signal is being transmitted.
The ULR2000 recognizes this signal and automatically mutes the output before the transmitter is
actually turned off, switched to another channel or before it powers down on its own due to battery
charge being too low.
For the Auto Mute function to work, it has to be activated on both the transmitter and the
receiver!
Activating/deactivating the Auto Mute function
1. Press the SET button to get to the menu.
2. Press the UP button three times to get to A.MUTE.
3. Press the SET button again to get to the A.MUTE submenu. Depending on the current setting, the
display shows ON or AMTOFF.
4. Press the UP or the DOWN buttons to turn the auto mute function on or off.
5. Press the SET button to save your settings. The procedure is now over, and the basic settings are
shown in the display again.
2.2.5 DISPLAY
When you power the ULR2000 on, its basic settings are loaded. That means that the channel you selected
last is shown; you can change this channel immediately without going to menu by using the UP and
DOWN buttons.
There are 3 different ways to show the selected channel in the display. You can decide for yourself which
representation is the most appropriate for your applications:
The exact channel carrier frequency is shown (FREQU).
The channel number is shown in the display (CHANNL).
The color assigned to the channel is shown in the display (COLOR).
Changing the ULR2000’s basic settings
1. Press the SET button to get to the menu.
2. Press the DOWN button three times to get to DISPL.
3. Press the SET button again to get to the DISPL submenu. The display shows the current basic parameter.
4. Press the UP and DOWN buttons to set one of the 3 parameters (FREQU, CHANNL or COLOR).
5. Press the SET button to store the parameter for the basic setting. The procedure is now over, and the
new basic setting is shown in the display.
2.2.6 LOCK
To prevent your settings from accidentally being changed, you can activate the keylock function (LOCK).
With the exception of the SET button, all other buttons (including the Power button) are locked. If one of those
buttons is pressed, “LOCKED” is shown in the display.
Activating LOCK
1. Press the SET button to get to the menu.
2. Press the DOWN button twice to get to LOCK.
3. Press the SET button again to get to the LOCK submenu. The display shows LOCOFF.
4. Press the UP and DOWN buttons once to activate the keylock function. The display shows
LOC ON.
5. Press the SET button to activate the keylock function. The procedure is now over, and the basic settings
are shown in the display again.
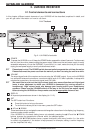
2. ULR2000 RECEIVER