


5
ULTRALINK UL2000M
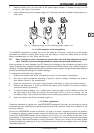
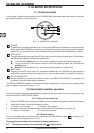
1. Keep the button (A) on the front side of the power supply pressed to release the plug. Pull the
plug out and let go of the button.
2. Insert a different plug into the power supply unit. The plug is securely snapped into place when you
hear a click.
Fig. 1.1: Swapping plugs on the switching power supply unit
1.1.4 Initial operation of the microphone
The ULM2000 microphone requires one or two 9V batteries. Of course, using only one 9V battery
decreases the effective uptime. When using only one battery, it does not matter which of the two
battery compartments you use. Either one will work.
When running the unit on two batteries, please make sure that both batteries are equally
fresh. Therefore, whenever changing batteries, always use two brand-new batteries.
When the battery is nearly depleted, the LED located on the bottom of the microphone will start to blink
rapidly. Simultaneously, a special inaudible signal is sent to the ULR2000 receiver, and “LowBat” is shown in
its display. To assure dependable operation of the transmitter-receiver system, change the transmitter batteries
as soon as possible after seeing the “LowBat” message.
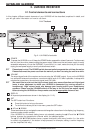
To change the transmitter (mic) batteries:
1. Unscrew the bottom end of the microphone and pull out the battery compartment.
2. Be sure to insert the batteries according to polarity. Labels for battery orientation are found in
each battery holder of the compartment.
3. Keep the microphone in the usual upright position and begin by placing the bottom battery.
4. Remove the base plate in order to connect the battery to the contacts. Re-insert the plate to
ensure the battery fits securely.
5. To place the second battery, turn it upside down. Insert the battery with the bottom end first into
the open side of the holder by pushing the base plate, which is fixed to a spring, into the
microphone body. Then connect the battery to the contacts (pay attention to the correct polarity).
6. Screw the bottom end of the microphone back on.
1.1.5 Online registration
Please do remember to register your new BEHRINGER equipment right after your purchase by visiting
www.behringer.com (alternatively www.behringer.de) and kindly read the terms and conditions of our
warranty carefully.
Should your BEHRINGER product malfunction, our goal is to have it repaired as quickly as possible.
To arrange for warranty service, please contact the retailer from whom the equipment was purchased.
Should your BEHRINGER dealer not be located in your vicinity, you may directly contact one of our
subsidiaries. Corresponding contact information is included in the original equipment packaging
(Global Contact Information/European Contact Information). Should your country not be listed, please
contact the distributor nearest you. A list of distributors can be found in the support area of our website
(www.behringer.com).
1. INTRODUCTION