


7 EUROLIVE B1520DSP User Manual
ON
When the switch is actuated (ON position), the automatic switch-o is
active. The loudspeaker is turned o auto matically when it receives no signal
for more than 3 minutes. As soon as a signal is received, the loudspeaker is
switched back on.
OFF
If the switch is not actuated (OFF position) then the speaker remains
switched on and can only be deactivated via the POWER switch (2).
(12) A noise-gate allows you to eliminate unwanted noise during signal pauses.
This is done by a circuit that mutes the output when the signal level drops
below a preset threshold. Use the NOISE GATE control to determine the
threshold below which the noise-gate closes.
(13) The TH LED lights up as soon as the signal level drops below the threshold
value adjusted with the NOISE GATE control (12) (the noise-gate closes).
3. Setting up the B1520DSP
The sound of your B1520DSP largely depends on the room acoustics.
Pleaseobserve the following hints to get the most out of your B1520DSP.
3.1 Tweeter
High frequencies are the very part of the audio spectrum that ensure a clear
perception of sound and speech intelligibility. Although these frequencies can be
located most easily, they are also the rst to be blocked acoustically. We therefore
recommend that you set up your speakers on speaker stands (not included),
sothat the tweeter radiates its signals slightly above the heads of the audience.
This will ensure both an optimum dispersion of the high-frequency content and a
considerably improved speech intelligibility.
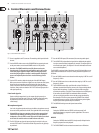
Fig. 3.1: B1520DSP mounted on a stand
3.2 How to avoid feedback
Always place the microphones (viewed from the audience) behind the B1520DSP,
never in front of it (Fig. 3.2). When you wish to adjust the controls on the
B1520DSP while holding a microphone, please approach the loudspeaker from
the rear to avoid feedback.
Fig. 3.2: Right and wrong positioning
To avoid feedback, it is recommended that you carefully select and direct the
microphones used. Basically, you should use microphones with a high directivity,
i.e. with a cardioid or hyper-cardioid polar pattern. Never hold a microphone so
that its main pick-up area points directly towards the loudspeaker. When you
hold it with its less sensitive side towards the speaker box, you can move closer
to the speaker.
◊ If you encounter persistent feedback problems, consider using our
proven FEEDBACK DESTROYER PRO FBQ2496 for line-level signals.
For signals with line or microphone level, we recommend our
BEHRINGER SHARK DSP110.
4. Application Examples
4.1 Presentations
With just one B1520DSP and one or two dynamic microphones, you can set up
a basic audio system with very little eort. Thanks to the built-in mixer section,
you can connect the microphones directly to the B1520DSP. Mount the B1520DSP
on a speaker stand for optimum presentation and intelligibility of announcements.
If one B1520DSP is not enough, you can, of course, use a second or even
more loudspeakers.
Connecting microphones:
• Turn the LEVEL controls (3) fully to the left
• Connect your microphones to the MIC/LINE inputs
• Switch on the B1520DSP
• Turn the LEVEL controls (3) gradually clockwise to set the volume of your
choice. Observe the CLIP LEDs while adusting the volume. Make sure they
never shine constantly but only light up at peak levels
• Use the LINE OUT connector (6) to connect an (optional) second B1520DSP
◊ Never place a microphone directly in front of the loudspeaker owing to
danger of feedback! When operating the B1520DSP make sure that you
always stay behind the loudspeaker to avoid feedback.
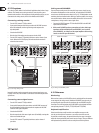
XM8500
EUROLIVE B1520DSP EUROLIVE B1520DSP
Fig. 4.1: Connecting microphones