


11 EURODESK SX2442FX/SX3242FX User Manual
behringer.com
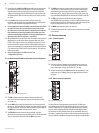
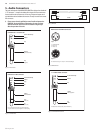
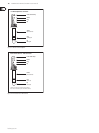
These are the master [51] AUX SEND controls 1 and 2 for adjusting the volume
level sent to the corresponding aux send connectors (see [52]). This way,
you can control the mix of all AUX 1 or AUX 2 signals of the input channels.
The AUX SEND section also has a SOLO switch.
[52]
Fig. 2.23: Master aux send outputs
Use the [52] AUX SEND outputs 1 and 2 to take the master AUX SEND
signals and route them to an external eects device or your monitor
speakers. Subsequently, you can return the eect signal, e.g. via the
STEREO FX RETURN inputs (see [67]) or specic input channels.
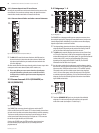
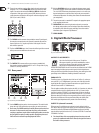
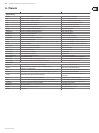
Graphic 9-band stereo equalizer2.9
[53] [56]
[54]
[55]
Fig. 2.24: The graphic stereo equalizer
Your EURODESK is equipped with a graphic 9-band stereo equalizer [53]
processing either the main or the AUX 1 signal. Use the EQ to adapt the
sound to the room acoustics.
Use the [54] EQ IN switch to switch the equalizer on. In this case, the fader
LEDs illuminate.
With the [55] MAIN/AUX 1 switch you can determine the signal to be processed,
either main or AUX 1.
Press the [56] FBQ IN switch to activate the FBQ Feedback Detection System.
The frequencies causing feedback are indicated by the brightly lit fader
LEDs, while all other LEDs are darker. Simply lower the level of the brightly
lit faders until feedback disappears.
When the switch is in the “AUX 1” position (see ◊ [55]), the EQ fader
LEDs show both the MAIN and the AUX 1 signal simultaneously.
However, if feedback occurs in one of the signals, those signals without
feedback will be faded out to enable clear identification of where
feedback is occurring. If the MAIN signal happens to be the one carrying
feedback, put the switch [55] to “MAIN” and then use the 9-band EQ to
remove the feedback.
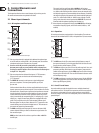
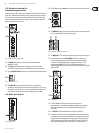
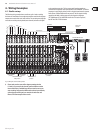
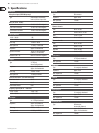
Eects section2.10
[62] [64]
[60]
[65]
[61]
[63]
[57]
[58]
[59]
Fig. 2.25: The digital eects processor
Here you will nd a list of all multi-eects presets (see also chapter 3 [57]
“Digital eects processor”).
The FX LED level meters show the eects processor’s input signal. [58]
Be sure that the clip LED only illuminates with signal peaks. If it is lit
all the time, the eects processor is overloading and hence producing
unpleasant distortion.
The [59] Eect displays show the currently selected presets.
This is the master [60] FX 1 (or 2) SEND control for adjusting the volume of all
FX send signals at the corresponding FX send jacks (see [66]) and at the
inputs of the built-in eects processor. Use it to control the master signal of
all FX 1/FX 2 signals from the input channels. When neither of the FX SEND
controls is turned up, the eects processor will not receive a signal.
Turn the [61] FX 1 (or FX 2) control to select an eects preset. Then, push it
briey to conrm your selection and activate the new eect.
The [62] FX 1 (or 2) TO AUX 1 controls allow you to add the eect signal from
the built-in eects processor (FX1 or FX2) to the AUX 1 monitor signal.
Naturally, the eects processor must be provided with an input signal
(i.e. the FX controls in the channel strips plus the FX SEND controls and the
channel faders must be turned up).
This is the [63] FX 1 (or 2) TO AUX 2 control adding the eect signal from the
eects processor to the AUX 2 monitor signal. See [62] for further details.
The [64] FX 1 (or 2) TO MAIN control routes the eect signal either to the main
mix or the subgroups 1 and 2 (or 3 and 4), depending on the position of the
selector switch (see [65]). When it is hard left, no eect signal will be audible.
Here, too, the FX controls in the channel strips plus the FX SEND controls and
the channel faders must be turned up.