


5
V-AMPIRE LX1200H/LX210
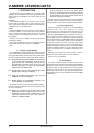
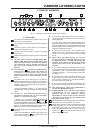
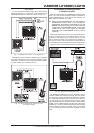
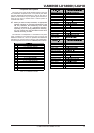
2.1 Front panel
The GAIN control determines the distortion level and the
saturation of an amp simulation.
The VOLUME control determines the volume of the selected
preset.
The BASS control in the EQ section is for boosting or
cutting the low-frequency range.
The MID control is for boosting or cutting the mid-range
frequencies.
TREBLE controls the high-frequency range of the selected
preset.
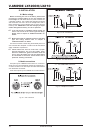
+ The LED rings around the VOLUME, BASS, MID,
TREBLE, GAIN, EFFECTS and REVERB controls each
have nine LEDs. On each ring either one LED or
two neighboring LEDs (in between position) will
light up at a time, indicating a total of 17 different
positions.
+ If the TAP button is pressed, the TREBLE control
functions as a PRESENCE control. This enables you
to boost/cut a high-frequency filter tuned to
whatever amp model is active, thus simulating the
frequency-dependent negative feedback of tube
amps.
The AMPS control is for selecting one of 32 different
amplifier simulation models. The control is surrounded by a
ring of 16 LEDs. Each LED corresponds to two types of
amplifiers. The first 16 simulations can be selected by
turning the AMPS control.
To select the simulation models 17 - 32, press down the
TAP button while making your selection by turning the AMPS
control.
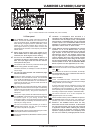
+ The LED 17 - 32 in the bottom left-hand corner of
the DISPLAY indicates that one of the simulation
models 17 - 32 has been selected.
In addition, you can activate a PREAMP BYPASS by
pressing the button combination TUNER and TAP
for using the V-AMPIRE as effects unit. If PREAMP BYPASS
has been selected, none of the LEDs on the AMPS control
lights up. To disable PREAMP BYPASS, simply select a
different amp model or press both buttons again.
These five buttons are for selecting a preset (A - E) within
one bank.
In EDIT mode (activated by simultaneously pressing the
arrow buttons described in ), the buttons perform the
function printed directly below them:
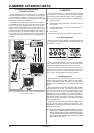
2. CONTROL ELEMENTS
s A: Accesses the MIDI functions. Use the arrow buttons to
set the MIDI channels (1 through 16) for transmitting and
receiving MIDI data.
If you use button A in EDIT mode to select the MIDI function
and then press the TAP button, the MIDI OUT connector is
set to act as a MIDI THRU. In this setting (the TAP LED is lit)
no MIDI data is sent, but the device passes on the signal
received at the MIDI IN connection.
s B: Selects the DRIVE function. This noticeably raises
distortion and volume. Use the arrow buttons to switch
DRIVE on and off. The DRIVE function is wired pre GAIN
control.
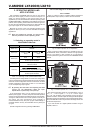
+ While editing the DRIVE function, you can also
activate and adjust the Wah-Wah effect by turning
the EFFECTS control. The LEDs surrounding the
EFFECTS control indicate the position of the pedal.
If none of the LEDs light up, the Wah-Wah is not
activated.
s C: This button activates the CABINETS mode. Use the
arrow buttons to select the type of speaker or combination
of speakers you want. You can also switch off the speaker
simulation completely (-). For further details, please refer
to chapter 5.2.
s D: Use this button to select the REVERB function. The
arrow buttons can be used to select one of nine different
types of reverb in addition to the multi-effects processor.
For further details see chapter 6.3.
s E: Here you can activate the NOISE GATE function. Use
the arrow buttons to adjust the noise reduction threshold.
+ After preset editing, please press TUNER/EXIT to
quit (the EDIT MODE LED dies out).
+ CONFIGURATION: If you press the D and E buttons
simultaneously, you can select the general
operating mode of your V-AMPIRE, allowing
adjustments to different studio and live situations
(see chapter 3). To do that, first exit the EDIT mode
by pressing TUNER (Exit).
The TUNER button is for switching on the tuner. In addition,
this button can be used to quit EDIT mode (Exit).
Use the two arrow buttons to select a different bank (BANK
DOWN and BANK UP). You can skip banks by holding
each of the buttons down. To activate the EDIT mode,
press both buttons simultaneously. If you press one of the
buttons A - E ( ) in that mode, the arrow buttons can be
used for setting parameters.
2. CONTROL ELEMENTS
Fig. 2.1: V-AMPIREs control elements (front panel LX1200H)