


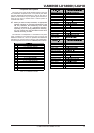


6
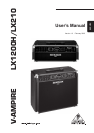
V-AMPIRE LX1200H/LX210
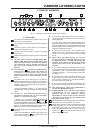
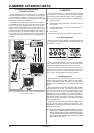
2. CONTROL ELEMENTS
The TAP button has seven functions:
s Tap: Tap the rhythm of a piece of music on the TAP
button and the selected effect automatically adapts to the
tempo of the music.
s Presence: While holding down the TAP button, you
can use the TREBLE control to change the PRESENCE
setting of the amp model youve selected.
s 2
nd
parameter: You also can access the second effects
parameter set by using the EFFECT control while holding
down the TAP button.
s Amp Models 17 - 32: Keep the TAP button pressed
down and select an amp model using the AMPS control.
s MIDI Thru: The MIDI OUT connector can be set to act as
MIDI THRU (see A).
s Drive: Using the TAP button and the EFFECT control
changes the sound of the Wah-Wah effect.
s Input Gain: By pressing the TAP button in the
configuration menu (see ) you change the value (please
refer to chapter 3.1 for further information).
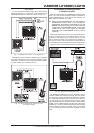
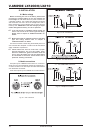
Fig. 2.2: V-AMPIRE display
The DISPLAY shows you which preset bank you have
selected and gives you information on parameter changes
when you are editing. In TUNER mode the DISPLAY shows
the pitch of the instrument connected to the unit. If one of
the amplifier simulations 17 - 32 has been selected, the
LED in the bottom left-hand corner of the DISPLAY lights
up. Applied signals are indicated by the green SIGNAL
LED, overload signals by the red CLIP LED.
This control is for selecting an effect or a combination of
effects. This encoder-type rotary control is also surrounded
by a ring of 16 LEDs. Each LED corresponds to one specific
effects preset.
If an effect has been selected via , its part of the
overall sound can be set using this EFFECTS control. If
you select the Compressor effect, you can use the
EFFECTS control to adjust the compression intensity.
Turning the control to the left until all the LEDs are off
disables the effect. This is known as an effects bypass.
+ By pressing the TAP button, you can set a second
effects parameter using the EFFECTS control
(see table 6.1).
Using the REVERB control, you can gradually add reverb
to your overall sound. By turning it to the left until all the
LEDs are off, you deactivate the reverb. To fade out the
original signal, turn the control to the right until only the last
LED lights up.
The MASTER control determines the overall volume of
your device.
+ This is the only conventional non-programmable
control. All other controls are encoder-type rotary
controls whose settings can be stored as a preset.
The INPUT socket is the 1/4" connector for your guitar.
Please use a standard 1/4" TS connector.
The stereo PHONES connector allows you to monitor the
audio signal with standard headphone (e.g. BEHRINGER
HP series).
+ Your V-AMPIRE automatically activates studio mode
1 (S1) when connecting headphones. In this mode
the digital speaker simulations are activated. With
the headphones plugged in, you are able to select
any other configuration, e.g. for monitoring
purposes (see also chapter 3).
+ If you did not choose a speaker simulation with the
current setting and connect headphones, the device
will automatically switch to a speaker simulation.
This will increase the listeners sound impression.
Please refer to table 5.2 for detailed information on
the various speaker/amp combinations. However,
you can intentionally change or deactivate the
simulation when using headphones by selecting
- in the CABINETS mode (see C).
WARNING!
+ Please note that high volume levels may cause
permanent damage to your hearing and/or your
headphones. Turn all LEVEL controls to the left
before you switch on the unit. Be sure to keep the
volume at an appropriate level.