


behringer.com
6 EUROPOWER PMP2000 User Manual
Introduction1.
BEHRINGER is a company with its roots in professional recording studio
technology. For many years now we have been successful in developing products
for studio and live use. These include microphones and 19" devices of all kinds
(compressors, enhancers, noise gates, tube processors, headphone amplifiers,
digital effects devices, DI boxes, etc.), monitor and P.A. speakers and professional
live and recording mixers. Our entire technical know-how has gone into
your PMP2000.
This manual first describes the terminology used, so that you fully ◊
understand the PMP2000 and its functions. Please read the manual
carefully and keep it for future reference.
Before you get started1.1
Shipment1.1.1
Your PMP2000 was carefully packed at the factory and the packaging is designed
to protect the unit from rough handling. Nevertheless, we recommend that
you carefully examine the packaging and its contents for any signs of physical
damage which may have occurred during transit.
If the unit is damaged, please do NOT return it to BEHRINGER, ◊
but notify your dealer and the shipping company immediately.
Otherwise, claims for damage or replacement may not be granted.
Initial operation1.1.2
Be sure that there is enough space around the unit for cooling and, to avoid
overheating, please do not place the PMP2000 near radiators etc.
Before you connect the PMP2000 to the mains, please make sure that ◊
the voltage setting on the unit matches the local voltage!
If you set the unit to a different mains voltage, be sure to use a fuse ◊
of the correct type and rating. Please refer to the “Specifications”
for details.
Blown fuses must be replaced by fuses of the same type and rating! ◊
Please refer to the “Specifi cations” for details.
The mains connection is made using the enclosed power cord and a standard IEC
receptacle. It meets all of the international safety certification requirements.
Please make sure that all units have a proper ground connection. ◊
For your own safety, never remove or disable the ground
conductor from the unit or of the AC power cord. The unit shall
always be connected to the mains socket outlet with a protective
earthing connection.
To avoid damage on the device, do not
earth the loudspeaker outputs•
connect the loudspeaker outputs to each other•
connect the loudspeaker outputs to those of other amplifiers•
IMPORTANT NOTES CONCERNING INSTALLATION
The sound quality may diminish within the range of powerful broadcasting
stations and high-frequency sources. Increase the distance between the
transmitter and the device and use shielded cables for all connections.
Online registration1.1.3
Please register your new BEHRINGER equipment right after your purchase
by visiting http://behringer.com and read the terms and conditions of our
warranty carefully.
Should your BEHRINGER product malfunction, it is our intention to have it
repaired as quickly as possible. To arrange for warranty service, please contact
the BEHRINGER retailer from whom the equipment was purchased. Should your
BEHRINGER dealer not be located in your vicinity, you may directly contact
one of our subsidiaries. Corresponding contact information is included in the
original equipment packaging (Global Contact Information/European Contact
Information). Should your country not be listed, please contact the distributor
nearest you. A list of distributors can be found in the support area of our website
(http://behringer.com).
Registering your purchase and equipment with us helps us process your repair
claims more quickly and efficiently.
Thank you for your cooperation!
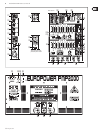
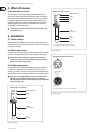
Control Elements2.
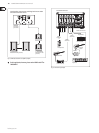
Front panel2.1
Your EUROPOWER PMP2000 comes with 14 input channels, which only differ
in terms of pad switch, peak LED and interface panel. Since the EQ, effect,
monitor and level controls are identical on all channels, they will be described
only once on the enclosed sheet.
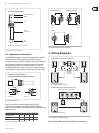
The [1] FX control determines the signal level that is routed from the respective
channel to the built-in effects processor.
Please note that the effects processor is muted as long as the FX TO ◊
MAIN control ((22)) is set fully counter-clockwise.
The [2] HIGH control in the EQ section governs the high frequencies of the
respective channel.
Use the [3] MID control to boost/cut the mid range.
The [4] LOW control allows you to raise or lower the bass frequencies.
The [5] MON control determines the channel’s volume assigned to the
monitor mix.
Use the [6] LEVEL control to set the volume level of the respective channel.
Use the [7] CLIP LED to ensure that the input gain is set properly. The CLIP LED
should light up only with peak signals, but never all the time.
The [8] PAD button reduces the channel input sensitivity by 25 dB. Thus, you
can also connect high-level line signals to the respective channel input.
This [9] HI-Z/LINE input can be used to connect line level signal sources, such as
keyboards, electric and bass guitars.
This is the channel’s balanced XLR microphone input.[10]
The stereo line input of channels 7 - 12 can be used to connect, for example, [11]
keyboards with stereo outputs or a stereo drum computer.
Please remember to use either the microphone or the line input on a ◊
specific channel. Never use both at the same time. This rule applies to
channels 1 - 12.
When you connect a mono line signal to channels 7 - 12, please always ◊
use the left input. The mono signal will then be reproduced on both
stereo sides.