


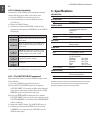


ENGLISH
U-CONTROL UMX250 User Manual
11
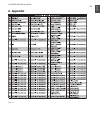
Other functions of the OCTAVE SHIFT 4.2.9
buttons
After power-up, the OCTAVE SHIFT buttons are set to their
initial state (see Table 3.1 on page 7). In addition to the program
change and octave shift functions already described, you can
assign a few special functions to the OCTAVE SHIFT buttons in
ASSIGN mode:
Transposition by single half-tonesa)
Scrolling in program librariesb)
Various controller functions:c)
As soon as a function has been assigned to one of the two
◊
buttons, the second button automatically performs the same
function—however with limited functionality. As long as
you have not assigned a particular function to this button
in ASSIGN mode, it will not send any data.
Transposition by single semitones:a)
Press the ASSIGN button and keep it pressed.1)
Press the TRANSP +/- key.2)
Release the ASSIGN button.3)
Conrm your selection with ENTER. To discard your 4)
assignments either press the CANCEL key or the ASSIGN
button again.
Pressing the right-hand button transposes the pitch up by one
half-tone, pressing the left-hand button transposes the pitch
down by one semitone. Pressing both buttons simultaneously
cancels any transposition made before.
According to the MIDI standard, a keyboard comprises a
◊
maximum of 128 semitones. When you reach the lower and
upper limits of this range using the transpose function, any
further keypress will not raise or lower the pitch any more.
This also applies to the transposition by octaves.
Scrolling in program libraries:b)
Most sound modules allow you to store presets in a separate
bank, often referred to as user bank. If the order of the songs to
be played during a gig is xed, you can use the user bank to store
all sounds used in concert one after the other and concentrate
entirely on your performance. Thanks to the OCTAVE SHIFT
buttons you don’t have to bother any more with searching sounds
in your various sound modules.
Press the ASSIGN button and keep it pressed.1)
Press the PROG +/- key.2)
Release the ASSIGN button.3)
Conrm your selection with ENTER. To discard your 4)
assignments either press the CANCEL key or the ASSIGN
button again.
Pressing the right-hand OCTAVE SHIFT button switches
the presets up by one number on the external sound module,
pressing the left-hand OCTAVE SHIFT button switches
the presets down by one number. Pressing both buttons
simultaneously switches back to preset 0 in the current bank.
Remember to assign the OCTAVE SHIFT buttons to an
individual MIDI channel if you do not want to use the GLOBAL
CHANNEL (see Chapter 4.2.2).
When using the stepwise search function, the channel
◊
assignment involves both buttons. Assigning an individual
channel to one of the two buttons is not supported.
Various controller functions:c)
Please note that the OCTAVE SHIFT buttons generate switch
controller information if assigned to a controller. They always
generate a value of 0 or 127.
Two exceptions: If you assign the OCTAVE SHIFT buttons
◊
to controller CC 07 (Channel Volume), pressing either of the
two buttons generates the value 0. With controller CC 10
(Panorama), the value generated by pressing either of the
buttons is 64.
Please note that when a controller has been assigned,
◊
pressing both buttons simultaneously has no effect.
Press the ASSIGN button and keep it pressed.1)
Press the one of the two OCTAVE SHIFT buttons to which 2)
you want to assign a controller.
Release the ASSIGN button.3)
Press the number keys on the keyboard to enter the 4)
controller number of your choice (as described in
Chapter 4.2.7).
Conrm your selection with ENTER. To discard your 5)
assignments either press the CANCEL key or the ASSIGN
button again. In either case the ASSIGN LED
goes out.
Remember to assign the OCTAVE SHIFT buttons to an
individual MIDI channel if you do not want to use the GLOBAL
CHANNEL (see Chapter 4.2.2).