


20 21X32 RACK DIGITAL MIXER Quick Start Guide
X32 RACK DIGITAL MIXER Getting started
(EN) Step 3: Getting
started
Linux/OS X applications and Windows-based
applications for X32 RACK
Also oered is a separate remote editor running
onhost computers that will allow for complete editing
control of the X32 RACK via Ethernet. Details of the
remote editor’s download, setup and operation are
included in a separate user manual available for
download from the X32 RACK product page. Check out
behringer.com for more information.
Tip: The X32 RACK remote communication is OSC-
based (open sound control) and we will share the
protocol on our website, allowing developers to
design their own control software. Stay tuned to
behringer.com for details on the OSC protocol.
X-USB expansion card
The X-USB card allows transmission of up to
32 channels to and from a connected computer.
Please download the X-USB drivers and Quick Start
Guide from behringer.com before connecting the
mixer to your computer. The card is CoreAudio
compatible, allowing it to work with computers with
the OS X operating system software of Apple, Inc.
without a driver.
X32 RACK DIGITAL MIXER Puesta en marcha
(ES) Paso 3: Puesta en
marcha
Ch01
01:
0:00 - 0:00
A: S16 A: 48K
B: - C: X-USB
: 19
01
home
aux out
analog out
p16 out
card out aes50-a aes50-b
13:45
Inputs 1-8 Inputs 17-24Inputs 9-16
Channel Processing Block Patch
Inputs 25-32 Aux In 1-4
Connected Devices
Local In 1-8
Local In 9-16
[Local In 17-24]
[Local In 25-32]
AES50 A1-8
AES50 A9-16
AES50 A17-24
AES50 A25-32
AES50 A33-40
AES50 A41-48
AES50 B1-8
AES50 B9-16
AES50 B17-24
AES50 A25-32
Local In 1-8
Local In 9-16
[Local In 17-24]
[Local In 25-32]
AES50 A1-8
AES50 A9-16
AES50 A17-24
AES50 A25-32
AES50 A33-40
AES50 A41-48
AES50 B1-8
AES50 B9-16
AES50 B17-24
AES50 A25-32
Local In 1-8
Local In 9-16
[Local In 17-24]
[Local In 25-32]
AES50 A1-8
AES50 A9-16
AES50 A17-24
AES50 A25-32
AES50 A33-40
AES50 A41-48
AES50 B1-8
AES50 B9-16
AES50 B17-24
AES50 A25-32
Local In 1-8
Local In 9-16
[Local In 17-24]
[Local In 25-32]
AES50 A1-8
AES50 A9-16
AES50 A17-24
AES50 A25-32
AES50 A33-40
AES50 A41-48
AES50 B1-8
AES50 B9-16
AES50 B17-24
AES50 A25-32
Aux 1-4
Local 1-4
AES50 A1-4
AES50 B1-4
Card 1-4
AES50 A
AES50 B
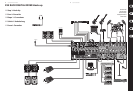
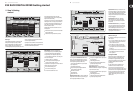
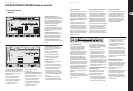
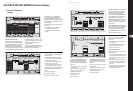
Ruteo de E/S
La consola X32 RACK dispone de 16 entradas
analógicas XLR con previo de micro en el panel
trasero, así como 8 salidas XLR y 6 envíos y retornos
auxiliares TRS en el panel trasero. Además,
dispone de dos puertos AES50 , cada uno de ellos con
48 canales de entrada y salida y una ranura de tarjeta
para 32 canales más de entrada y salida a y desde un
ordenador conectado vía USB.
Las señales de entrada pueden ser pasadas a los núcleos
de procesado audio internos de la consola en bloques
de 8 señales desde cualquiera de las fuentes de entrada
mencionadas antes.
Delay
ms
0.3
Set DelayAssign
ft
m
ms
0.3
0.3
0.10
Delay
Delay
Select Select Select Select
Ch01
01:
01
home aux out
analog out
p16 out
card out aes50-a aes50-b
Analog Output
CategoryCurrent Setting
Edit Output Assignment
Processed Output Signal Tap
0:00 - 0:00
A: S16 A: 48K
B: - C: X-USB
: 37
14:09
Output 01
Output 02
Output 03
Output 04
Output 05
Output 06
Output 07
Output 08
*Output 09
*Output 10
*Output 11
*Output 12
*Output 13
*Output 14
MixBus
OFF
Main (LRC)
Mix Bus
Matrix
Direct Out
Monitor
OFF
Main L
Main R
Main C/M
Main Bus 01
Main Bus 02
Main Bus 03
Main Bus 04
Main Bus 05
Main Bus 06
Main Bus 07
Main Bus 08
Main Bus 09
Pre EQ
Post EQ
Pre Fader
Post Fader
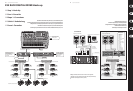
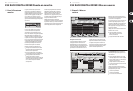
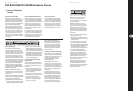
Las señales de salida pueden ser asignadas
libremente desde cualquier señal interna a
cualquiera de las salidas siguientes:
• 8 salidas analógicas XLR locales (con retardo
digital ajustable para el alineamiento en el
tiempo de los altavoces)
• 8 salidas virtuales (marcadas con un *) para su
ruteo a través de salidas AES50 o de tarjeta
• 6 envíos auxiliares en salidas TRS de 6,3 mm
• 16 salidas de monitorización personal usando el
conector de salida de bus P-16 de la consola
Cualquiera o todas las señales anteriores también
pueden ser reejadas en bloques de 8 señales en
cualquiera de los
• 48x canales en el puerto AES50 A
• 48x canales en el puerto AES50 B
• 32x canales en la tarjeta de interconexión USB
Nota: Todos los bloques de señal derivados al
procesado audio será conectados automáticamente a
los canales de entrada correspondientes.
Las entradas locales 17-24 y 25-32 vienen marcadas entre
corchetes para hacerle saber que no están disponibles
físicamente en este dispositivo. Su asignación
obviamente no llevará ninguna señal, pero podrá seguir
usándolas cuando esté preparando shows para una
consola X32 completa.
Cableado para todas las conexiones AES50 entre el
X32 y unidades de escenario S16:
• Cable CAT-5e blindado, Cable Ethercon
terminado en los extremos (recomendado)
• Longitud máxima de cable 100 metros
Ch01
FatSnare
OpeningScene
02: next 0:00 - 0:00
A: S16 A: 48K
B: - C: X-USB
: 15
01 15:33
home
cong
gate dyn eq sends main
square indication at the top section of the main
display, please verify if the synchronization settings
on Setup/Cong make sense.
In order to prevent any errors by losing power
during a store operation, we recommend
using the “Safe Shutdown” function from the
Setup/Global page.
NOTE: The X32 RACK can be locked against unintended
use by activating ‘Lock Console’ from the Setup/Global
page. In this state the UI will not allow any changes
to be made and the display shows “X”. Keep HOME
depressed for about 5 seconds to unlock the X32 again.
The X32 rmware can easily be updated by
performing the following steps:
• Download the new console rmware from the
X32 RACK product page onto the root level of a
USB thumb drive
• Plug the USB thumb drive into the front panel USB
connector while the console is turned o
• Hold the USB button depressed while switching
the console on. While booting, the X32 RACK
will run a fully automatic rmware update,
which will take 2-3 minutes longer than the
regular boot sequence
When no update le is available on the USB drive,
or when it is corrupted, the update mode will remain
active, preventing the X32 from booting regularly.
Switch the console o and back on without holding
the USB button to boot the console with the
existing rmware.
CAUTION: Please do not block the vent openings on
the sides of the X32 RACK cabinet! Specically when
mounting the X32 RACK in a road case, please ensure
there is sucient space to allow for some airow.
A 48K
C X-USB
16
15
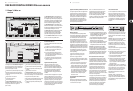
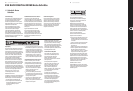
Main Display Area
The top section of the main display permanently
covers useful status information. The top left corner
shows the selected channel number, its nickname
and the selected icon. The next block shows the
current scene number and name in amber, as well
as the next upcoming scene. The center section
displays the playback le name along with elapsed
and remaining time and a recorder status icon.
Thenext block to the right has 4 segments to show
the status of AES50 ports A and B, the Card slot and
the audio clock synchronization source and sample
rate (topright). Small green square indicators show
proper connectivity. The right most block shows the
console time that can be set under Setup/Cong.
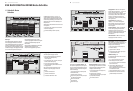
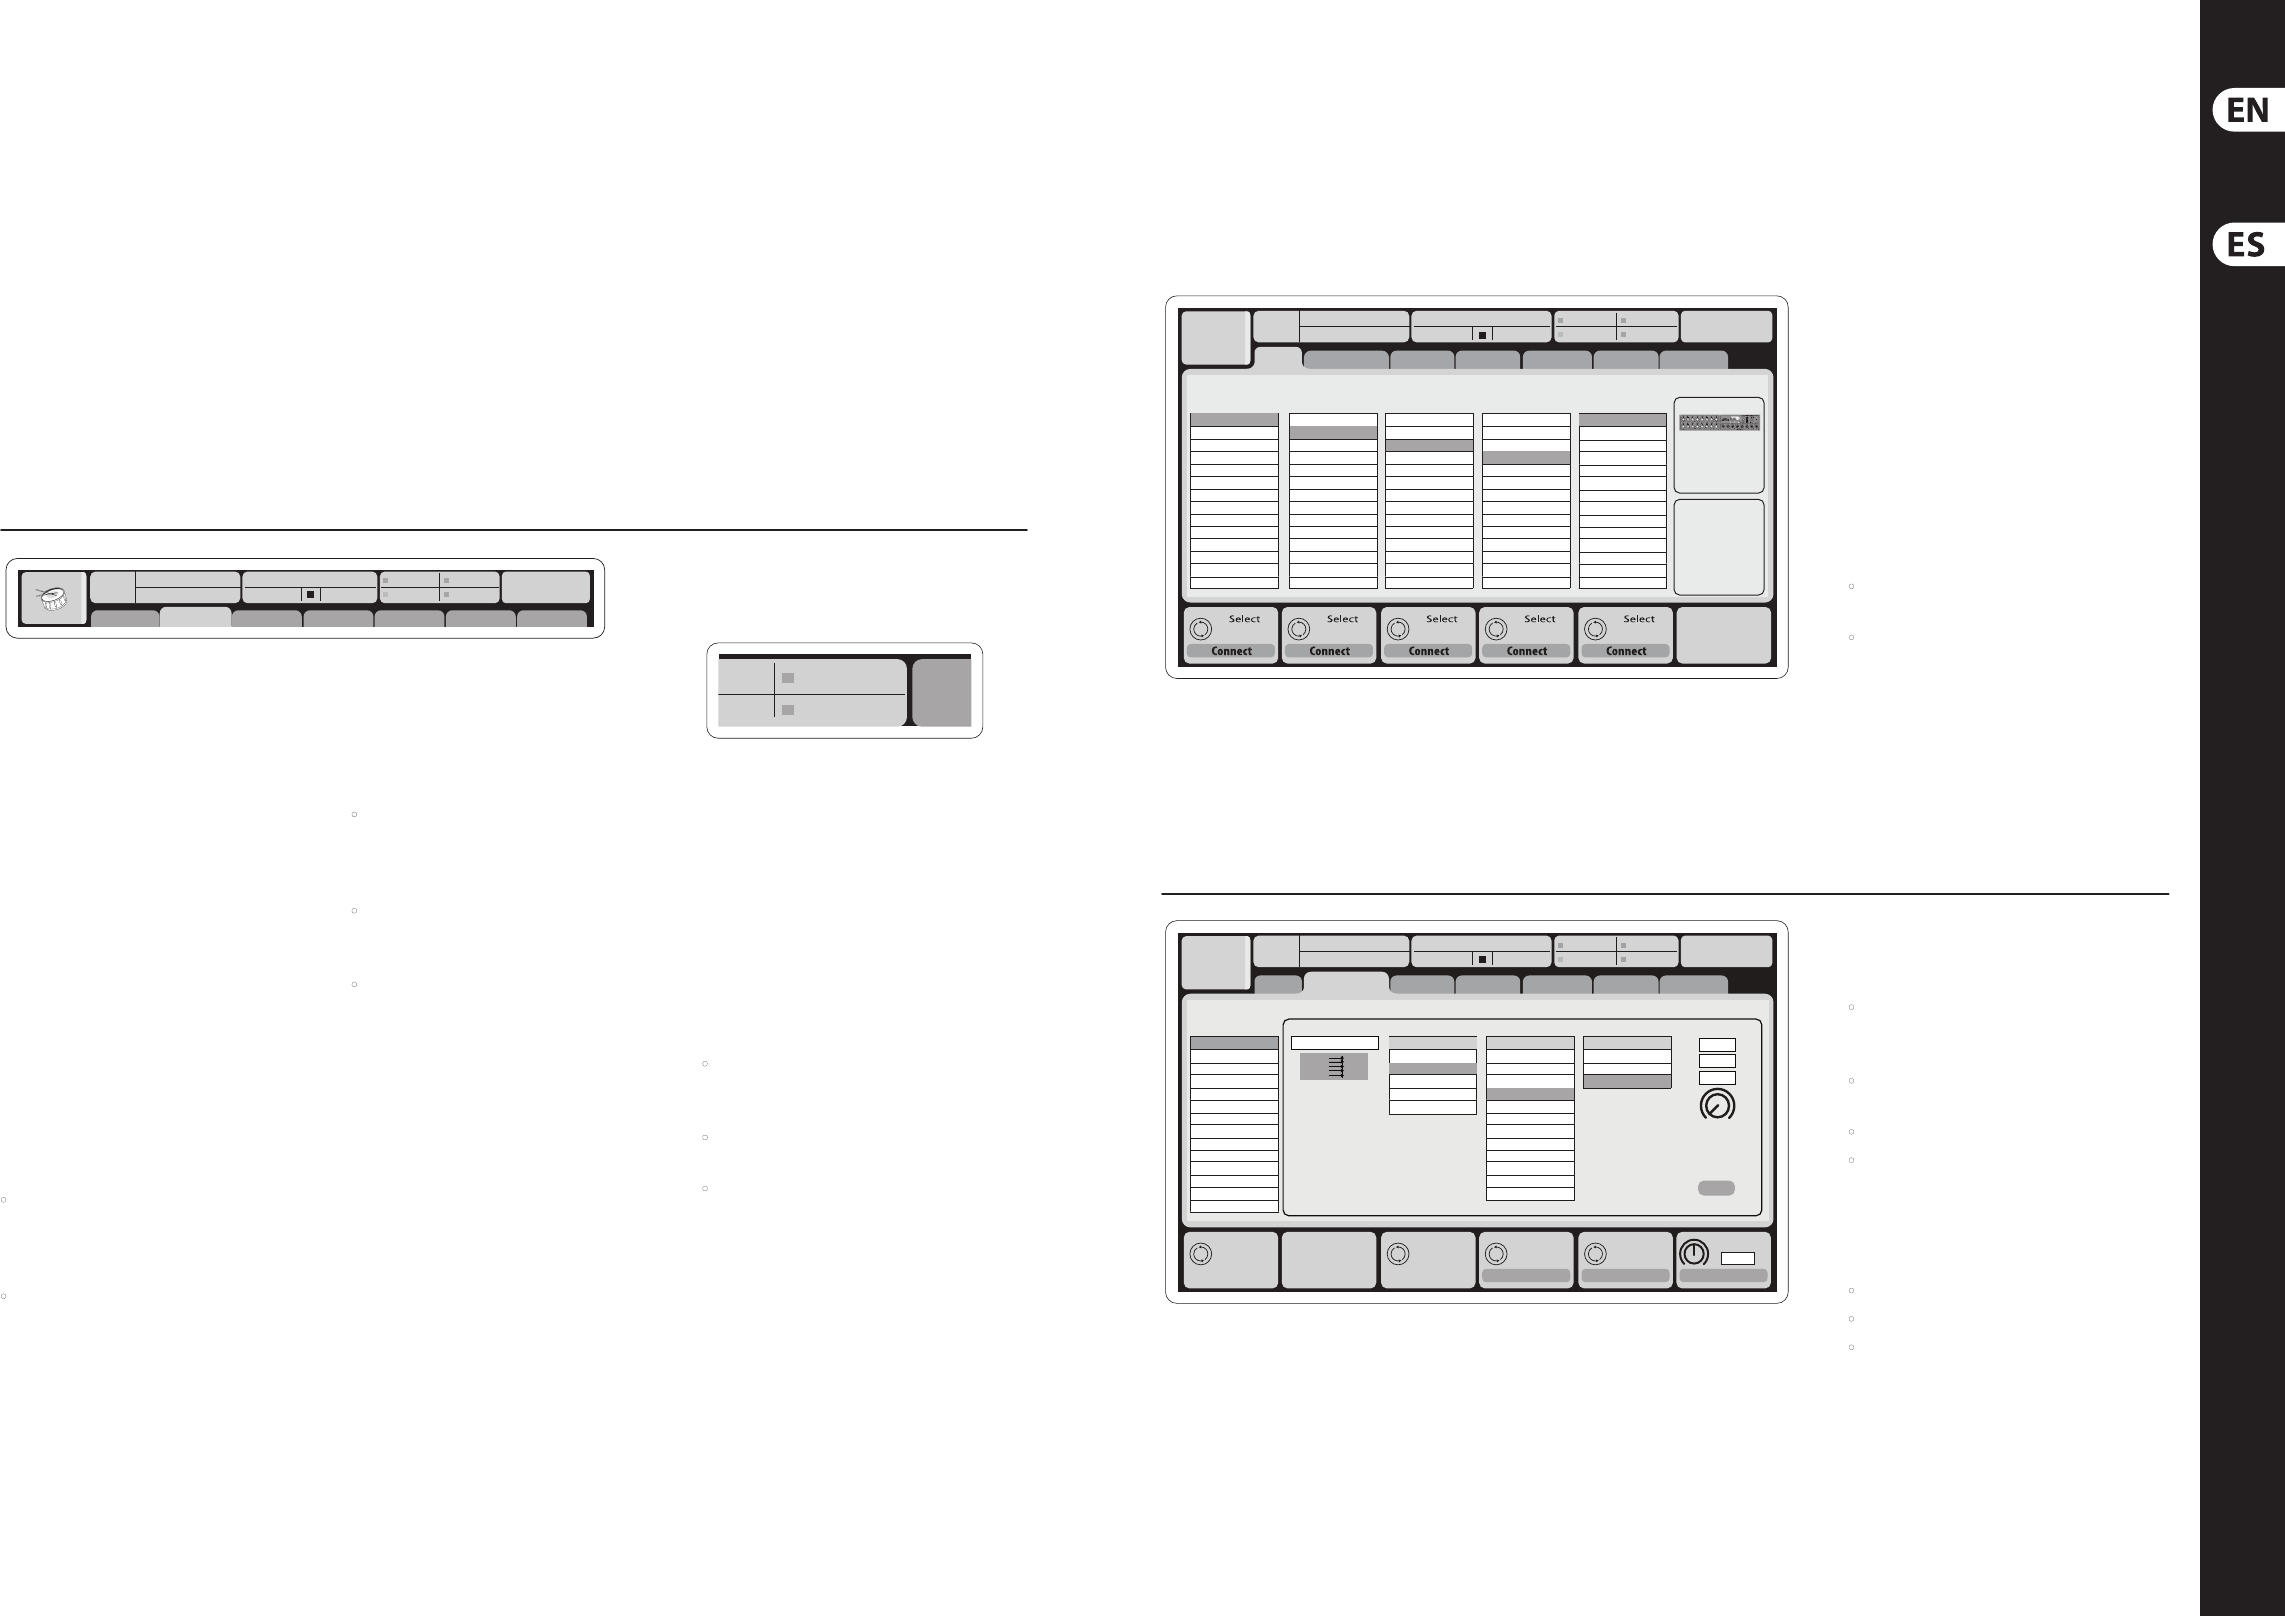
When working with any given screen, press the
Page keys located on the display bezel to switch to
dierent screen pages.
Editing parameters or settings on each of the screens
is done using the 6 associated push-encoders along
the bottom edge of the display.
• Whenever there is a continuous control or list
entry, you can turn the corresponding knob
forediting, which is indicated by various
circularicons
• When there is a switch or toggle function
on one of these knobs, you will see a broad
rectangular button along the lower edge of the
eld. Pressing the encoder changes the on/o
state of the corresponding function. When the
rectangular button in the display is dark grey,
thecorresponding function is o/inactive; whenit
is amber, the function is on/active
Customizing the X32 RACK through the
Utilities page
Press the Utility button, located to the right of
the main display, to bring up useful functions in a
“context-sensitive” manner. For example:
• When you are adjusting the equalizer of a
console channel, pressing the Utility button
will oer copying, pasting, loading or saving of
equalizer settings
• On the Routing pages, pressing the Utility button
will oer loading or saving dierent presets of
routing scenarios
• In the Scenes menu, pressing the Utility button oers
copying, loading, saving or naming console scenes
NOTE: The X32 RACK DCA groups can be selected
using the Channel Select control in order to adjust
their fader level, mute or solo status. Note, however,
that the main display will remain focused on the last
real channel (bus or input) that was selected before
DCA, since DCAs do not feature any processing.
Startup and Shutdown, and Update:
We recommend switching the X32 RACK mixer on
rst, and shutting it o last when any sound system
is connected. This will prevent the possibility of any
unexpected noises being transmitted during the
startup/shutdown process.
The Setup screen’s general preference page contains a
Safe Main Levels function. When activated, the console
automatically mutes the main LRC levels when booting
the console. It also prevents any scene loading from
aecting (i.e. turning up) the mains levels.
Synchronization and Sample Rate settings for the
console can be adjusted on the Setup/Cong page,
but please note that sample rate changes will
require a reboot of the console. When you see a red