


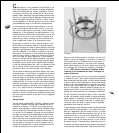
Kiwi
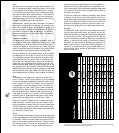
Technical Data
Microphones
Acoustical operating principal
Directional Pattern
Frequency range
Sensitivity at 1 kHz into 1 kohm
Rated impedance
Rated load impedance
S/N ratio CCIR468-3
S/N ratio DIN/IEC 651
Noise level DIN/IEC 651
Maximum SPL for THD 0.5%
Dyn. range of the mic amplifier
Supply voltage
Weight
Dimensions (mm)
Blueberry
Cardioid
20mV/Pa
150ohms
75dB
86dB-A
8dB-A
133dB
95dB
520g
235x50x30
Mouse
Cardioid
21mV/Pa
150ohms
76dB
87dB-A
7dB-A
134dB
96dB
980g
165x65
Dragonfly
Cardioid
21mV/Pa
50ohms
76dB
87dB-A
7dB-A
132dB
96dB
630g
165x60
Kiwi
19mV/Pa
150ohms
76dB
87dB-A
8dB-A
133dB
95dB
880g
220x60
Cactus
18mV/Pa
150ohms
71dB
82dB-A
10dB-A
130dB
97dB
800g
230x50x30
Bottle
(w/B6)
20mV/Pa
200ohms
76dB
87dB-A
7,5dB-A
134dB
98dB
1700g
390x90
Pressure gradient
20Hz – 20KHz
Not less than 1kohms
48V phantom powered Power Supply 9610
multipattern Cardioid
In keeping with our policy of continued product improvement, Baltic Latvian Universal Electronics (BLUE)
reserves the right to alter specifications without prior notice.
snare. Moving the microphone closer to a drum generally in-
creases the low end, shell resonance, and separation from
other sound sources, while more distant placement emphasizes
the interaction of the drum and the environment, producing
a blended, airier sound.
The Kiwi will produce an interesting personality when used at
a distance of four feet or more as an ambient room mic on
drums. Many modern recordings have benefited from the unique
sound of minimalist drum miking, where one to three micro-
phones are strategically placed to capture the entire set,
along with the characteristics of a well-tuned studio room.
Percussion
On tambourine, shaker, bells, clave, and orchestral percussion
the Kiwi offers astounding clarity and realism, and can be
positioned quite close to a percussive source without distortion
or undue proximity effect. Start by placing the Kiwi about a
foot from percussive instruments. Selecting a cardioid pickup
pattern, or moving the mic closer to the source will empha-
size detail and tone, as well as decreasing the proportion of
ambient room sound on a track. More distant placement, or
the use of an omnidirectional or figure of eight pattern will
yield a natural, roomy sound that blends easily with other
rhythm instruments.
Piano
Pop and jazz piano recording is usually accomplished with a
pair of microphones placed inside a grand piano, either close
to the hammers for a defined, percussive sound, or roughly
in the middle of the piano body to get a more resonant and
blended tone. When using these methods, it is conventional
to employ a coincident stereo pair, with one microphone
capsule oriented to pick up the treble strings, and the other
focused on the bass range of the instrument.
A less common, though very useful technique, is to position
a stereo pair or single Kiwi microphone just outside of the
piano, either in the curve of a grand, above an upright, or a
few feet away for a classically-oriented sound with a signifi-
cant amount of natural room reverberation. The variable
pickup pattern control can be used to dial in the desired
amount of ambience.
Saxophones and Reeds
For soprano sax, clarinet and related instruments, position
the mic about a foot away, directly above and in front of the
keys between the middle of the horn and the lowest pads. Try
rotating the capsule or moving the mic up or down along the
length of the body to adjust the balance of airy highs (toward
the mouthpiece) and cutting midrange (toward the bell).
For other members of the saxophone family, start by placing
the capsule two to six inches in front of the lip of the bell.
Turn the capsule up toward the mouthpiece, or raise the micro-
phone above the bell to capture more air, brightness, and
high notes. For a mellower sound, rotating the microphone
toward the floor emphasizes the low range of the sax, and
tames the biting upper mids that project straight out of the
bell, particularly on alto saxophone. Omnidirectional and sub-
cardioid pickup patterns tend to soften the edge of close-miked
saxophone tracks, while super-cardioid and figure of eight pat-
terns emphasize high-end detail, cutting power, and warmth.
Brass
All members of the brass family need to be miked from in
front of the bell. But for studio recording it is not necessary
to aim the microphone capsule right down the center of the
bore, or place it too close. The trumpet, with its directional
characteristics, high sound pressure level, and limited fre-
quency range, will yield a clear, cutting tone at distances
ranging from 6 inches to 2 feet. The trombone and tuba can
be approached similarly, although closer miking toward the
outer edge of the bell (4 to 8 inches), and the enhanced
proximity effect of supercardioid and figure of eight pickup
patterns will help offset a thin or overly bright timbre.
Capturing a mellow, rounded tone is a challenge with any
brass instrument. To avoid buzzy highs and transient over-
loading, persuade the player to blow at less than peak stage
volume. Cornet and flugelhorn usually have a softer, more
intimate sound, are played at lower volume, and can be miked
at a distance of 2 to 6 inches.
Drums
For kit and hand drums, begin by positioning the capsule two
to four inches above the rim or hoop (where the head is secured
to the shell). Angle the capsule toward the player’s stick or
hand to pick up more attack and definition. Turning the cap-
sule toward the shell will soften the sharp attack of a hand
drum, or pick up more of the bright, crackling buzz from a