


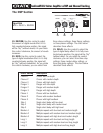

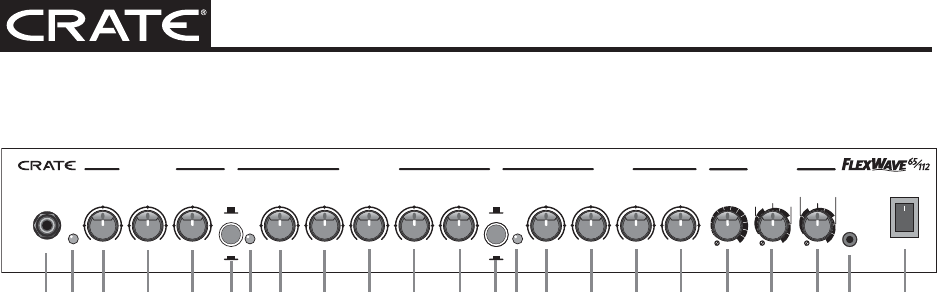
FlexWave65/112 Guitar Amplifier w/DSP and Channel Tracking
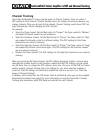
1. INPUT: Use this jack to connect your
guitar to the amplifier by means of a shield-
ed instrument cable.
2. HIGH GAIN LED: This LED illuminates
when the High Gain channel is selected.
3. GAIN: Use this control to adjust the amount
of distortion for the High Gain channel.
4. SHAPE: Use this control to “dial in” the
tone for the High Gain channel. Rotating
this control counter-clockwise enhances the
mid frequencies, while rotating it clockwise
enhances the low and high frequencies.
5. LEVEL: Use this control to adjust the out-
put level of the High Gain channel.
6. HIGH GAIN/OVERDRIVE: Use this switch
to select the High Gain or Overdrive chan-
nel. With the switch in the out position, the
Overdrive channel is selected. When the
switch is pushed in, the High Gain channel is
selected. Note: This switch is only active when
the Overdrive/Clean switch [13] is pushed in.
7. OVERDRIVE LED: This LED illuminates
when the Overdrive channel is selected.
8. GAIN: Use this control to adjust the amount
of distortion for the Overdrive channel.
9. LOW: This adjusts the bass frequencies.
Use this control to get the best sounding
bass response for your instrument when
using the Overdrive channel.
10. MID: This adjusts the midrange frequen-
cies. Use this control to get the best projec-
tion and midrange tones for your instrument
when using the Overdrive channel.
11. HIGH: This adjusts the treble frequen-
cies. Use this control to attain a bright and
lively sound for your instrument when using
the Overdrive channel.
12. LEVEL: Use this control to adjust the
output level of the Overdrive channel.
13. OVERDRIVE/CLEAN: Use this switch
to select the Clean channel or the Overdrive
and High Gain channels. With the switch in
the out position, the Clean channel is select-
ed. When the switch is pushed in, either the
High Gain or Overdrive channel is selected,
depending on the setting of the High Gain/
Overdrive switch [6].
14. CLEAN LED: This LED illuminates when
the Clean channel is selected.
15. VOLUME: Use this control to adjust the
output level of the Clean channel.
16. LOW: This adjusts the bass frequen-
cies. Use this control to get the best sound-
ing bass response for your instrument when
using the Clean channel.
17. MID: This adjusts the midrange frequen-
cies. Use this control to get the best projec-
tion and midrange tones for your instrument
when using the Clean channel.
18. HIGH: This adjusts the treble frequen-
cies. Use this control to attain a bright and
lively sound for your instrument when using
the Clean channel.
19-21. EFFECTS: Use these controls to apply
and adjust the DSP effects. Complete informa-
tion on these effects is provided on page 7.
22. CD INPUT: Use this 1/8" stereo mini
jack to connect the output from a CD player,
MP3 player, laptop, etc., to the amplifier.
The signal at this jack is summed into a
mono signal, which is sent to the internal
power amp circuit. Use the output level con-
trol for the signal source to adjust the signal
for the proper mix with your guitar.
23. POWER: Use this switch to turn the
amplifier on (top of the switch depressed)
and off (bottom of the switch depressed).
The switch illuminates when the amplifier is
turned on.
The Front Panel
5
0 10 0 10 0 10 0 10 0 10 0 10 0 10 0 10
010
010 010010
SLAP LONG
MEDIUM
DELAYMODREVERBHIGHHIGH MIDMID LOWLOW VOLUMELEVELLEVELSHAPEGAININPUT
POWER
GAIN
CHORUS PHASER
FLANGER
EFFECTS
CLEANHIGH GAIN OVERDRIVE
OVERDRIVE
CLEAN
HIGH GAIN
OVERDRIVE
CD
INPUT
1 2 3 1514 16 17 18 19 20 21 2322125 6 7 8 9 1311104