Congratulations on purchasing the Gemini EX-26 mixer!
This state of the art mixer is backed by a three-year
warranty, excluding crossfader and channel slides. We
know you’re anxious to hook everything up and start mixing
beats and cranking up the volume on those hot dance
tracks, but we suggest reading this instruction manual first
as there are really cool features on this mixer that we
wouldn’t want you to miss!
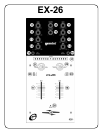
The EX-26 Mixer features a crossfader which controls a
super-quiet photo coupler to give you smooth operation and
the cleanest possible sound, along with a "hamster" switch
that is easily accessible on the front of the mixer. This
“hamster” switch reverses the direction of the main
crossfader. This mixer also features individual “hamster”
switches for the separate channel input faders as well.
For additional information, refer to the diagrams on pages 1
& 2 for crossfader adjustment and channel slide curve.
Connect
ions Connections Connections
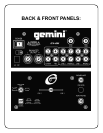
• 2 Stereo Channels
• State of the Art Cue Section
• 2 Phono & 2 Line Inputs
• Channel Slide Curve Control
• Crossfader with Curve Control
• Adjustable Input Assign Switches
• Crossfader Reverse (Hamster) Button
• Individual Channel Fader Reverse (Hamster) Buttons
• LED Display
• Gain, High, Mid and Low tone controls for each channel
• Balanced and Unbalanced Master Outputs
• Record outputs
1. All operating instructions should be read before using
this equipment.
2. Treat this unit as you would any other piece of electrical
equipment and use good common sense!
3. To reduce the risk of electrical shock, do not open the
unit. There are NO USER REPLACEABLE PARTS INSIDE.
Please refer servicing to a qualified service technician.
INTR
D
TI
N
FEAT
RE
4. Do not expose this unit to direct sunlight or to a heat
source such as a radiator or stove.
5. This unit should be cleaned only with a damp cloth.
Avoid solvents or other cleaning detergents.
6. When moving this equipment, it should be placed in its
original carton and packaging. This will reduce the risk of
damage during transit.
7. Do not expose this unit to rain or m oisture.
8. Do not use any spray cleaner or lubricant on any controls
or switches.
Okay, let’s hook everything up!
1. Make sure that the
POWER
(1)
switch is in the “OFF”
position. This unit comes supplied with a 15 volt AC
adaptor. Plug the adaptor into the rear panel power jack.
Then plug the adaptor into your power strip or outlet.
2. The EX-26 mixer is supplied with 3 sets of output jacks.
The
BALANCED MASTER OUTPUT
(2)
jacks are used to
connect to your main amplifier using standard cables with
1/4” connectors. We recommend using the balanced amp
outputs if the cables to your amp are 25 feet or more.
BALANCED MASTER OUTPUTS
have three separate
conductors, two of which are signal (positive and negative)
and one shield (ground). The balanced line uses a tip-ring-
sleeve connection. Tip = hot or positive (+), ring = cold or
negative (-), and sleeve = shield/ground.
The
MASTER OUTPUT
(3)
jacks are unbalanced and are
also used to connect to your main am plifier. The
REC
OUTPUT
(4)
jacks can be used to connect the mixer to the
record input of your recorder enabling you to record your
mix.
A
TI
N
In the U.S.A., if you have any problems with this
unit, call 1-732-969-9000 for customer service.
Do not return equipment to your dealer.
NNE
TI
N
Pa
e 4
1-732-738-9003