


SPLIT/MIX switch is in CUE mode you will only be able to monitor your CUE,
when the rotary C
UE/MIX/PGM control is in CUE. When the CUE SPLIT/MIX
switch is in split, you will notice the left side of your headphones will play
your C
UE signal & the right side will play PGM, thus enabling you to mon-
itor both outputs separately. This feature will only work properly if the
C
UE/MIX/PGM rotary control is placed at noon or middle position. If the
C
UE/MIX/PGM rotary control is set to CUE you will only here the CUE signal
playing on the left side of your headphones. If the C
UE/MIX/PGM rotary
control is set to PGM, the PGM will be the only signal heard from the right
side of your headphones.
7. C
ROSS FADER: The CROSS FADER (22) allows you to mix
from one source to another. The C
ROSS FADER (22) in your
unit is removable & if the need arises can be easily replaced. Your G
EMINI
mixer comes with an RG-45 (RAIL GLIDE™) dual-rail cross fader. RAIL
GLIDE™ cross faders have internal dual stainless steel rails that allow the
slider to ride smoothly & accurately from end to end. Also available is our
RG-45 P
RO (PRO GLIDE™) dual-rail cross fader. This unique cross fader fea-
tures, a special curve designed for scratch mixing. Just purchase one from
your G
EMINI dealer & follow the instructions:
8. C
ROSS FADER SECTION (20):
- R
EVERSE: The REVERSE switch allows you to reverse the CROSS
FADER (22). When REVERSE is activated, the right side CH 2 (24) or
CH 3 (25) is controlled by the left side of the C
ROSS FADER
(22) & the left
side CH 1 (23) or CH 2 (24) is controlled by the right side of the C
ROSS
FADER (22). When REVERSE is inactive, the CROSS FADER (22) functions are
returned to normal.
NOTE: WHEN THE REVERSE SWITCH IS ACTIVATED, ONLY THE CROSS FADER (22)
REVERSES
. THE CHANNEL FADERS (23, 24, 25), KILL SWITCHES (28), GAIN & TONAL
CONTROLS
(29, 30, 31) DO NOT REVERSE.
- X F
ADER SLOPE: The X FADER SLOPE switch allows you to adjust
the kind of curve the C
ROSS FADER (22) has. Flip the X FADER SLOPE
switch up to make the slope steep & cutting (perfect for scratch-
ing). Flip the X F
ADER SLOPE switch to make the slope gradual & gentle.
- A
SSIGN: The ASSIGN switch is used to place CH(s) on either side of
the C
ROSS FADER (22). When the ASSIGN switch is in the top position,
CH 1 & CH 3 are assigned to the C
ROSS FADER (22). When the REVERSE
switch is not activated, CH 1 will be on the left & CH 3 will be on the right.
When the A
SSIGN switch is in the bottom position, CH 2 & CH 3 are
assigned to the C
ROSS FADER (22). When the REVERSE switch is not activat-
ed, CH 2 will be on the left & CH 3 will be on the right.
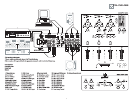
9. OUTPUT SELECTION CONTROL: Once you are comfortable
with the sound level of your music you may adjust the volume with the
M
ASTER VOLUME FADER (26) control. You may adjust the volume of the
zone output with the Z
ONE ROTARY CONTROL (37). You may also pan the
audio output from left to right with the B
ALANCE ROTARY CONTROL (38).
10. M
IC SECTION (19): Plug your main MIC into the 1/4" MIC
JACK located on the front panel. Connecting a microphone
to the 1/4" M
IC JACK allows voice amplification through the
mixer to the stereo receiver through the O
UTPUTS (5, 6, 7, 8, 9, 11).
This M
IC is controlled by the MIC VOLUME, HIGH, & LOW rotary con-
trols. To activate the M
IC SECTION (19), raise the level of the MIC VOLUME.
The rotary knob will click & a green LED will light up to indicate that the
M
IC is in use. To turn off the MIC SECTION (19), lower the MIC VOLUME rotary
knob until it clicks & the LED turns off.
11. VU M
ETER: The PS-02 USB has a DUAL MODE VU
M
ETER (35) that allows you to monitor the decibel levels
of C
UE & PGM or left & right stereo levels of the master out-
put. With the VU M
ODE SWITCH (36) you may monitor the out-
put level of the C
UE & PGM when the switch is UP. When this
mode is engaged the C
UE will be located on the left of the
D
UAL MODE VU METER (35), while the PGM will be located on
the right. Or you can monitor the left & right stereo decibel levels of the
PGM output when the switch is D
OWN.
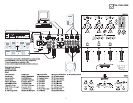
USB OPERATION:
The PS-02 USB is compatible with any audio software program & media
player. You can utilize the USB P
ORTS (9, 11) to play files stored on your
computer through the mixer with the same control features as you would
playing through a CD player or turntable. Or you can record a live session
onto almost any audio software program to burn on a CD at a later time.
Each port can record & play at the same time.
S
YSTEM REQUIREMENTS:
- PC Windows 98 SE, ME, 2000, XP, or XP Professional with at least one
USB port
- Mac OS 9.1 or X with at least one USB port
- USB 1.0 or greater
NOTE:
PLEASE CHECK THAT THE MIXER CHASSIS & COMPUTER CHASSIS ARE CON-
NECTED TOGETHER IN THE GROUNDING SYSTEM.
F
OR MAC:
1. Turn on your computer & PS-02 USB mixer.
2. Connect the USB P
ORTS (9, 11) on your mixer to the USB ports on your
computer via USB cable.
3. Select the APPLE icon.
4. Select S
YSTEM PREFERENCES.
5. Select the SOUND icon.
6. Select O
UTPUT box to monitor the computer through the mixer or INPUT
box to record onto the computer through the mixer.
7. Select USB CODEC or USB AUDIO DEVICE.
8. You can begin playing audio from iTunes, Quicktime, or any other media
player available on your system.
To eliminate your computer’s sound effects from running through the
mixer transfer the computer's signal to the internal speakers:
1. Select the A
PPLE icon.
2. Select SYSTEM PREFERENCES.
3. Select S
OUND icon.
4. Select S
OUND EFFECTS.
5. Select P
LAY ALERTS & SOUND EFFECTS THROUGH scroll down menu.
6. Select I
NTERNAL SPEAKERS.
7. Keep SOUND open to access this area often.
F
OR PC:
1. Turn on your computer & PS-02 USB mixer.
2. Connect the USB P
ORTS (9, 11) on your mixer to the USB ports on your
computer via USB cable. Windows will recognize & automatically install
the necessary drivers & you can begin playing audio from any other media.
If sound is not playing through the mixer:
1. Select START menu.
2. Select C
ONTROL PANELS.
3. Select S
OUNDS & AUDIO DEVICES.
4. Select A
UDIO tab.
5. Select S
OUND PLAYBACK for computer sounds through the mixer &
choose USB A
UDIO CODEC or USB AUDIO CODEC [2] if more than one device
is connected.
6. Select S
OUND RECORDING for external sounds recorded through the mixer
into the computer & choose USB A
UDIO CODEC or USB AUDIO CODEC [2] if
more than one device is connected.
7. Be sure the USE ONLY DEFAULT DEVICES is not checked.
8. A
PPLY the settings.
9. Keep the CONTROL PANEL open to access this area often.
To eliminate your computer’s sound effects from running through the
mixer transfer the computer's signal to the internal speakers:
1. In the C
ONTROL PANELS select SOUNDS & AUDIO DEVICES.
2. Select S
OUNDS tab.
3. In the scroll down menu for SOUND SCHEME select NO SOUND.
4. A
PPLY the settings.
5. Select OK.
You can begin playing audio from any other media player available on
your system.
NOTE:
WHEN USING ADUIO SOFTWARE YOU MUST ADJUST THE PREFERENCES OF THE
SOFTWARE PROGRAM
.
NOTE:
WHEN ADDING THE PS-02USB TO YOUR SOUND DEVICE THE COMPUTER’S
DEFAULT HAS THE VOLUME LEVELS SET AT HALF
. ENTER YOUR AUDIO SETTINGS &
ADJUST THE VOLUME ACCORDING TO YOUR NEEDS.
USB ASSIGN:
The USB PORTS (9, 11) have USB ASSIGN SWITCHES (10, 12)
located below each port so playback signals from the computer
coming in through the mixer can be assigned to a channel. After making
your connections, you must adjust the USB A
SSIGN SWITCHES (10, 12) for
the channel you will be using. USB 1 (9) can be controlled by CH 1 or CH
3. USB 2 (11) can be controlled by CH 2 or CH 3.
1. USB 1 (9) can be assigned to CH 1, CH 3, or turned O
FF
.
During playback, the signal from the computer will be sent into the CH 1
F
ADER (23), GAIN & EQ CONTROLS (29) & CUE SECTION (21, 27) when CH 1
is assigned to USB 1 (9).
During playback, the signal from the computer will be sent into the CH 3
F
ADER (25), GAIN & EQ CONTROLS (31) & CUE SECTION (21, 27) when CH 3
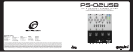
ps-02usb
5
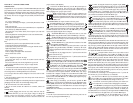
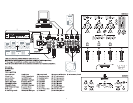
USER REPLACEABLE CROSS FADER
1. UNSCREW THE OUTSIDE MIXER FACE
PLATE SCREWS
& REMOVE THE FACE
PLATE
. THEN REMOVE FADER PLATE
SCREWS
(B & NOT C).
2.
CAREFULLY LIFT THE FADER & UNPLUG
THE CABLE
(D).
3.
PLUG THE NEW FADER INTO THE CABLE
& PLACE IT BACK IN THE MIXER.
4.
SCREW FADER PLATE TO THE MIXER &
REPLACE THE MIXER FACE PLATE.