


(6)
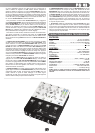
5. DRY/WET FADER: To control this section you must adjust the
DRY/WET FADER (59) in order to increase the depth of the FILTER
effect. Glide the DRY/WET FADER (59) to the RIGHT to increase the
FILTER effect, drowning out the program mix with a WET effect. Glide
the DRY/WET FADER (59) to the LEFT or DRY area to decrease the
FILTER effect, thus disabling all FILTER effects.
6. RESONANCE FADER: Use the RESONANCE FADER (65) to chan-
nel the PGM through variable cut-off frequency responses. Glide the
RESONANCE FADER (65) to the LEFT to increase the cut-off frequen-
cy response. You will notice the activated FILTER PASS (62) frequen-
cies in your program mix will become the focal point in your audio mix
and all other frequencies will sound muffled. While gliding the
RESONANCE FADER (65) to the RIGHT from the LEFT, you will notice
the FILTER frequency(ies) will begin to blend with the other
frequency(ies). Notice how the cut off response goes through the steps,
from very sharp cut off on the LEFT to very dull on the RIGHT.
7. Q FACTOR: Use the Q FACTOR (60) rotary control to adjust the
FILTER effect's frequency volume. Rotate the Q FACTOR (60) rotary
control clockwise to increase the effect's frequency volume, giving the
effect a very sharp, audible cut-off response. Rotate the Q FACTOR (60)
rotary control counter-clockwise to decrease the effect's frequency vol-
ume, giving the effect a dull, less audible cut-off response.
INPUTS:
Phono..................................................................................3 mV, 47 KOhm
Line..................................................................................150 mV, 27 KOhm
MIC 1…………………........................................1.5 mV, 1 K Ohm Balanced
MIC 1 Bass........................................................................................± 12dB
MIC 1 High.........................................................................................± 12dB
OUTPUTS:
Amp/Zone........................................................................0 dB 1V, 400 Ohm
Max..................................................................................20V Peak-to-Peak
Rec....................................................................................225 mV, 5 KOhm
Balanced Master………………………......................................2V, 400 Ohm
GENERAL:
Frequency Response................................................20Hz - 20KHz +/- 2 dB
Distortion.........................................................................................< 0.02%
S/N Ratio..........................................................................Better Than 80 dB
Headphone Impedance....................................................................16 Ohm
Power Source........................................................115/230V, 60/50Hz, 20W
Unit Dimensions.................................................................10" x 3.3" x 11.9"
………………………………….......................................(254 x 84 x 303 mm)
Weight...............................................................................7.6 lbs (3.45 kg)
SPECIFICATIONS SUBJECT TO CHANGE WITHOUT NOTIFICATION FOR IMPROVEMENT.
SPECIFICATIONS:
The FILTER RECALL (61) buttons have an overwrite feature that is
used in the event that the filter setting stored in the memory can be
changed. In order to overwrite the FILTER RECALL (61) button, which
has a filter setting already stored in the memory, repeat the instructions
for storing memory in the FILTER RECALL (61) buttons.
After the filter settings are saved in the filter memory, press a FILTER
RECALL (61) button. The saved filter settings will be engaged and the
FILTER RECALL (61) button will flash indicating that this button is in
use. Press the button again and it will stop flashing indicating that the
button is not in use. The LED will remain lit indicating that the setting is
still stored in the filter memory. The FILTER RECALL (61) will be disen-
gaged when changing the settings during FILTER RECALL (61). When
the FILTER RECALL (61) button is in use, adjusting the filter setting
after a setting has been stored into the memory will cancel the FILTER
RECALL (61). You will notice the PGM output will change according to
the filter setting. The FILTER RECALL LED(s) will remain lit.
To preview the FILTER RECALL (61), engage the CUE FILTER mode,
as instructed in the CUE FILTER/TEMPO ON section of the manual.
Engage the FILTER RECALL (61) to be previewed. If you are satisfied
with your setting, leave the FILTER RECALL (61) button alone. If you
are not satisfied and would like to change this setting, you may overwrite
the memory by setting the FILTER and pressing and holding the FILTER
RECALL button to be overwritten for 2 seconds.
To erase a filter memory bank, press and hold the FILTER RECALL
(61) button in use for 5 seconds. The filter memory will be cleared and
the FILTER RECALL LED will no longer be on. You may also clear the
filter memory by turning the PS-03 mixer off, then turning it back on. The
FILTER RECALL LED will no longer be lit to indicate that the memory
has been cleared.
4. CUE FILTER/TEMPO ON BUTTON: You can plan your filters by plac-
ing your filter in preview mode by engaging the CUE FILTER mode. To
do this you must press & hold the CUE FILTER/TEMPO ON (63) button
for 5 seconds. The EFX ASSIGN LED will blink when the CUE FILTER
mode is engaged. Then use the EFX ASSIGN SWITCH (66) to assign
the filter to the CH in CUE. Use your headphones to monitor the
progress of the CUE FILTER mode. You may control the volume of the
CUE FILTER mode with the respective CH
slide controls being moni-
tored. Press and hold the CUE FILTER/TEMPO ON (63) button for 5
seconds to disengage the CUE FILTER mode. The EFX ASSIGN LED
will stop blinking to indicate that the CUE FILTER mode has been dis-
engaged.
Engage the TEMPO ON mode to control the recycling speed of the
FILTER's effect by pressing the CUE FILTER/TEMPO ON button (63).
When in use the CUE FILTER/TEMPO ON LED (63) will blink at the
recycling speed you have set into the mixer via the TEMPO (64) rotary
control. Use the TEMPO (64) rotary control to adjust the recycling speed
of the FILTER's effect. Rotate the TEMPO (64) rotary control clockwise
to increase the recycling speed of the FILTER's effect. Rotate the
TEMPO (64) rotary control counter clockwise to decrease the recycling
speed of the FILTER's effect.