


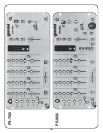

(5)
8. OUTPUT CONTROL: The level of the AMP OUT (48, 49) is controlled by
the MASTER (31) slide and BALANCE (30) control. Activating the MONO
(29) button (the mono LED will light) makes the overall output mono. The
BOOTH (28) control adjusts the level of the BOOTH OUTPUT (50).
9. MIC/TALKOVER: The purpose of the talkover is to allow the program
playing to be muted so that the mic may be heard above the music. The
MIC/TALKOVER SWITCH (7) controls MIC 1 and MIC 2 and has 3 settings.
When MIC/TALKOVER (7) is in the BOTTOM position, MIC and
TALKOVER are OFF. When MIC/TALKOVER (7) is in the CENTER
position, MIC is ON. MIC INDICATOR (6) glows, TALKOVER is OFF.
When the MIC/TALKOVER SWITCH (7) is in the TOP position, MIC and
TALKOVER are ON and the volume of all sources except
the MIC input is
lowered by 16 dB. MIC 1 LEVEL (5) controls the level of MIC 1. MIC 2
LEVEL (4) controls the level of MIC 2. The TREBLE (2) and BASS (3)
controls allow you to adjust the tone of MIC 1 and MIC 2.
10.CUE: By connecting a set of headphones to the HEADPHONE (45) jack,
you can monitor any or all of the channels. Press the CUE/CUE-SAMPLE
ASSIGN (24) buttons for channels 1-4 to select the channel or channels to
be monitored and their respective LED indicators will glow. Use CUE
LEVEL (43) control to adjust cue volume without affecting the overall mix.
By moving the CUE PGM PAN (38) control to the left you will be able to
monitor the assigned cue signal. Moving the control to the right will
monitor the PGM (program) output. Use the CUE SPLIT (44) button to
split the signals from cue and program so that cue will be heard in one
earphone and program in the other.
PS-900i Only:
Press the CUE/SAMPLE ASSIGN (8) button to monitor MIC 1 and MIC 2.
CUE/CUE-SAMPLE ASSIGN (8, 24) buttons are also used to assign
samples (see Sampler Operation for more details). Press the SAMPLE
CUE (35) to monitor samples.
11.DISPLAY: The peak hold, dual function DISPLAY (25) indicates either the
MASTER (48, 49) output left and right levels or the selected cue and
program (premaster output) levels. You can choose the option you want
by pressing the DISPLAY (26) button.
NOTE: WHEN THE DISPLAY IS IN THE CUE/PROGRAM MODE YOU CAN INCREASE OR DECREASE
THE SIGNAL TO MATCH THE OTHER CHANNEL’S SIGNAL SIMPLY BY ADJUSTING GAIN (9).
SAMPLER OPERATION (PS-900i ONLY):
GENERAL INFORMATION: The PS-900i sampler uses dynamic RAM
memory and a microprocessor controller. The full bandwidth results in
true sound reproduction.
MEMORY INFORMATION:
The PS-900i comes equipped with 5 MEMORY
BANKS (27). The two banks marked 2 & 2 are two seconds in length, the
two banks marked 4 & 4 are four seconds in length, and the bank marked
12 is twelve seconds in length. These banks are separate and can NOT
be linked. You may store a different sample in each bank, they must,
however, be recorded individually and they must be played one at a time.
SAMPLE RECORDING:
1. Put the MODE SELECTOR (34) switch into the WRITE position.
2. Select the source from which you wish to sample from by pressing the
appropriate CUE-SAMPLE ASSIGN (24, 8) button.
3. Select the memory bank to which you wish to record by pressing the
proper MEMORY BANK (27) button.
4. The PS-900i comes equipped with a sampler PITCH (33) control. To get
a “perfect” sample, set the control to its center position and record the
sample. Raising or lowering the control during playback will raise or lower
the pitch of the sample. The center position will remain as normal pitch.
5. Tapping the START/STOP (39) button begins the sampling process (the
SAMPLER INDICATOR (37) will illuminate RED). Tapping the START/
STOP button a second time ends the sample (the SAMPLER INDICATOR
will turn off). If you do not tap the START/STOP button a second time, the
sampling process will stop automatically after 2, 4 or 12 seconds
depending on which MEMORY BANK (27) was selected.
HINT: YOU CAN RECORD A SAMPLE WITH THE PITCH (33) CONTROL IN ANY POSITION.
WHATEVER THAT POSITION IS WILL BECOME THE “NORMAL” SOUND. IF YOU START TO
RECORD A SAMPLE WITH THE PITCH CONTROL SET AT MINIMUM (THIS NOW BECOMES
YOUR NORMAL PITCH), BY INCREASING THE PITCH TO MAXIMUM, THE PITCH EFFECT
WILL DOUBLE IN SPEED. RECORDING AT MAXIMUM AND LOWERING TO MINIMUM WILL
DO EXACTLY THE OPPOSITE.
SAMPLE PLAYBACK:
1. Put the MODE SELECTOR (34) switch into the SINGLE or REPEAT position.
2. Select the memory bank you wish to play by pressing the proper MEMORY
BANK (27) button.
3. Tapping the START/STOP (39) button with the MODE SELECTOR (34)
switch in the SINGLE position will cause the sampler to playback one time
(the SAMPLER INDICATOR (37) will illuminate GREEN). Every push of
the START/STOP (39) button will restart the sample from the beginning.
Rapid pressing of the START/STOP (39) button will cause a stuttering
effect. Once the sample has started playback and the START/STOP (39)
button is not pushed a second time, the sample will play to the end and
then stop (the SAMPLER INDICATOR (37) will turn off).
4. Tapping the START/STOP (39) button with the MODE SELECTOR (34)
switch in the REPEAT position will cause the sample to continuously play
over and over (the SAMPLER INDICATOR (37) will illuminate GREEN).
The START/STOP (39) button will act as an ON/OFF switch. The first
push will start the sample, the second push will stop it. The SAMPLER
LEVEL (32) controls the level of the sample.
ROBO PLAY:
1. With the ROBO PLAY (36) button in the OFF position (the ROBO PLAY
INDICATOR will be OFF) and the MODE SELECTOR (34) switch in either
the SINGLE or REPEAT mode, pressing the START/STOP (39) button will
cause the sample to play along with the selected source.
2. When the ROBO PLAY (36) button is in the ON position (the ROBO PLAY
INDICATOR illuminates RED), starting the sampler mutes the selected
source. When the sample ends, the source automatically turns back on.
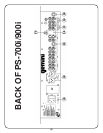
BATTERY BACKUP:
BATTERY BACKUP: The PS-900i is equipped with battery backup to
retain samples. To activate this feature, a 9 volt battery (not included)
should be connected to the BATTERY HOLDER (47) located on the rear
panel. This enables the storage of samples in memory. When the unit is
unplugged, the battery backup retains the samples for future use.
NOTE: IF THE UNIT IS UNPLUGGED WITH NO BATTERY ATTACHED, ALL SAMPLES WILL BE LOST.
LOW BATTERY INDICATOR: A low battery indicator is included with the
PS-900i. When changing the battery, make sure the unit is plugged in and
the power is ON. Failure to adhere to this will result in lost memory and
“vanished” samples. The low battery indicator is ON when the selected
memory bank LED blinks. The LED blinks a warning if no battery is
connected to the unit.
SPECIFICATIONS:
INPUTS:
Phono @ 1kHz................................................................................2mV,47 KW
Line............................................................................................100 mV, 10 KW
MIC 1 & MIC 2...............................................................1.5mV, 2 KW Balanced
Bass........................................................................................................± 12dB
High.........................................................................................................± 12dB
MIC 3.......................................................................1.5mV, 2 K Ohm Balanced
Controls..............................................................................................Channel 4
OUTPUTS:
Main/Aux......................................................................................0dB 1V, 400W
Max........................................................................................20V Peak-to-Peak
Rec...............................................................................................225mV, 5 KW
GENERAL:
Bass (Chnls 1-4)........................................................................+ 12dB/- 32 dB
Mid (Chnls 1-4)...........................................................................+ 12dB/- 32 dB
Treble (Chnls 1-4)......................................................................+ 12dB/- 32 dB
Gain (Chnls 1-4)...............................................................................0 to -20 dB
Frequency Response.....................................................20Hz - 20KHz +/- 2 dB
Distortion...................................................................................less than 0.02%
S/N Ratio.................................................................................better than 80 dB
Talkover Attenuation.................................................................................16 dB
Power Source...........................................................115/230V, 50/60Hz, 20W
Dimensions.............................................................................19”W x 4”H x 9”D
Weight..................................................................................................10.17 lbs