


4 Setting Up
Reflections off metal parts, walls, ceilings, etc. or the shadow effects of musicians and other
people may weaken or cancel the direct transmitter signal.
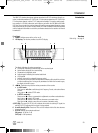
For best results, place the receiver or remote antennas as follows:
• Place the receiver/antennas near the performance area (stage). Make sure, though, that
the transmitter will never get any closer to the receiver than 10 ft (3 m).
• Check that you can see the receiver from where you will be using the transmitter.
• Place the receiver at least 5 ft. (1.5 m) away from any big metal objects, walls, scaf-
folding, ceilings, etc.
• You can either use the receiver freestanding or mount it in a 19" rack using the supplied
Rack Mount Kit.
• If you install one or ore receivers into a 19" rack, either mount the supplied antennas on
the receiver front panel(s) or use remote antennas. This is the only way to ensure opti-
mum reception quality.
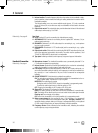
You can use both the XLR and ¼” jack outputs to connect the receiver to your mixer or amp.
Use the receiver’s AUDIO Menu to adjust the output level as required.
• Connect the audio output to the desired input:
- XLR output -> XLR Cable -> XLR input
- 1/4” output -> unbalanced cable -> ¼" input
Attenuation Switch
• The attenuation switch lets you match the receiver’s BALANCED output level to the input
gain of the connected equipment.
• If you use a MIC input on your mixer, set the attenuation switch to -30 dB. This reduces
the output level by 30 dB and prevents the input from being overloaded.
• The UNBALANCED line output level is not adjustable.
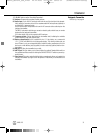
1. CAUTION: Check that the AC mains voltage stated on the included power supply
is identical to the AC mains voltage available where you will use your system.
Using the power supply with a different AC voltage may cause damage to the
unit.
2. Plug the feeder cable (1) on the included power supply into the DC IN socket (2) on the
receiver rear panel and screw down the DC connector (3).
3. Plug the power supply into a convenient power outlet.
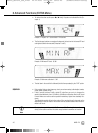
The receiver is electronically locked so that you cannot make any unintended adjustments.
The "LOCK" label is shown on the display.
• To enter SETUP mode, press and hold the key until the "LOCK" label disappears.
Positioning the Receiver
Connecting the Receiver
to a Mixer/Amplifier
Connecting the Receiver
to Power
Refer to fig. 9 on page iii.
LOCK Mode
33
WMS 470
WMS470_F031016_Hex_final 22.12.2010 14:19 Uhr Seite 33 (Schwarz/Black Auszug)