


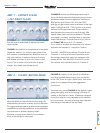


AMP 3 – MODERN GAIN
'Truth in distortion' is a major consideration when
buying an amp. An absolute prerequisite for any
top amp is that it preserves the guitar's own
characteristic sound - rather than making all
guitars sound more or less alike - and the tone
must remain well defined no matter how high you
set the gain. Only a handful of amps make the
grade, and AMP 3 is certainly a leading member
of this elite club.
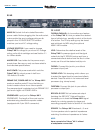
CHANNEL A is based on the Hughes & Kettner
®
Duotone’s Overdrive channel. Brutally honest
and direct, its hair-trigger response reacts instantly
to even subtle changes in your picking attack
and the slightest twist of your guitar’s volume
knob. Though this lead channel was built for the
veteran axe slinger who believes great tone is
well worth fighting for, it’s also the bee’s knees
for pounding out big & beefy power chords.
110% rock ‘n’ roll indeed!
CHANNEL B pumps out high-gain American-style
sound of the more merciless variety. New Metal
merchants and Drop-D acolytes will swoon at
the sound of this channel’s hot, huge and
downright nasty distortion, while well-rounded
players will appreciate the extra hues in their lead
tone palette.
TRIAMP MK II - MANUAL
6
6
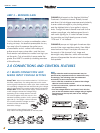
2.0 CONNECTIONS AND CONTROL FEATURES
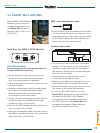
2.1 MAINS CONNECTION AND
MAINS INPUT VOLTAGE SETTING
TriAmp
®
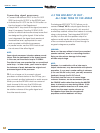
MK II ships in two versions rated for 110/120V and
220-240V, respectively. The rating stamped on the mains
socket (figure) indicates the version type. Both models offer
two operating voltages that are selected using the voltage
selector integrated in the mains socket. Before connecting
TriAmp
®
MK II to the mains power supply, ensure that the
mains voltage matches the voltage rating
appearing in the voltage selector window.
This value is legible when the amp is in the
standard operating position, that is, placed
right side up. The upright number indicates
the currently selected voltage, and the
inverted number indicates the
alternative voltage.
Check also the fuse ratings to ensure
they match the ratings indicated on the rear panel.
NOTE:
Voltage selection and fuse replacement may be
performed by experienced service technicians only.
Accordingly, the following notes are addressed
exclusively to service technicians!
• Use a small flat screwdriver to remove the voltage
selector from the mains socket.
• If the fuse is defective, replace it with a fuse bearing
the specified rating.
• Turn the voltage selector and insert it back into the
port so that the desired mains voltage rating is legible
and appears at the top left (next to the "Voltage
Setting" arrow).