


10
TUBE 50/100 - MANUAL
3.0 OPERATION
3.1 SELECTING SOUNDS
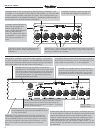
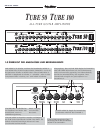
The four basic sounds of the TUBE 50 / TUBE 100 can be activa-
ted via the FRONT PANEL SELECTOR buttons, the included STA-
GEBOARD, or via the MSM-1 MIDI Module.
Please keep in mind that the AMP MODE selector button switches
modes in both channels. If for example CHANNEL 1/MODE A is
currently active and you want to switch to CHANNEL 2/MODE B,
then you must switch twice (i.e. AMP MODE and CHANNEL SEL-
ECT). To simplify this procedure, the switches on the STAGEBO-
ARD are located next to each other so you can step on both swit-
ches simultaneously.
The STAGEBOARD switching functions are as follows:
SWITCH 1: AMP MODE
SWITCH 2: CHANNEL SELECT
SWITCH 3: FX/REVERB ON/OFF
NOTE: Ensure the CHANNEL SELECT and AMP MODE buttons on
the front panel are set to OFF (not pushed in) when operating the
TUBE in the STAGEBOARD footswitch or MIDI switching modes.
If you want to operate the TUBE via the front panel switches
only, ensure the STAGEBOARD is unplugged or switched off. For
information on pre-selecting and activating REVERB and the FX
LOOP, please refer to the table in Section 3.3.
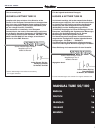
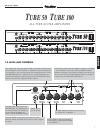
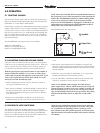
STAGEBOARD JACK pin assignments:
1
3
5
24
black/schwarz
red/rot
white/weiß
yellow/gelb
Stageboard
Amp Mode
Channel Select
FX loop/Reverb
on/off
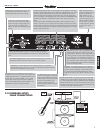
3.2 ADJUSTING GAIN AND VOLUME LEVELS
Generally, with conventional amps you have one of two goals in
mind when you are adjusting gain and volume levels - either you
want to achieve the same volume level for all basic sounds, or
you want the best possible quality for each individual sound.
With the special power amp control features of your Hughes &
Kettner TUBE Series amplifier, it is very easy to achieve great
results when you pursue both objectives at the same time. If you
want to dial in great tone for all four basic sounds, we recom-
mend you start with the following steps:
• Make all adjustments with the volume and tone controls on
your guitar turned all the way up.
• Start with the CHANNEL 1 VOLUME MODE A control. Dial in
the desired volume level and amount of distortion. Keep in
mind that the POWER control plays a special role in defining
tone and volume.
• Switch over to CHANNEL 1 MODE B. Use the GAIN and
MASTER controls to dial in the kind of sound and level you
want.
• Switch back and forth between the MODES to compare and
adjust EQ controls until you have achieved your desired sounds.
Then use MODE B MASTER to determine the final volume level
for both MODES.
• Follow the same procedure for CHANNEL 2, i.e. compare the
MODES and adjust the GAIN and EQ controls.
• Use the CHANNEL 2 MASTER to determine the volume of the
channel in comparison to the volume of CHANNEL 1.
NOTE: At low POWER control settings, the TUBE 50/100's
power output level is reduced, which means the power amp will
generate harmonic overdrive even at low volumes, provided you
turn the preamp levels up. If you do not want the power amp to
clip, turn the POWER control all the way up and use the preamp
VOLUME and MASTER controls to adjust the overall volume
level.
3.3 REVERB/FX LOOP SWITCHING
The TUBE 50 / TUBE 100 is designed to let you comfortably
activate the reverb circuit and any signal processors patched into
the FX loop via the buttons on the front panel, STAGEBOARD
(Switch 3) or MIDI. Switching can be executed for both features
simultaneously or separately for each feature.
NOTE: You can switch these functions remotely only when the
respective buttons on the front panel are set to the "OFF" positi-
on - provided the corresponding control is turned up. If you
leave a button in the "ON" position (pressed) on the front panel,
then this function will remain functional and cannot be switched
off remotely.