


tion with the Lead Master to adjust the amount of distortion and volume for
the channel. For cleaner sounds, this control would be set to lower settings
and the Master set higher...for slight breakup, the controls would be set in
their middle ranges...for heavier distortion, set the Lead Volume higher and
the Master lower. Pulling the Pull Bright will increase the high frequencies of
the signal, while also reducing low frequencies for a chunkier, tighter attack.
This function is very useful for ne-tuning the amp’s tone and feel for different
guitars.
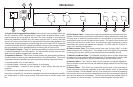
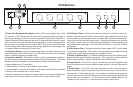
9) Lead Master—The Lead Master sets the overall volume of the Lead chan-
nel, and can be used to balance the volumes between it and the Rhythm
channel. The interactions between Volume and Master are described in detail
in the previous section entitled 8) Lead Volume/Pull Bright.
10) Bass EQ—This passive EQ adjusts the low frequency equalization of the
amplier. It interacts with the Middle and Treble as described in the 12) Treble
EQ section. For a tighter low end, use the Bass EQ set to lower settings. This
is particularly helpful when using the amp at very loud settings. This EQ works
for both Rhythm and Lead channels.
11) Middle EQ—This passive EQ adjusts the midrange equalization of the
amplier. It interacts with the Bass and Treble EQ as described in the 12)
Treble EQ section. For a heavier, more distorted sound, set the Middle lower.
For more of a vintage-style, cleaner sound, set the Middle higher. This EQ
works for both Rhythm and Lead channels.
12) Treble EQ—This passive EQ adjusts the high frequency equalization of
the amplier, but also interacts with the Bass and Middle controls as follows:
As the Treble is increased, the Bass automatically decreases and the Middle
slides down in frequency. Conversely, if the Treble is decreased, the Bass
automatically increases and the Middle slides up in frequency. This interac-
tion is typical of vintage-style passive EQ, and is responsible for the increased
effectivity of such a simple system.
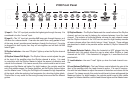
13) Reverb Intensity—The Reverb Intensity controls the amount of rever-
beration effect in the amplier. This effect is created by an authentic spring
reverb pan, and sounds essentially like playing the amp in a large room. The
Reverb can be defeated with the footswitch, or by turning the Intensity control
fully counter-clockwise.
14) Reverb Tone—A traditional Kustom feature, the Reverb Tone allows the
user to ne-tune the sound of the reverb effect. Turning this Tone fully clock-
wise yields a very bright reverb effect with emphasized “spring.” By turning
the Reverb Tone down, a warmer, less-springy sounding reverb effect results.
The warmer reverb tone allows for more reverb intensity without dominating
the sound.
15) Jeweled Pilot Light—Indicates that the amplier’s power switch is in the
On position.
16) On/Off Power—Provides AC power to the amplier when in the “On”
position—switched to the left.
17) Standby—This allows the amplier to be powered up, but with the tubes
in a non-operational mode. The Standby can be used instead of the power
switch between performance sets, since it allows the amp to “shut down”
while keeping the tubes warm and ready to go. It’s also best to power the
amp up with this switch set to the right/off position until the tubes have had a
few minutes to warm up, although modern tubes are more tolerant of this.