


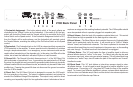


Pulling the Pull Bright will increase the high frequencies of the signal, while also
reducing low frequencies for a chunkier, tighter attack. This function is very
useful for ne-tuning the amp’s tone and feel for different guitars.
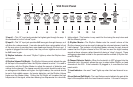
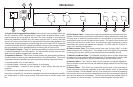
9) Lead Master—The Lead Master sets the overall volume of the Lead channel
and can be used to balance the volumes between it and the Rhythm channel.
The interactions between Volume and Master are described in detail in the pre-
vious section entitled 4) Lead Volume/Pull Bright.
10) Bass EQ—This passive EQ adjusts the low frequency equalization of the
amplier. It interacts with the Middle and Treble as described in the 12) Treble
EQ section. For a tighter low end, use the Bass EQ set to lower settings. This
is particularly helpful when using the amp at very loud settings. This EQ works
for both Rhythm and Lead channels.
11) Middle EQ—This passive EQ adjusts the midrange equalization of the am-
plier. It interacts with the Bass and Treble EQ as described in the 12) Treble EQ
section. For a heavier, more distorted sound, set the Middle lower. For more of
a vintage-style, cleaner sound, set the Middle higher. This EQ works for both
Rhythm and Lead channels.
12) Treble EQ—This passive EQ adjusts the high frequency equalization of the
amplier, but also interacts with the Bass and Middle controls as follows: As
the Treble is increased, the Bass automatically decreases and the Middle slides
down in frequency. Conversely, if the Treble is decreased, the Bass automati-
cally increases and the Middle slides up in frequency. This interaction is typical
of vintage-style passive EQ, and is responsible for the increased effectivity of
such a simple system.
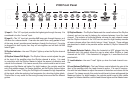
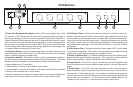
13) Reverb Intensity—The Reverb Intensity controls the amount of reverbera-
tion effect in the amplier. This effect is created by an authentic spring reverb
pan, and sounds essentially like playing the amp in a large room. The Reverb
can be defeated with the footswitch, or by turning the Intensity control fully
counter-clockwise.
14) Reverb Tone—A traditional Kustom feature, the Reverb Tone allows the
user to ne-tune the sound of the reverb effect. Turning this Tone fully clock-
wise yields a very bright reverb effect with emphasized “spring.” By turning
the Reverb Tone down, a warmer, less-springy sounding reverb effect results.
The warmer reverb tone allows for more reverb intensity without dominating
the sound.
15) Tremolo—This control sets the intensity of the Tremolo effect. Tremolo is
also called Amplitude Modulation, since it is an effect that changes the ampli-
tude of the dry signal using a low frequency oscillator, or LFO. This vintage
Kustom circuit uses the Speed control to set the speed of the oscillation, and
can be set from very slow to a very high speed.
16) Speed/Pull Active—This control sets the speed of the Vibrato and Tremolo
effects, which are synchronized. If the switch is pushed in, the Vibrato/Tremolo
circuit is not in the signal path. When the footswitch is engaged, it will override
the Pull Active switch if the Footswitch Assignment Switch is in the Out posi-
tion.
17) Vibrato—This vintage Kustom circuit creates a pitch shift, otherwise known
as Frequency Modulation, since it affects the apparent frequency of the dry sig-
nal using the LFO. It uses the Speed control to set the speed of oscillation, and
when combined with the Tremolo control, can simulate many different effects,
from simple Tremolo, to phase shifter sounds, to rotary speaker simulations.
18) Jeweled Pilot Light—Indicates that the amplier’s power switch is in the
“On” position.
19) On/Off Power—Provides AC power to the amplier when in the “On” posi-
tion—switched to the left.
20) Standby—This allows the amplier to be powered up, but with the tubes in
a non-operational mode. The Standby can be used instead of the power switch
between performance sets, since it allows the amp to “shut down” while keep-
ing the tubes warm and ready to go. It’s also best to power the amp up with
this switch set to the right/off position until the tubes have had a few minutes to
warm up, although modern tubes are more tolerant of this.