


8 Onyx 1620i
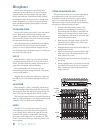
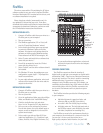
Microphones
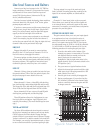
Connect your microphones to the female XLR
connectors on mono channels 1-8. The microphone
preamps feature our Onyx design, with super high
fi delity and headroom. Professional ribbon, dynamic,
and condenser mics all sound excellent through these
inputs. Microphone-level signals are passed through
these splendid microphone preamplifi ers to become
line-level signals.
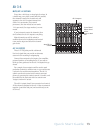
48V PHANTOM POWER
Press the 48V phantom power switch if your microphones
need it.
Most modern professional condenser mics
require 48 V phantom power, which lets the mixer send
low-current DC voltage to the mic’s electronics through
the same wires that carry audio.
Never plug single-ended (unbalanced) micro phones,
or ribbon mics into the mic input jacks if phantom
power is on. Do not plug instrument outputs into the
mic XLR input jacks with phantom power on, unless you
are certain it is safe to do so.
LOW CUT
Mono channels 1-8 each have a low-cut switch that
cuts bass frequencies below 75 Hz of the mic and line
inputs. This will reduce any thumps and bangs due to
stage noise and rumble, and mic handling.
We recommend that you use low-cut on every
microphone application except kick drum, bass guitar,
or bassy synth patches.
Using the low cut switch also allows you to add some
bass EQ to your vocals without boosting the really-low
lows.
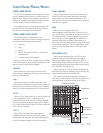
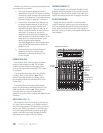
EQUALIZATION
Mono channels 1-8 have a 4-band EQ, with shelving-
low, shelving-high, and peaking-high-mid and low-mid.
The frequency of the low-mid can be adjusted from 100
Hz to 2 kHz, and the high-mid from 400 Hz to 8 kHz.
This loving attention to detail in the mid EQ section is
ideal for vocal equalization, so you might consider using
channels 1-8 for your main vocal microphones.
INSERTS
Channels 1-8 have insert jacks on the rear panel.
These allow you to send the mic and line signals out
to an external device, and back in again on the same
connector. For example, vocals benefi t from having
an external vocal compressor. Use standard 1/4" TRS
"insert" connectors, where tip=send, ring=return, and
sleeve=ground.
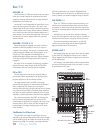
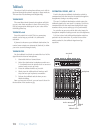
SETTING THE MICROPHONE GAIN
The gain controls allow you to set your input signals
to an optimum level: not so hot that the mixer is
overloaded, and not so low that the signal is lost in
noise. For a signal entering the XLR mic inputs, the
adjustment range is from 0 to 60 dB. Use the following
procedure for setting the gain just right:
1. Press the solo switch at the bottom of the
channel your microphone is connected to.
The fl ashing rude solo light is a reminder that
what you are listening to in the control room
and headphones, and shown on the main right
meter is the soloed channel.
2. Make sure the solo mode switch is in the PFL
(pre-fader listen) position (out). This is just
below the rude solo light.
3. Sing/talk/shout/scream into the microphone at
typical loudness levels.
4. Adjust the channel gain control until the right
main meter level is hovering around the 0 dB
mark (labeled "level set").
5. Now that the gain is set correctly, disengage the
solo switch.
6. During a performance, if you notice that the OL
(overload) LED comes on next to the channel
fader, carefully decrease the gain until OL no
longer comes on.
SOLO SOLO SOLO SOLO SOLO SOLO SOLO SOLO SOLO SOLO SOLO SOLO
MUTE MUTE MUTE MUTE MUTE MUTE MUTE MUTE MUTE MUTE MUTE MUTE
48V 48V 48V 48V 48V 48V 48V 48V
XLR Mic
Inputs
Low Cut
EQ
Gain
48V
Level
Set
Solo
Inserts
Solo
OL Led
Solo
Mode