


17
Owner’s Manual
Owner’s Manual
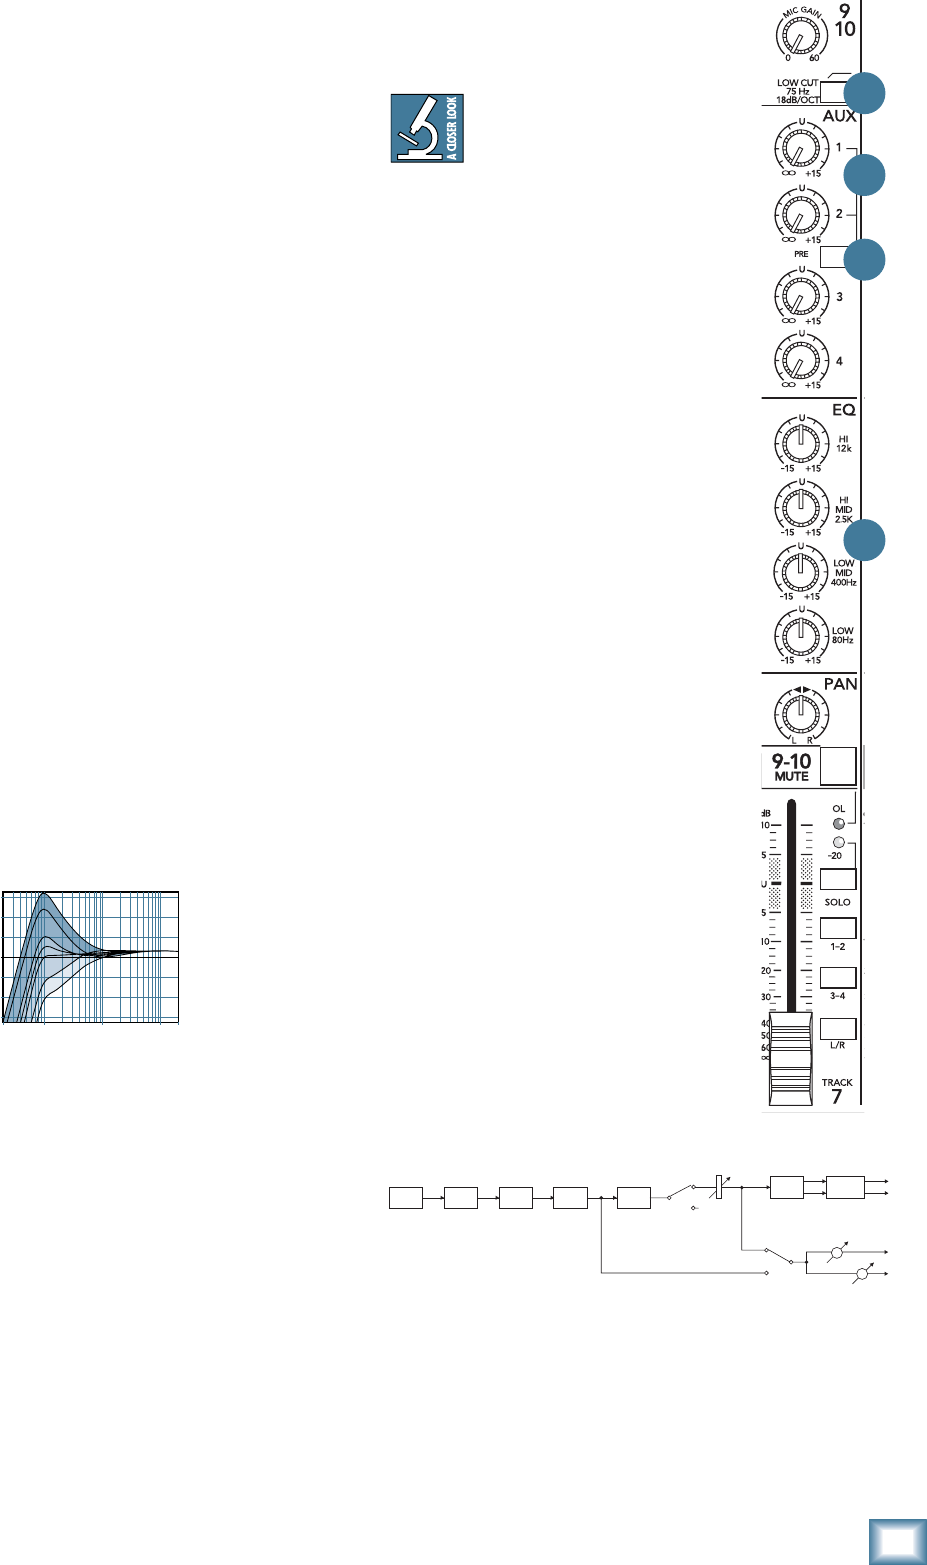
33. 4-BAND FIXED-FREQUENCY EQ
The stereo channels (9-16) have a 4-band, fi xed-fre-
quency equalization: LOW shelving at 80 Hz, LOW MID
peaking at 400 Hz, HI MID peaking at 2.5 kHz, and HI
shelving at 12 kHz.
Each of these fi lters provides up to 15 dB of boost or
cut. As with the mono channels, the circuit is fl at (no
boost or cut) at the center detent positions.
34. LOW CUT
The LOW CUT switch (not present on channels
13-16), often referred to as a high pass fi lter, cuts bass
frequencies below 75 Hz at a rate of 18 dB per octave.
This ain’t no thrown-in dime-store fi lter — an 18 dB per
octave curve requires an elaborate circuit. Nothing but
the best for you.
We recommend that you use this on every sound
source except kick drum, bass guitar, bassy synth patch-
es, or recordings of earthquakes. These aside, there isn’t
much down there that you want to hear, and fi ltering it
out makes the low stuff you do want much more crisp
and tasty. Not only that, but low cut can help reduce the
possibility of feedback in live situations, and it helps to
conserve amplifi er power.
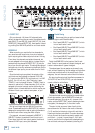
With LOW CUT, you can safely boost LOW EQ. Many
times, bass shelving eq can really benefi t voices. Trouble
is, adding LOW EQ also boosts the subsonic debris:
Stage rumble, mic handling clunks, wind noise and
breath pops. LOW CUT removes all that debris so you
can boost the LOW EQ without frying your woofer. Here’s
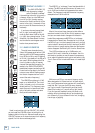
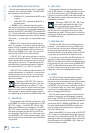
a frequency curve of LOW EQ combined with LOW CUT:
35. AUX 1, 2, 3, & 4
These four knobs tap a portion of each channel’s
signal, mix them together and send them to the AUX
SEND [6] outputs. They are off when turned fully down,
deliver unity gain at the center detent, and can provide
up to 15 dB of gain turned fully up. Chances are you’ll
never need this extra gain, but it’s nice to know it’s
there if you do.
The AUX SEND outputs can then be patched to paral-
lel effects processor inputs or stage monitor amp inputs.
AUX SENDS 1 and 2 levels are controlled not only by the
channel’s AUX knobs, but also by the AUX SEND [49]
master knobs.
AUX SENDS can also be used to generate separate
mixes for recording or “mix-minuses” for broadcast. By
using AUX 1 or 2 in the PRE [36] mode,
these mix levels can be obtained indepen-
dently of a channel’s fader settings.
We recommend going into
a stereo reverb in mono and
returning in stereo. We have
found that on most “stereo”
reverbs, the second input just ties up an
extra aux send and adds nothing to the
sound. There are exceptions, so feel free
to try it both ways. Should you choose to
use two aux sends, use the “odd” AUX (1
or 3) to feed its left input and the “even”
AUX (2 or 4) to feed the right input. Re-
member, if you’re also dealing with a ste-
reo source signal, you’ll want to follow the
sides — use the odd AUX on the channel
carrying the left side and the even AUX
on the channel carrying the right.
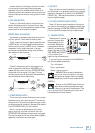
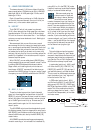
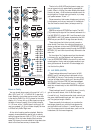
36. PRE
This switch determines the tap point
of AUX 1 and 2. Generally, “post” sends
are used to feed effects devices, and “pre”
sends are used to feed your stage moni-
tors. See the “Pre vs. Post” diagram below.
AUX 3 and 4 are always in post mode.
In post mode (switch up), AUX 1 and 2
will follow the EQ [32], LOW CUT [34],
FADER [25] and MUTE [30] settings. If
you fade the channel, you fade the send.
This is a must for effects sends, since you
want the levels of your “wet” signals to
follow the level of the “dry.”
In PRE mode (switch down), AUX 1
and 2 follow the GAIN [3] and LOW CUT
settings only. EQ, PAN [31], FADER and
MUTE settings have no effect on the PRE
sends. This is the preferred method for
setting up stage monitor feeds — they’ll
be controlled independently of the fader
and mute moves.
33
34
35
36
INPUT GAIN INSERT
LOW
CUT
EQ
PAN ASSIGN
MUTE
FA DE R
'POST' SIGNAL
'PRE' SIGNAL
PRE SWITCH
AUX 1
AUX 2
20Hz 100Hz 1kHz 10kHz 20kHz
–15
–10
–5
0
+5
+10
+15