


13
Owner’s Manual
Owner’s Manual
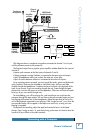
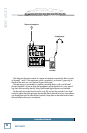
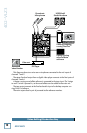
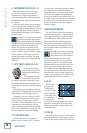
1. POWER SWITCH
Press the top of this rocker switch inwards
to turn on the mixer. The power LED [23] on
the top surface of the mixer will glow with
happiness. Press the bottom of this switch to
turn off the mixer.
As a general guide, turn on your mixer
first, before the power amplifier or powered
speakers, and turn it off last. This will
reduce the possibilities of any turn-on, or
turn-off thumps in your speakers.
2. POWER CONNECTION
This is where you plug in the connector
from the AC adapter supplied with your
mixer.
Only use the AC adapter that came with
your mixer, or a factory-authorized power
supply.
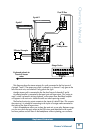
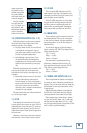
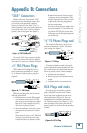
3. MIC INPUTS (Ch.1–2)
We use phantom-powered, balanced
microphone inputs just like the big studio
mega-consoles, for exactly the same reason:
This kind of circuit is excellent at rejecting
hum and noise. You can plug in almost any
kind of mic that has a standard XLR male
mic connector.
Professional ribbon, dynamic, and con-
denser mics will all sound excellent through
these inputs. The 402-VLZ3’s mic inputs will
handle any kind of mic level you can toss at
them, without overloading.
PHANTOM POWER
Most modern professional condenser mics
are equipped for phantom power, which lets
the mixer send low-current DC voltage to
the mic’s electronics through the same wires
that carry audio. (Semi-pro condenser mics
often have batteries to accomplish the same
thing.) “Phantom” owes its name to an abil-
ity to be “unseen” by dynamic mics (Shure
SM57/SM58, for instance), which don’t need
external power and aren’t affected by it
anyway.
The phantom power for both channels 1
and 2 is turned on and off together using the
phantom [20] switch.
Never plug single-ended
(unbalanced) microphones or
instruments into the mic input
jacks if the phantom power is on.
Do not plug instrument outputs into the mic
input jacks with phantom power on, unless
you know for certain it is safe to do so.
Do not use phantom power with ribbon
microphones.
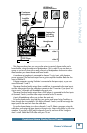
4. LINE INPUTS (Ch.1–2)
These inputs share circuitry (but not
phantom power) with the mic preamps, and
can be driven by balanced or unbalanced
sources at almost any level. You can use
these inputs for virtually any audio signal
you’ll come across.
To connect balanced lines to these inputs,
use a 1⁄4" Tip-Ring-Sleeve (TRS) plug.
To connect unbalanced lines to these
inputs, use a 1⁄4" mono (TS) phone plug or
standard instrument cable.
These two line inputs are a good place to
connect older instruments that need more
gain. You can correct weak levels by adjust-
ing the channel’s gain control [7].
5. LOW CUT (Ch.1–2)
Each low-cut switch, often referred to as a
high-pass filter (all depends on how you look
at it), cuts bass frequencies below 100 Hz at
a rate of 18 dB per octave.
We recommend that you use low-cut on
every microphone application except kick
drum, bass guitar, bassy synth patches, or
recordings of earthquakes. These aside,
there isn’t much down there that you want to
hear, and filtering it out makes the low stuff
you do want much more crisp and tasty. Not
only that, but low-cut can help reduce the
possibility of feedback in live situations, and
it helps to conserve amplifier power.
Another way to consider low-cut’s
function is that it actually adds
flexibility during live perfor-
mances. With the addition of low-cut, you
can safely use low equalization on vocals.
Many times, bass shelving EQ can really
benefit voices. Trouble is, adding low EQ also
boosts stage rumble, mic handling clunks
and breath pops. Applying low-cut removes
all those problems, so you can add low EQ
without losing a woofer.