


76
1. LOUDSPEAKER OUTPUTS
WARNING! Never use the amplifier without a load
attached!
There are two parallel loudspeaker output jacks
provided for connection to speaker extension
cabinet(s). Please always ensure that the
amplifier's output impedance selector is set
correctly (see item 2) and
ALWAYS ensure you use
good quality speaker (unshielded) cables.
NEVER
use guitar (shielded) cables.
Always use a non-screened Marshall approved
speaker lead when connecting an extension
cabinet to these units.
2. OUTPUT IMPEDANCE SELECTOR
Matches the amplifier’s output to the load (speaker)
impedance.
Your 1959HW should be completely powered down
before the Output Impedance Selector is turned.
As is the case with any Marshall all-valve amplifier
it is imperative that: a) the amplifier is connected to
a load whilst in operation and b) the impedance
selected on the amplifier matches the total
impedance of the extension speaker cabinet(s)
being used.
1x16 Ohm cabinet - Selector on 16 Ohm
Use either speaker output
2x16 Ohm cabinets - Selector on 8 Ohm
Use both outputs
1x8 Ohm cabinet - Selector on 8 Ohm
Use either output
2x8 Ohm cabinets - Selector on 4 Ohm
Use both outputs
1x4 Ohm cabinet - Selector on 4 Ohm
Use either output
WARNING! Do NOT use any other combination of
cabinets and/or impedances. Doing so may result
in damage to the amplifier! An extension speaker
cabinet with an impedance of less than 4 Ohms, or
two extension cabinets of 4 Ohms or less should
NOT be used with this amplifier.
Failure to comply with any of the points raised in
this section will result in damage to the amplifier.
3. MAINS SELECTOR
Matches the amplifier’s mains transformer to the
incoming mains voltage.
Your 1959HW should always be completely
powered down before the mains selector is turned.
WARNING! ALWAYS ensure that this rotary
selector is set to the correct mains voltage
applicable for the country where the 1959HW is
being used. If you do not know, consult your
authorized Marshall dealer.
Adjusting the selector from 230V to 120/100V or
vice-versa will require the mains fuse (item 5) to be
changed to the correct value as detailed on the
rear panel.
4. MAINS INPUT
Your amp is provided with a detachable mains
(power) lead, which is connected here. The specific
mains input voltage rating that your amplifier has
been built for is indicated on the back panel. Before
connecting for the first time, please ensure that
your amplifier is compatible with your electricity
supply. If you have any doubt, please get advice
from a qualified technician. Your Marshall dealer
will help you in this respect.
5. MAINS FUSE
The correct value of mains fuse is specified on the
rear panel of the amplifier.
NEVER attempt to
bypass the fuse or fit one of the incorrect value.
6. H.T. FUSE
The correct value of this H.T
. fuse is specified on
the rear panel of the amplifier.
NEVER attempt to
bypass the fuse or fit one of the incorrect value.
ENGLISH
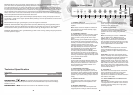
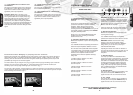
3 4 5 621
1959HW Rear Panel
Follow all instructions and heed all warnings
KEEP THESE INSTRUCTIONS !
ENGLISH
11. LOW SENSITIVITY INPUT FOR
CHANNEL I
This is the ‘low sensitivity’ guitar input for Channel I.
It is 6dB lower in volume than the ‘high sensitivity’
input and has a darker sound as well due to its
significantly lower input impedance.
Interesting aside: Back in the day, a ‘high
sensitivity’ input jack was recommended for use
with a guitar loaded with low-output pickups (e.g.:
single coils) while the ‘low sensitivity’ input was
recommended for higher output pickups (e.g.:
humbuckers). This said, the majority of guitarists -
then and now - ignore these recommendations and
plug high-output guitars into the ‘high sensitivity’
input because it further boosts the strength of their
signal.
12. HIGH SENSITIVITY INPUT FOR
CHANNEL II
This is the ‘high sensitivity’ guitar input for Channel II,
the so-called ‘Normal’ channel.
13. LOW SENSITIVITY INPUT FOR
CHANNEL I
This is the ‘low sensitivity’ guitar input for Channel II.
It is 6dB lower in volume than the ‘high sensitivity’
input and has a darker sound as well due to its
significantly lower input impedance.
Performance Note: Bridging or ‘jumping’ the two channels
Because both Channels of the 1959HW have the same number of gain stages (two) and are therefore in
phase with each other, it is possible to bridge them together (‘slaving’, ‘jumping’, ‘linking’ or even ‘daisy-
chaining’) and use them both at the same time. Doing this enables you to expand upon the amp’s tonal
possibilities by mixing the two channels together.
The most common way of doing this is to plug your guitar into the top (high sensitivity) input of Channel I
and then run a short ‘jumper’ guitar cable (i.e. a screened cable) from the Channel I’s bottom (low
sensitivity) input to the top (high sensitivity) input of Channel II. (fig. 1)
The ‘reverse’ is also possible – namely plugging your guitar into Channel II’s top input and then running the
‘jumper’ cable from Channel II’s bottom input to Channel I’s top input. This less common approach can yield
some interesting tonal variations. (fig. 2)
Fig. 1 Fig. 2