


after the signal passes the threshold setting. In general, ideal attack time
settings are a function of the type of instrument and inherent transients.
For instruments like string and bass that exhibit slower attack, a slower
attack time setting is usually best. Similarly, instruments such as snare
drums exhibiting fast transients typically benefit from faster attack times.
The release time controls how long it takes the signal to return from a
state of gain reduction to a normal state of zero gain reduction. Longer
release times tend to produce a smoother, more transparent compressor
action, especially with low-frequency content such as bass guitar. Exact
settings will be determining partially by the genre and tempo of the source
signal, as well and how the instrument is played.
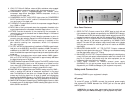
To set TAMPA’s compressor:
1. Start with the COMPRESSOR IN/OUT switch set to the OUT position.
2. Use the steps outlined under “Setting Levels” to achieve a good sound and
output level.
3. Set the COMPRESSOR IN/OUT switch to the IN position, wih all
compressor controls set fully counterclockwise. The COMPRESSOR IN
INDICATOR will light to show that the compressor is engaged.
4. Start by determining the approximate compression ratio for the desired
result. Adjust the RATIO and the THRESHOLD to achieve the desired
amount of gain reduction.TAMPA’s GAIN REDUCTION VU meter is useful
in confirming what your ears are hearing by dynamically displaying the
amount of gain reduction. For transparent compression, try to have loud
passages incur a maximum gain reduction of about -3dB to -6db, while
insuring that softer passages incur no reduction.
5. Set the ATTACK and DECAY times to taste. 5ms and 1 second are good
respective starting points.
6. Continue to adjust all controls until you achieve the desired result. This
may include the adjustment of the preamp gain controls, including the
GAIN knob, +20dB gain boost, and the 20dB PAD.
As with many things in the audio realm, experimentation is required due
to the differences between instruments, performance styles, microphones,
recording environments and production styles.Remember to test dynamic
extremes in the source material when setting the compressor. Keep in
mind that the compressor is also responding to the signal level it gets from
TAMPA’s input gain stage.
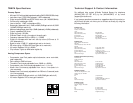
The next page lists some typical settings for compressor use and is a good
place to start in your experimentation.
13
high frequencies more than the low frequencies produced by passing traffic
or overhead jets. Low frequencies can also be prominently produced when
someone bumps a mic stand or taps their feet.TAMPA has a built-in low
cut filter that rolls off frequencies of 80Hz and below at 12dB/octave.While
this can be instrumental in preventing unwanted rumble and other low
frequencies from being recorded or amplified, it should be used with
caution since some instruments and voices produce frequencies that fall
below 80Hz.
To engage TAMPA’s low-cut filter, set the LOW CUT switch to the LOW
CUT position.
NOTE: Some microphones have their own low cut switches. Be certain
to use this feature on either the mic or the preamp, not both.
Setting the Compressor
While the philosophy behind compressors is pretty straightforward, the
process of finding the actual settings that work best varies from situation
to situation and from ear to ear. A little compression can make the ideal
difference in the dynamics of a track, where too much compression can
suck the life out of a performance.
In general,the ideal is to record the hottest level possible without distorting
or clipping, as this results in the greatest signal level in relation to the noise
floor on your recording media. Many sound sources, such as the human
voice,can vary significantly in level during the course of a performance.Even
when the situation is not that severe, it is often desirable to lessen or
“compress” the difference between the extremes in dynamics.That’s where
compressors come in—automatic dynamic range reduction.
The threshold setting determines the point in the compressor’s output
level above which the compressor will engage. The compression ratio is
expressed as the relationship of the signal level passing the threshold to
that of the output level. For example, at a 2:1 ratio, for every 2dB of signal
level over the threshold, the output is 1dB of signal level over the
threshold.At a 4:1 ratio, for every 4dB of signal level over the threshold,
the output is 1dB of signal level over the threshold. The higher the
compression ratio, the more uniform the signal level is once the threshold
is reached. In general, a lower compression ratio (4:1 and under) is fairly
transparent.At 6:1 and over, compression may tend to become an audible
effect.This may not be the desired result for a vocal performance, but may
work well for a lead guitar track.
The attack time determines how long it takes for compression to engage
12