8
1.4 Velocity Curve
The ProKeys 88sx has four different velocity curve settings. The velocity curves define the response of the keyboard to how hard or soft you strike a
key. You should experiment with each to find which curve best suits your playing style. To cycle through the various velocity curves, keep pressing
the Velocity Curve button.
One of the four curves gives a fixed velocity of 100 regardless of how hard or soft you strike a key. When this curve is selected, the velocity curve is
effectively OFF. The LED above the Velocity Curve button will turn off to reflect this.
1.5 Volume Slider
The Volume slider will control the output level of your ProKeys 88sx.
1.6 Sustain Pedal
If you connect a foot switch pedal to the Sustain Pedal socket, you will be able to control the decay of the sound just like a sustain pedal does on a
real piano. A sustain pedal affects all notes played while the pedal is being held down.
1.7 Sostenuto Pedal
If you connect a foot switch pedal to the Sostenuto Pedal socket, this pedal performs the same function as on a real piano. The sostenuto pedal
affects only those notes held down at the time the pedal is depressed.
1.8 Expression pedal
A continuous controller-type pedal can be connected to the Expression Pedal socket. This pedal can be used to control the volume level of the
ProKeys 88sx. Controlling the volume with your foot allows you to keep both hands on the keyboard at all times.
1.9 Pitch Bend Wheel
The Pitch Bend wheel allows you to bend the pitch of your instrument. The Pitch Bend will raise or lower the pitch of your instrument by two semi-
tones. For example, if you play a C and push the Pitch Bend wheel all the way forward, the note you hear will be D. If you pull it all the way back
towards you, you will hear Bb.
1.10 Modulation Wheel
Some of the instruments have Tremolo and Vibrato effects associated with them. The Modulation wheel will control the depth of these effects. So, if
you set the wheel at the bottom, the Tremolo/Vibrato effect will be off. If you then move the modulation wheel upwards, the Tremolo/Vibrato effect
will become more and more prominent.
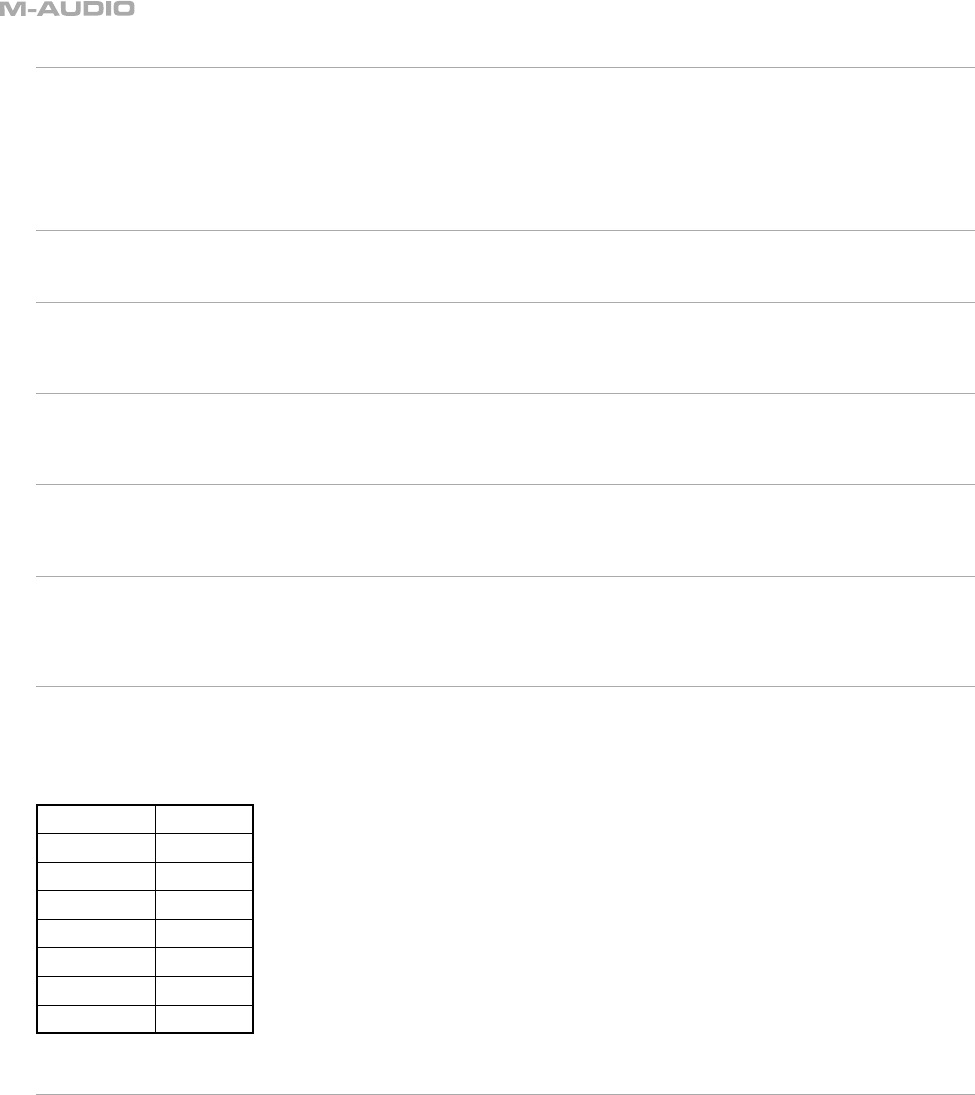
The following table defines the effect that the Modulation wheel controls for each of the seven instruments:
Instrument Effect
Piano 1 None
Piano 2 None
E. Piano 1 Tremolo
E. Piano 2 Tremolo
Clav None
FM Piano Tremolo
Perc. Organ Vibrato
1.11 Digital Effects
There are two digital effect buttons – Reverb and Chorus. Reverb will add ambience, as if you are playing your instrument in a large hall or church.
Reverb can be used to add warmth to the sound of your instrument.
Chorus is an effect that sounds much like two of the same instruments being layered together and slightly detuned one from the other. It can be
used to fatten up the sound of your instrument. In some cases, Chorus can make your instrument sound like a different instrument altogether. For
example, adding a lot of Chorus to Piano 1 or Piano 2 will add a “honky-tonk” effect to the piano sound.
Each of the digital effects has four levels of depth – Reverb (off, small, medium and large) and Chorus (off, narrow, medium and wide). Pressing the
Reverb or Chorus button repeatedly will select the depth of the corresponding effect. The depths increase in ascending order.
When the effect is set to off, the LED above the relevant button remains off. Pressing the effect button will then turn the effect on, with a small depth.
Pressing the button again will increase the depth from a “small” or “narrow” amount, to a “medium” amount, and pressing it again will increase the
depth further. The LED will remain on. Finally, pressing the button a third time will set the effect back to off and switch off the LED.
Part 1: ProKeys 88sx as a Digital Piano


