


5
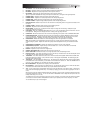
How do I know if my ¼” cables
are balanced?
BALANCED
UNBALANCED
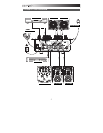
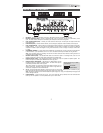
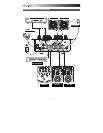
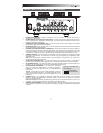
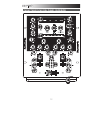
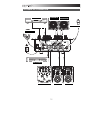
REAR PANEL FEATURES
6
1
2343478
6
5
5
9
10
10
11
11
1. MIC INPUT – Connect a ¼” microphone to this input. Microphone controls are located on the top panel.
2. MIC-AUX LINE INPUT (RCA) – Connect a line-level device, such as a CD player, sampler, or audio interface, to this
input. The audio levels for this input are controlled by the microphone controls on the top panel.
3. LINE | PHONO INPUTS (RCA) – Connect your audio sources to these inputs. These inputs can accept both line and
phono-level signals.
4. LINE INPUTS (RCA) – Connect line-level devices, such as CD players, samplers or audio interfaces, to these inputs.
5. LINE | PHONO SWITCH – Flip this switch to the appropriate position, depending on the device connected to the LINE |
PHONO INPUTS. If you are using phono-level turntables, set this switch to “PHONO” to provide the additional
amplification needed for phono-level signals. If using a line-level device, such as a CD player or sampler, set this switch
to “LINE.”
6. GROUNDING TERMINAL – If using phono-level turntables with a grounding wire, be sure to connect the grounding wire
to these terminals. If you experience a low “hum” or “buzz”, this could mean that your turntables are not grounded.
Note: Some turntables have the grounding wire built into the RCA connection and, therefore, nothing needs to be
connected to the grounding terminal.
7. RECORD OUTPUT (RCA) – Use standard RCA cables to connect this output to a recording device, such as a CD
recorder or tape deck. The level of this output is based upon pre-master levels.
8. MASTER OUTPUT (RCA) – Use standard RCA cables to connect this output to a speaker or amplifier system. The
level of this output is controlled by the MASTER knob on the top panel.
9. MASTER OUTPUT (BALANCED) – Use balanced ¼” (TRS) cables to connect
this Master output to a speaker or amplifier system. The level of this output is
controlled by the Master knob on the top panel.
Tip: When possible, we recommend using these balanced outputs for your
Master audio output. Balanced outputs are better suited for long cable runs
and are less susceptible to noise and interference.
10. AC IN – Use the included power adapter to connect the mixer to a power outlet. While the power is switched off, plug
the power supply into the mixer first, then plug the power supply into a power outlet.
Note: The mixer is designed to work with the included AC power supply only. Using an incompatible power supply could
result in damage to the unit.
11. POWER SWITCH – Turns the mixer on and off. Turn on the mixer after all input devices have been connected and
before you turn on amplifiers. Turn off amplifiers before you turn off the mixer.