


7
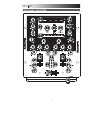
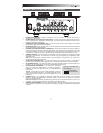
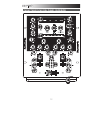
1. MIC SWITCH – Turns the MIC INPUT and MIC-AUX LINE INPUT on or off.
2. MIC GAIN – Adjusts the audio level of the MIC INPUT and MIC-AUX LINE INPUT.
3. MIC BASS – Adjusts the low (bass) frequencies of the microphone channel.
4. MIC TREBLE – Adjusts the high (treble) frequencies of the microphone channel.
Tip: If you experience feedback when using a microphone at loud levels, try turning down the high frequencies.
5. CHANNEL GAIN – Adjusts the channel’s pre-fader and pre-EQ gain level.
6. CHANNEL BASS – Adjusts the low (bass) frequencies of the corresponding channel.
7. CHANNEL MID – Adjusts the mid-range frequencies of the corresponding channel.
8. CHANNEL TREBLE – Adjusts the high (treble) frequencies of the corresponding channel.
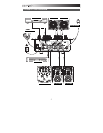
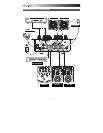
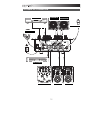
9. INPUT SELECTOR – Selects the input source to be routed to the corresponding channel. Input jacks are located on the
rear panel.
10. CHANNEL FADER – Adjusts the audio level on the corresponding channel
11. CUE GAIN – Adjusts the volume level of the headphone output.
12. HEADPHONES – Connect your ¼” headphones to this output for cueing and mix monitoring. Headphone output
controls are located on the top panel.
13. CUE SLIDER – When the CUE MODE SELECTOR is set to “CH1 – CH2,” this blends the audio from Channel 1 and 2 in
the headphones. Sliding this to the left plays Channel 1. Sliding to the right plays Channel 2.
14. CUE METER – Monitors the audio level of the Cue Channel, depending on the position of the CUE MODE SELECTOR.
15. CUE MODE SELECTOR – Selects the audio that is sent to the headphones. Selecting MASTER routes the Program
mix to the headphones. Selecting FX routes the effects block output to the headphones. (This allows you to cue the
effects before applying it.) Selecting CH1-2 allows cueing of Channels 1 and 2 using the CUE SLIDER.
16. CROSSFADER – Blends audio between the channels assigned to the left and right side of the crossfader.
Note: The crossfader is user-replaceable if it should ever wear out. Simply remove the facepanel, then remove the
screws holding it in position. Replace the fader with a quality authorized replacement from your local Numark retailer
only.
17. CROSSFADER (CF) REVERSE – Reverses the assignment of Channels 1 and 2 on the crossfader.
18. CROSSFADER (CF) SLOPE – Adjusts the slope of the crossfader curve. Turn knob to the left for a smooth fade
(mixing) or to the right for a sharp cut (scratching).
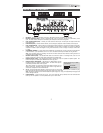
19. MASTER – Adjusts the output volume of the Program mix.
20. STEREO LEVEL INDICATOR – Monitors the audio level of the Program mix.
21. EQ KILL SWITCHES – Eliminates the bass, mid, or high frequencies of the corresponding channel.
22. EFFECTS (FX) ON – Turns effects processing on and off. Note that you will also have to raise the Intensity Mix control
to be able to hear the effects once they have been turned on.
23. ASSIGN – This switch selects the audio source on which the effects will be applied: the MIC INPUT and MIC-AUX
LINE INPUT (MIC-AUX), Channel 1 (CH1), Channel 2 (CH2), or the Program mix (MASTER). The selected group will
illuminate as the switch is toggled.
24. SELECT – This switch selects the effects group. The selected group will illuminate as the switch is toggled. When
the ASSIGN switch is set to MIC/AUX, you can select from the effects on the bottom row. When the ASSIGN switch is
set to CH1, CH2, or MASTER, you can select from the effects on the top row.
25. RATE / FREQUENCY – Adjusts the rate / frequency of the selected effect.
26. MIX / INTENSITY – Controls the amount of effected (wet) vs. non-effected (dry) sound in the mix. With the fader down,
no effected sound will be audible. With the fader up, only the effected sound will be heard.
27. TAP – In order to align tempo-synced effects with the beat, press the TAP button on the beat 3-4 times. The beat sync
often works best when tapping half the tempo. For example, try tapping just on the snare drums (typically the “2” and “4”
count).
When beat sync has been enabled, effects denoted with an asterisk (*) will have rates / frequencies related to the tempo
(see “Effects Descriptions” section). You can use the RATE / FREQUENCY knob to adjust the beat-synced rate as a
multiple of the tempo (1x, 2x, 4x, etc.)
To disable beat sync and have continuous control over the rate / frequency of an effect, press and hold trhe TAP button
until it remains lit. Now the RATE / FREQUENCY knob allows you to precisely tune the rate / frequency of an effect.
To re-enable beat sync, tap out the beat again.