


9
You now have a 16 (or more) channel automatic mixer. Any unit can be used for the system output. The
notch filter and master controls will only affect that unit's output.
NOTE: When configuring multiple units, the wire jumpers in the ALOAD and the CLOAD must be left in one
unit and one unit only.
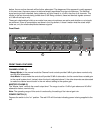
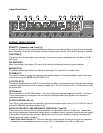
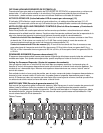
MASTER OUTPUT (24)
The master output is a 600 ohm, transformer balanced output that can be used to feed an external power
amplifier. It is at this point that the automatically mixed or the manually mixed output is accessed.
SETTING UP THE AUTOMIX
1. Wiring Inputs and Outputs:
For best results it is recommended that a two-conductor shielded cable is used for all input and output
connections. When making connections remember to observe proper polarity. The recommended strip
length for the screw terminal connectors is 1/2".
2. Initial Control Settings:
Channel Levels (Faceplate) - (Full CCW)
Channel Gain Trims (Internal) - (Full CCW)
Priority (Internal) - (Full CCW)
Notch Controls (Internal) - (Full CCW)
Downward Expander (Internal) - (Full CCW)
Master Level (Faceplate) - (Full CW)
Master Level (Internal) - (Full CCW)
All channels in auto mode
3. Setting the Channel Level:
Set the front panel control (of the channel that is being adjusted) to the middle (12 o’clock) position. Connect
a mic or line input to one channel. While someone is speaking into the mic (in a way that it would normally
be used), slowly increase the channel gain trim until a slight ringing (feedback) is heard. Turn the channel
gain trim down slowly until the ringing is no longer audible. This is the maximum level that the gain trim
should be set. Turn the external channel level control down (full CCW).
NOTE: The internal master gain trim may need to be turned up (CW) if the channels can be easily driven
into clipping, or feedback cannot be obtained in the normal operating range of the internal gain trim control.
Repeat this step for the remaining channels.
4. Return all of the external channel level controls to their mid position (0).
5. Setting the Notch Filter:
The Notch Filter can be set in several different ways. It can be set using test equipment to pinpoint frequen-
cies that are prone to feedback, or it can be set “by ear.” For the purpose of this manual the “by ear” method
will be described.
a. Slowly increase the master gain trim (internal) until a slight ringing is audible.
b. Select the proper frequency range and turn the corresponding level control CW to about the 12 o’clock
position.
c. Slowly turn the frequency control back and forth until the ringing is no longer audible.
d. Again slowly increase the master gain trim until ringing is heard. If this is a different frequency, repeat
steps 2 and 3. If it is not a different frequency, try turning the frequency control while listening to the
feedback. Stop when the frequency that is feeding back is reduced. If the feedback is still audible turn
the level control CW toward the -15 until the feedback is gone.
e. Set the Master Level Control (external) for the desired overall output level. The mixer’s levels are now
set and the mixer’s other features (downward expander, Lo cut and priority) can be set as desired for
the application.
f. Attach the security plexiglass with the four supplied screws. This will prevent any unwanted tampering
with the settings.