


21
MIDI SETTINGS
MIDI SETTINGS
MIDI (Musical Instrument Digital Interface) is a standard protocol designed to allow exchange of information between electronic
instruments and/or computers. A MIDI cable is used to connect two appliances equipped with MIDI connectors, thus allowing data to be
exchanged between the two appliances. The EFX-1000 uses MIDI to send and receive operation and BPM data (timing clock).
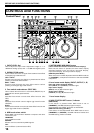
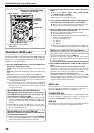
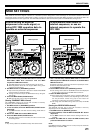
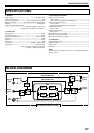
Synchronizing an external
sequencer to an audio signal, or
using EFX-1000 operation data to
operate an external sequencer
MIDI TRANSMIT/
RECEIVE/OFF
MIDI START/
CH SET
TIME TAP
EFX-1000
OUT
OUTIN
IN
MIDI
BPM
=120
BPM
=120
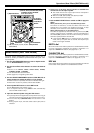
MIDI TRANSMIT/
RECEIVE/OFF
MIDI START/
CH SET
TIME TAP
EFX-1000
OUTOUT
ININ
MIDI
BPM
=120
To synchronize beat effects to
external sequencer, or use an
external sequencer to operate the
EFX-1000
1. Use a commercially available MIDI cable to connect the
EFX-1000’s MIDI OUT connector and the MIDI
sequencer’s MIDI IN connector.
¶ The MIDI sequencer’s sync mode should be set to slave.
¶ MIDI sequencers which do not support MIDI timing clock
cannot be synchronized.
2. Set MIDI switch to [TRANSMIT] position.
¶ Sync cannot be performed in the case of tracks whose BPM
values cannot be measured stably.
¶ Timing clock is also output for BPM values set by using the
TAP mode.
3. Press the MIDI START/CH SET button.
¶ MIDI timing clock output range is 40-250 BPM.
[Setting TRANSMIT MIDI channel]
The TRANSMIT channel can be set and recorded in memory
separately from the RECEIVE channel.
1. Set MIDI switch to [TRANSMIT] position.
2. In this condition, hold the MIDI START/CH SET button
depressed.
¶ The MIDI indicator will flash and the setting mode will be
enabled.
3. Rotate the TIME dial to select MIDI channel.
4. Press the MIDI START/CH SET button.
¶ The MIDI channel will be recorded, and the unit will leave
the setting mode.
NOTE:
It may not be possible to set BPM correctly with some tracks.
1. Use a commercially available MIDI cable to connect the
MIDI sequencer’s MIDI OUT connector to the EFX-1000’s
MIDI IN connector.
¶ Adjust controls for optimum instrument input/output levels.
¶ Set all effect switches to OFF.
¶ Set BYPASS switch to OFF.
2. Set the MIDI switch to the [RECEIVE] position.
¶ The timing clock based on the BPM counted and displayed
by this unit is output from the MIDI OUT connector.
3. Start the MIDI sequencer.
¶ Even during use of sequencer control, the EFX-1000 can be
controlled directly if desired, but depending on the volume,
the set parameter values may jump at the instant an
operation is performed, so caution is needed.
¶ The range that the MIDI timing clock can accept is 40-250
BPM.
[Setting the RECEIVE MIDI channel]
The RECEIVE channel can be set and recorded in memory
separately from the TRANSMIT channel.
1. Set MIDI switch to [RECEIVE] position.
2. In this condition, hold the MIDI START/CH SET button
depressed.
¶ The MIDI indicator will flash and the setting mode will be
enabled.
3. Rotate the TIME dial to select the MIDI channel, then
press the TAP button to confirm.
NOTE:
If the MIDI sequencer’s BPM is set in 0.1 units, it may not match the
BPM display on the EFX-1000.
DJ CD player
Audio
MIDI sequencer
Audio
MIDI sequencer