


7
<DRB1315>
En/Fr
English
Français
1 GND
2 HOT
3 COLD
MIC 2MIC 3CH-4CH - 1
CH - 1
CH - 2
CH - 2
CH - 3
CH - 3
CH - 4
CH - 4
CONTROLCONTROLCONTROLCONTROL LINE 1
LINE 1
LINE 3
LINE 3
LINE 5
LINE 5
LINE 7
LINEPHONO
LINEPHONO
LINEPHONO
LEVEL
LEVEL
ATT .
MASTER
TALK OVER
SIGNAL
GND
/ LINE 2/ LINE 4
PHONO 1
/ LINE 2
PHONO 1
PHONO 2
/ LINE 4
PHONO 2
/ LINE 6
PHONO 3
/ LINE 6
PHONO 3
PHONO 4
LINE 7PHONO 4
R
L
R
L
R
L
R
L
R
L
L
L
R
RLR
RL
(MONO)
RL
(MONO)
LR12
BOOTHMASTER
MASTER OUT 2
MASTER OUT 2
DIGITAL OUT
REC OUT
SEND
SEND
RETURN
RETURN
OUT 1 MONITOR
BOOTHMASTER
OUT 1 MONITOR
R L
R L
R L
R L
R L
R L
R L
R L
CMX-3000 / CMX-5000
[A] [B]
CDJ-1000 /
CDJ-100S /
CDJ-500S /
CDJ-500II
[B]
CDJ-1000 /
CDJ-100S /
CDJ-500S /
CDJ-500II
[A]
DJM-3000
Cassette deck, etc.
Lecteur de cassette, etc...
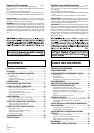
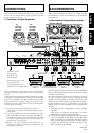
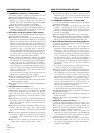
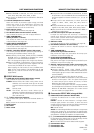
CONNECTIONS
When connecting or changing the connection of units, make
sure to first turn off the power switch and disconnect the
power cord from the outlet.
1. Connection of Input Equipment
Connect to a wall’s
electrical outlet
Branchez sur une
prise de courant
Player 3
Lecteur 3
Player 2
Lecteur 2
Player 1
Lecteur 1
(PHONO 4 cannot be used
when using MIC 3)
(Les jacks PHONO 4 sont
inopérants si vous utilisez MIC 3.)
When connecting an analog player to the CH-4 PHONO 4
connectors, first remove the short-circuit pin plugs (2) from
the jacks.
The short-circuit pin plugs are provided to reduce any residual
noise when an analog player is not connected to the PHONO
4 jacks, thus producing the highest possible sound quality.
After removing the pin plugs, store them securely, and
replace them in their original jacks any time an analog player
is not physically connected.
*1 Connect the cord for the analog player’s ground.
This terminal is exclusively for an analog player and is not
a safety earth.
*2 If you are using the unit with the separately sold CMX-
3000, CMX-5000, CDJ-1000, CDJ-100S, CDJ-500S, or
CDJ-500
II connected to the LINE terminals, the fader
start function can be used if the unit and CD player are
connected with a control cord.
*3 Because the unit’s PHONO input terminals are
exclusively for MM, use MM-type cartridges for the
analog player connected.
RACCORDEMENTS
Veillez à mettre l’appareil hors tension et à retirer le cordon
d’alimentation de la prise avant d’effectuer ou de modifier des
raccordements.
1. Raccordement d’appareils aux entrées
Si vous raccordez un lecteur analogique sur les jacks PHONO 4
de CH-4, débranchez d’abord les fiches (2) à broche de court-
circuit au niveau des jacks.
Les fiches à broche de court-circuit sont prévues pour réduire
tout bruit résiduel, lorsqu’un lecteur analogique n’est pas
raccordé aux jacks PHONO 4, et obtenir ainsi la plus haute
qualité sonore possible. Après avoir débranché les fiches à
broche, rangez-les en lieu sûr et replacez-les sur leurs jacks
chaque fois qu’un lecteur analogique n’est pas physiquement
raccordé.
*1 Raccordez le cordon correspondant à la terre du lecteur
analogique.
Cette borne est destinée uniquement à un lecteur
analogique et n’est pas une terre de sécurité.
*2 Si vous utilisez l’appareil avec des lecteurs vendus en option,
comme le CMX-3000, le CMX-5000, le CDJ-1000, le CDJ-
100S, le CDJ-500S ou le CDJ-500 II, raccordés aux bornes
LINE, la fonction démarrage par variateur peut être utilisée à
condition que l’appareil soit raccordé au lecteur de CD à
l’aide d’un cordon de commande.