


Pyle Pro Mixer Owner’s Manual – 10 11 – Pyle Pro Mixer Owner’s Manual
Adding Equalization to the Mix
You can further tailor the sound processed through the mixer to match your acoustic surroundings
or suit your personal preferences by using the ten frequency sliders for each channel. To engage
the equalization module, press the Equalization On/Off Switch. The LED next to the switch will be
illuminated, indicated the EQ mode has been engaged.
Each one of the sliding controls boosts or cuts the selected frequency by up to 10 dB. If you leave
a slider at the center (”0”) position, the corresponding frequency range for that stereo channel will
be left unaffected (”flat”). Please note that in order to provide a smooth range of control, the frequency
ranges overlap slightly. Therefore, for example, if you raise the level in the 2K range, the 1K and
4K ranges are also slightly affected.
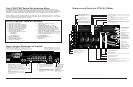
Adding External Effects to the Mix
To connect a sound effect device such as an echo reverb or digital sampler processor, first connect
the EFFECTS SEND jacks to the external device’s AUDIO IN jacks using RCA type cables. Then connect
the device’s audio outputs to the EFFECTS RECEIVE jacks on the mixer.
To activate the loop with which now has an outboard processor, press the Effects Switch.The effect
devices are now in the audio chain. Be sure the device is ON.
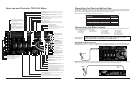
Using the Mono/Stereo Mode Switch
When the MASTER MONO/STEREO switch is in the MONO position, the mixer combines the right
and left channels and sends them to the OUTPUT R and L jacks. These combined outputs can be
used by a monoaural amplifier, such as a PA amp.
In the STEREO position, right and left channels remain separate. The mixer outputs can be used by
a stereo amplifier or recorder.
The ZONE MONO/STEREO switch works similarly, except that its setting affects the ZONE R & L
Outputs.
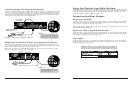
Using the Crossfader with the Assign Switches
For crossfading effects, you can assign any of the four channels to either A or B sides of the crossfade
mix using the Crossfade assign knobs.
When the crossfade slider is in the center position, the two assigned channels play equally. Sliding
the control towards the A position will increase the level of A and fade out B proportionally to the
distance from center. Likewise, sliding the control towards the B position will increase the level of
B and fade out A.
Using the Echo Controls (PYD1922 and PYD1942)
The built-in Echo effect is applied to the total mix. To turn on the Echo mode and activate the
DELAY/REPEAT cycle, press the ECHO ON/OFF switch.
To change the length of time a sound is repeated, increase of decrease the REPEAT control.
To vary the time in between the repeats, increase or decrease the DELAY control.
To adjust the output level of the echo, increase or decrease the LEVEL control.
Using the Sound Effects (PYD1932 and PYD1942)
There are eight pre-programmed sound effects for your selection. Press and hold any button to
generate a sound which is added to the mix. The sound will play continuously until you release the
button.
The SPEED control lets you raise or lower the pitch of the sound effect, and the VOLUME control
allows you to increase or decrease the effect’s volume level within the mix.
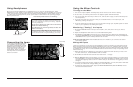
Using the Microphone
Incorporating Voice into the Mix
Talkover mode allows a voice to be heard clearly through the microphone by attenuating all the
other audio input sources. This mode is engaged by setting the Talkover Switch to the TALKOVER
position.
Talkover Mode
To blend voice from the microphones with the audio program material, first be sure the MIC/TALKOVER
switch is set to the ON position. (In this position, the MIC channel is mixed into the program like
any other audio input source.)
Then adjust the corresponding MIC level controls to increase or decrease the microphone level (this
will not affect the main volume inputs). When a microphone is not in use, set the MIC/TALKOVER
switch to OFF.
These BASS, MID and TREBLE controls, permit you to tailor the tone frequencies of the MIC inputs
processed through the mix. Left in their center positions, the sound is unaffected (”flat”).
Microphone Tone Controls
The independent MIC1 and MIC2 controls permit you to increase or decrease the levels of these
microphones within the mix.
Microphone Level Controls
Using the MIC Frequency Kill Switches
For unique circumstances or interesting special effects, you can completely eliminate the bass, mid
or treble frequency range from the MIC channels by pressing the Kill button for that range. When
the Kill mode is active, the LED above the button will be illuminated.