


Pyle Pro Mixer PYD1911/1955 Owner’s Manual – 11
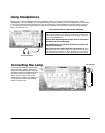
Using the Mono/Stereo Mode Switch
When the MASTER MONO/STEREO switch is in the MONO position, the mixer combines the right and
left channels and sends them to the OUTPUT R and L jacks. These combined outputs can be used
by a monoaural amplifier, such as a PA amp.
In the STEREO position, right and left channels remain separate. The mixer outputs can be used by
a stereo amplifier or recorder.
The ZONE MONO/STEREO switch works similarly, except that its setting affectstheZONER&LOuts.
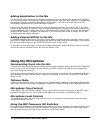
Using the Crossfader with the Assign Switches
For crossfading effects, you can assign any of the four channels to either A or B sides of the crossfade
mix using the Crossfade assign knobs.
When the crossfade slider is in the center position, the two assigned channels play equally. Sliding
the control towards the A position will increase the level of A and fade out B proportionally to the
distance from center. Likewise, sliding the control towards the B position will increase the level of
B and fade out A.
Using the Digital Sampler (PYD-1955)
The PYD-1950 mixer contains a digital sampler circuit which can record 5 different samples to the
internal recording IC. These samples can then be assigned to CH 1, CH 2, CH 3, CH 4 and the MIC
channel for playback. At the time of playback, the SPEED control can be adjusted to change the pitch
of the sample.
Follow these steps to record a sample:
1. Play the audio source for recording as a sample.
2. While it is playing, press the desired cue/sample channel assign button (i.e., CH 1, CH 2, CH 3,
CH 4 or MIC).
3. To record the source to that channel, set the SAMPLER MODE switch to the RECORD position and
press the START/STOP button to begin recording. The LED will go on, indicating recording is in
progress. To stop recording, press the START/STOP button again. Please note that the recording
IC is limited to 12-second samples, so in the event you do not press stop, it will automatically
stop after 12 seconds
4. To playback the recorded sample ONCE, turn the SAMPLER MODE switch to SINGLE, and press
START/STOP. The LED will go on, indicating that a sample is playing. Pressing START/STOP
during playback will stop the playback.
Each time you press the START/STOP control, the unit will replay the recorded sample from the
beginning and play it through the end of the recorded sound. Rapid, consecutive pressing of the
START/STOP button will create an interesting stuttering effect.
5. To playback the record sample repeatedly (”looping”), set the SAMPLER MODE switch to
REPEAT, and press START/STOP. The mixer will play the sampled recording all the way through,
and thenrepeat it until you press the START/STOP button.
6. To adjust the speed of the playback signal, rotate the SAMPLE PITCH control to reduce or
increase the pitch of the sample during playback.
7. To adjust the level of the sample playback as it enters the mix, rotate the SAMPLE LEVEL
to increase or decrease the level.