


14
Cassette Deck Operation
RECORDING TIPS
• Tape quality greatly affects the quality of
the recording. We recommend
RadioShack Supertape Extended
Range or Low-Noise Type 1 tape. We
do not recommend long-play cassette
tapes, such as C-120s, because they
are thin and can easily tangle in the cas-
sette mechanism. For low-noise, side-
range recordings, use normal-bias tape.
• Before recording, be sure the tape you
are using has its erase-protection tabs in
place. See “Preventing Accidental Era-
sure” on Page 15.
• Recording automatically stops when the
tape in TAPE 1 reaches the end. To
record on the other side, turn over the
tape.
RECORDING YOUR VOICE
WITH MUSIC
Follow these steps to record your voice
along with music from a tape in TAPE 2, a
CD/CD+G, or an audio source connected to
the system’s AUX INPUT jacks.
1. Load a blank tape, or one that you want
to record over, into TAPE 1, with the side
you want to record on facing you, and
the full reel to the left.
2. Follow Steps 1–10 under “Singing with a
CD/CD+G or Cassette Tape” on Page 8
or Steps 1–6 under “Singing With
Another Audio Source” on Page 9.
3. Press
RECORD
on TAPE 1 to begin
recording.
RECORD
and
PLAY
both locks
down.
Note:
Press
PAUSE
on TAPE 1 to tem-
porarily stop recording. Press
PAUSE
again to resume recording.
4. Press
STOP/EJECT
on TAPE 1 to stop
recording.
RECORD
and
PLAY
release.
5. Press
STOP/EJECT
on TAPE 2 or stop
the audio source.
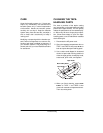
DUBBING A CASSETTE
TAPE
You can dub (copy) any cassette tape on the
karaoke system’s dual cassette decks using
a source tape with the music or sound you
want to copy and a blank or reusable tape to
record on.
Follow these steps to dub from one cassette
tape to another.
1. Turn on the system by pressing
STANDBY
. STANDBY turns off.
2. Set
FUNCTION SELECTOR
to
TAPE
.
TAPE lights.
3. Load the cassette you want to copy into
TAPE 2 with the side you want to record
from facing you.
4. Load a blank tape (or one you want to
record over) into TAPE 1 with the side
you want to record on facing you.
5. Press
PAUSE
then
RECORD
on TAPE 1.
RECORD
and
PLAY
both lock down.
6. Press
PLAY
on TAPE 2 to begin record-
ing.
PAUSE
on TAPE 1 automatically
releases.
Note:
You can listen to the tape playing
in TAPE 2 as you copy it. Set
MASTER
VOLUME
to a comfortable level. The vol-
ume setting does not affect the record-
ing level.
7. Press
STOP/EJECT
on TAPE 1 to stop
recording.
RECORD
and
PLAY
release.
8. Press
STOP/EJECT
on TAPE 2 to stop
playing the tape.